Pioneer 4345HD Owner's Manual - Page 41
For AV source, For PC source
 |
UPC - 012563009123
View all Pioneer 4345HD manuals
Add to My Manuals
Save this manual to your list of manuals |
Page 41 highlights
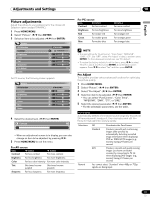
Adjustments and Settings 10 English Picture adjustments Adjust the picture to your preference for the chosen AV Selection option (except DYNAMIC). 1 Press HOME MENU. 2 Select "Picture". ( / then ENTER) 3 Select an item to be adjusted. ( / then ENTER) Picture AV Selection Contrast Brightness Color Tint Sharpness Pro Adjust Reset STANDARD 40 0 0 0 0 For PC source, the following screen appears: Picture AV Selection Contrast Brightness Red Green Blue Reset STANDARD 40 0 0 0 0 4 Select the desired level. ( / then ENTER) Contrast 40 • When an adjustment screen is in display, you can also change an item to be adjusted, by pressing / . 5 Press HOME MENU to exit the menu. For AV source Item Contrast button For less contrast button For more contrast Brightness For less brightness For more brightness Color For less color intensity For more color intensity Tint Skin tones become Skin tones become purplish greenish Sharpness For less sharpness For more sharpness For PC source Item button Contrast For less contrast Brightness For less brightness Red For weaker red Green For weaker green Blue For weaker blue button For more contrast For more brightness For stronger red For stronger green For stronger blue • To make settings for "PureCinema", "Color Temp", "MPEG NR", "DNR", "CTI", and "DRE", select "Pro Adjust" in step 3, and then press ENTER. For the subsequent procedures, see "Pro Adjust". • To restore the factory defaults for all the items, press / to select "Reset" in step 3, and then press ENTER. A confirmation screen appears. Press / to select "Yes", and then press ENTER. Pro Adjust This system provides various advanced functions for optimizing the picture quality. 1 Press HOME MENU. 2 Select "Picture". ( / then ENTER) 3 Select "Pro Adjust". ( / then ENTER) 4 Select an item to be adjusted. ( / then ENTER) • You can select "PureCinema", "Color Temp", "MPEG NR", "DNR", "CTI", or "DRE". 5 Select the desired parameter. ( / then ENTER) • For the selectable parameters, see the table. PureCinema Automatically detects a film-based source (originally encoded at 24 frames/second), analyzes it, then recreates each still film frame for high-definition picture quality. Selections Remark Off Deactivates the PureCinema. Standard Produces smooth and vivid moving images (film specific) by automatically detecting recorded image information when displaying DVD or 1080i HDTV images (e.g., movies) having 24 frames per second. ADV Produces smooth and quality moving images (as shown on theater screens) by converting to 72 Hz when displaying DVD images (e.g., movies) having 24 frames per second. You cannot select "Standard" when 480p or 720p signals are being input. 41 En
-
 1
1 -
2
-
3
-
4
-
5
-
6
-
7
-
8
-
9
-
10
-
11
-
12
-
13
-
14
-
15
-
16
-
17
-
18
-
19
-
20
-
21
-
22
-
23
-
24
-
25
-
26
-
27
-
28
-
29
-
30
-
31
-
32
-
33
-
34
-
35
-
 36
36 -
 37
37 -
 38
38 -
 39
39 -
 40
40 -
 41
41 -
 42
42 -
 43
43 -
 44
44 -
 45
45 -
 46
46 -
47
-
48
-
49
-
50
-
51
-
52
-
53
-
54
-
55
-
56
-
57
-
58
-
59
-
60
-
61
-
62
-
63
-
64
-
65
-
66
-
67
-
68
-
69
-
70
-
71
-
72
-
73
-
74
-
75
-
76
-
77
-
78
-
79
-
80
-
81
-
82
-
83
-
84
-
85
-
86
-
87
-
88
-
89
-
90
-
91
-
92
-
93
-
94
-
95
-
96
-
97
-
98
-
99
-
100
-
101
-
102
-
103
-
104
-
105
-
106
-
107
-
108
-
109
-
110
-
111
-
112
-
113
-
114
-
115
-
116
-
117
-
118
-
119
-
120
-
121
-
122
-
123
-
124
-
125
-
126
-
127
-
128
-
129
-
130
-
131
-
132
-
133
-
134
-
135
-
136
-
137
-
138
-
139
-
140
-
141
-
142
-
143
-
144
-
145
-
146
-
147
-
148
-
149
-
150
-
151
-
152
-
153
-
154
-
155
-
156
-
157
-
158
-
159
-
160
-
161
-
162
-
163
-
164
-
165
-
166
-
167
-
168
-
169
-
170
-
171
-
172
-
173
-
174
-
175
-
176
-
177
-
178
-
179
-
180
-
181
-
182
-
183
-
184
-
185
-
186
-
187
-
188
-
189
-
190
-
191
-
192
-
193
-
194
-
195
-
196
-
197
-
198
-
199
-
200
-
201
-
202
-
203
-
204
-
205
-
206
-
207
-
208
-
209
-
210
-
211
-
212
-
213
-
214
-
215
-
216
 |
 |
