Pioneer DV-440 Owner's Manual
Pioneer DV-440 Manual
 |
View all Pioneer DV-440 manuals
Add to My Manuals
Save this manual to your list of manuals |
Pioneer DV-440 manual content summary:
- Pioneer DV-440 | Owner's Manual - Page 1
DVD PLAYER DV-533 DV-533K DV-440 Operating Instructions - Pioneer DV-440 | Owner's Manual - Page 2
FINE PIONEER PRODUCT. Pioneer is on the leading edge of DVD research for consumer products and this unit incorporates the latest technological developments. We are sure you will be fully satisfied with the DVD player. Thank you for your support. Please read through these operating instructions so - Pioneer DV-440 | Owner's Manual - Page 3
Corporation and other rights owners. Use of this copyright protection technology must be authorized by Macrovision Corporation, and is intended for home and other limited viewing uses only unless otherwise authorized by Macrovision Corporation. Reverse engineering or disassembly is prohibited. 3 En - Pioneer DV-440 | Owner's Manual - Page 4
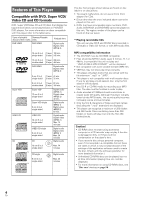
discs that display the logos shown below can be played back on PIONEER DVD players. For more information on discs compatible with this player, at 128Kbps should sound close to regular audio CD quality. Although this player will play lower bit-rate MP3 tracks, the sound quality becomes noticeably - Pioneer DV-440 | Owner's Manual - Page 5
two stereo soundtracks to be recorded. Super VCD also supports the widescreen size. Compatible with a wide range of DVD uses technology that simulates multichannel surround sound using only two speakers. "DTS" is a registered trademark of Digital Theater Systems, Inc. *4 TruSurround and the ® symbol - Pioneer DV-440 | Owner's Manual - Page 6
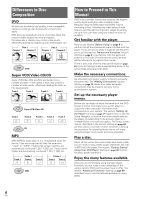
manual. There is also a list of terms that can be found on page 61 if you are having trouble understanding some of the terminology associated with DVD. Make the necessary connections. No entertainment system may be made to suit your home entertainment system. Set up the necessary player menus - Pioneer DV-440 | Owner's Manual - Page 7
16 System Control Connections 16 Setting Up the Player 17 Setting the TV System 17 Compatible with Your AV Component ...... 26 Getting Surround Sound from Stereo Speakers 28 Setting the TV On and Off 53 Resetting the Player to System Settings ....... 53 Viewing Disc Information 54 Additional - Pioneer DV-440 | Owner's Manual - Page 8
2 Insert batteries. Make sure to match the plus (+) and minus (-) polarity guides on the batteries with the marks inside the battery compartment. 3 Close the cover or environmental public instruction's rules that apply in your country or area. H048 En Operating instructions (this manual) Notes • Do - Pioneer DV-440 | Owner's Manual - Page 9
facing up (pages 20, 23). 3 Remote sensor Point the remote control toward the remote sensor to operate the player (page 8). 4 Display window Displays system information (page 10). 5 Karaoke controls (DV-533K only) MIC input jack Use to connect a microphone (not supplied) to the player to use the - Pioneer DV-440 | Owner's Manual - Page 10
Display Window 1 23 4 56 7 8 9 0- DTS GUI 2D TITLE TRK CHP LAST COND. TOTAL REMAIN = ~! 1 DTS indicator Indicates DTS audio playback. 2 GUI indicator Indicates an on-screen menu operation is being performed (pages 17, 24). 3 indicator Indicates Multi-Angle playback is in progress (page 33). - Pioneer DV-440 | Owner's Manual - Page 11
COAXIAL AC IN 56 1 CONTROL IN jack Use to connect this player to another component bearing the Pioneer Î mark. This lets you control this unit as though it were a component in a system. Player operations are then performed by pointing the remote control at the component that the player is connect - Pioneer DV-440 | Owner's Manual - Page 12
Remote Control 1 2 3 4 5 6 7 8 9 0 = ~ ! @ OPEN/ LAST CONDITION CLOSE MEMORY MEMORY AUDIO SUB TITLE ANGLE REPEAT SETUP REPEAT MENU TOP MENU A-B DISPLAY RETURN ¶ 5 ¶ ENTER 2 5 5 3 PREV 4 ¶ ∞ 5 NEXT ¢ ¶ STOP 7 PLAY 3 ¶ PAUSE 8 eSTEP/SLOWE 1REV FWD ¡ 1 2 3 CLEAR 4 5 6 +10 - Pioneer DV-440 | Owner's Manual - Page 13
NAMES AND FUNCTIONS - STOP 7 button Press to stop playback. Pressing once enables playback to resume from a point shortly before the location where it was stopped. Pressing twice causes the disc to return to the beginning of the disc when playback starts again (page 23). = STEP/SLOW e/E buttons - Pioneer DV-440 | Owner's Manual - Page 14
output options which allows playback to be enjoyed in any number of system configurations from a standard TV with stereo audio input to a home theater system with a TV or monitor and full surround sound capabilities. Connection Guide The illustration on this page shows the basic setup using the - Pioneer DV-440 | Owner's Manual - Page 15
In this case, be sure to set up the Setup Navigator audio settings to best reflect the type of system you are using (page 19). Additionally, the digital audio settings can be adjusted manually in the Setup screen Audio 1 menu (pages 26, 27). DIGITAL OUT OPTICAL The digital signal is transmitted as - Pioneer DV-440 | Owner's Manual - Page 16
PIONEER component bearing the Î mark, you can control the player as though it were a component in a system (system control). • If you connect for system using only digital components. • For details, refer to the operation manuals of the connected components. DV-533K (Taiwanese model) CONTROL IN - Pioneer DV-440 | Owner's Manual - Page 17
ECHO MIN-MAX MIN-MAX 41 ¡¢ 0 7 8 Î 3 DVD PLAYER 1 Switch the player into standby. 2 Hold down ¡¢ then press STANDBY/ON to switch the TV system. The TV system changes as follows: AUTO = NTSC NTSC = PAL PAL = AUTO The display indicates the new setting. Note that you have to switch the player - Pioneer DV-440 | Owner's Manual - Page 18
, use the cursor button (∞) to select [Auto Start Off] at this time. The Setup Navigator function may still be used at a later time in manual Setup screen menu operation (page 24). 4 Press ENTER. The selection is entered and the next Setup Navigator screen appears. Use steps 3 and 4 as a basis - Pioneer DV-440 | Owner's Manual - Page 19
. As there are numerous options available, please refer to the instructions supplied with the component the player is connected to determine what digital Changes Select to exit the Setup Navigator without changing any of the system settings. Start Again Select to return to the [OSD Language] screen - Pioneer DV-440 | Owner's Manual - Page 20
in the next section to set up the player to correspond to your home system. Having made these settings, you are now ready to start using the Load a disc. Load a disc with the label side facing up, using the disc tray guide to align the disc. 4 Press PLAY 3 (3 on the front panel). • The disc tray - Pioneer DV-440 | Owner's Manual - Page 21
GETTING STARTED USING YOUR DVD PLAYER 5 5 When a Menu Screen is Displayed- DVD/Super VCD/VideoCD Menu screens are displayed for DVDs that have menu screens or Super VCDs/Video CDs that include Playback Control (PBC). DVDs often contain extra information that can be accessed in the DVD menu and - Pioneer DV-440 | Owner's Manual - Page 22
Chapter (Track) Skip Forward/ Skip Back - DVD/Super VCD/Video CD/CD/MP3 PREV 4 OPEN/ LAST CONDITION CLOSE MEMORY MEMORY AUDIO SUB TITLE ANGLE REPEAT SETUP REPEAT MENU TOP MENU A-B DISPLAY RETURN ¶ 5 ¶ ENTER 2 5 5 3 PREV 4 ¶ ∞ NEXT ¢ ¶ STOP 7 PLAY 3 ¶ PAUSE 8 eSTEP/SLOWE 1REV - Pioneer DV-440 | Owner's Manual - Page 23
GETTING STARTED USING YOUR DVD PLAYER 5 5 Resuming playback from where you stopped - DVD/Super VCD/Video CD Use the resume feature to restart playback from the point that the disc was stopped last time. This features cannot be used with MP3s and CDs. Press STOP 7 once. The display shows "RESUME" - Pioneer DV-440 | Owner's Manual - Page 24
how to operate the menus on the Setup screen. These menus are used to set and adjust a number of system settings. The various functions that can be adjusted are covered throughout this manual. The procedure on this page provides a basic outline for using the Setup screen menus. When setting up for - Pioneer DV-440 | Owner's Manual - Page 25
convenient to operate for different levels of users. The [Basic] menu mode contains functions further personalize performance of the player. In this manual, functions that are contained in the [Expert] menu Setup screen menus When setting up the system, or when making adjustments, it is convenient - Pioneer DV-440 | Owner's Manual - Page 26
audio cord, it is not necessary to make any changes in this menu. Dolby Digital Out This player is capable of outputting the Dolby Digital surround sound audio signal. When the player is connected to an AV component that has a built-in Dolby Digital decoder, select [Dolby Digital]. This player can - Pioneer DV-440 | Owner's Manual - Page 27
this player is connected to an AV component that has a built-in DTS decoder, select [DTS]. If your system is not equipped to decode DTS, select [Off]. Refer to the operating instructions supplied with your audio components if you are unsure about compatibility with DTS. Audio1 A2 Video1 V2 Language - Pioneer DV-440 | Owner's Manual - Page 28
TruSurround (stereo audio sources) to produce a surround sound effect from stereo speakers. This function works only when connections are made to the AUDIO OUT jacks. A1 Audio2 Video1 V2 Language General Virtual Surround - Off TruSurround Surround effect from 2 speakers Move SETUP Exit Settings - Pioneer DV-440 | Owner's Manual - Page 29
may appear 'stretched' on the screen. To remedy this condition, change your wide screen TV to display a standard (4:3) screen. Refer to the instructions supplied with your wide screen TV or monitor for more information. "Wide" setting When viewing a standard size TV or monitor DVD/Super VCD screen - Pioneer DV-440 | Owner's Manual - Page 30
[Still Picture] setting in the Setup screen Video 2 menu in the [Expert] menu mode (page 25). Audio1 A2 V1 Video2 Language General Background - Pioneer Logo Video Adjust - t Still Picture - Field On Screen Display Frame Angle Indicator Auto Move SETUP Exit Settings: Field (Picture shake will be - Pioneer DV-440 | Owner's Manual - Page 31
screen Video 2 menu. Audio1 A2 V1 Video2 Language General Background - Pioneer Logo Video Adjust - Start Picture Quality Controls Move SETUP Exit Selecting a bright clear colors. Memory1, Memory2, and Memory3 These are user programmable settings. See 'Adjusting the picture quality settings' on - Pioneer DV-440 | Owner's Manual - Page 32
Adjusting the picture quality settings To create your own setting (1) 1 Use the cursor button (3) to select [Start] then press ENTER. Video Memory Select Video Setup 2 Use the cursor button (∞) to select [Video Setup] then press ENTER. Video Memory Select Video Setup 6 Repeat steps 4 and 5 to make - Pioneer DV-440 | Owner's Manual - Page 33
Indicator] setting in the Setup screen Video 2 menu in the [Expert] menu mode (page 25). Audio1 A2 V1 Video2 Language General Background - Pioneer Logo Video Adjust Still Picture - Auto On Screen Display - Position-Normal Angle Indicator - On Off Move SETUP Exit Settings: On* ( is displayed - Pioneer DV-440 | Owner's Manual - Page 34
Setting the Language Options DVDs have the capacity to contain a great deal of audio information, which includes the ability to hold up to 8 different language tracks and subtitle information in as many as 32 different languages. This section outlines the variety of audio language and subtitle - Pioneer DV-440 | Owner's Manual - Page 35
Super VCD Press AUDIO repeatedly during playback to switch the audio type. Choose the audio type that lets you hear the soundtrack (the sound may not be audible with some audio types). The audio changes according to the diagram above. Audio : 1 Stereo Audio : 1 L Selecting an audio language - Pioneer DV-440 | Owner's Manual - Page 36
Selecting a Subtitle Language (Multi-Language Subtitles) - DVD You can select a desired subtitle language with DVDs that have subtitle data in multiple languages recorded on them. SUBTITLE OPEN/ LAST CONDITION CLOSE MEMORY MEMORY AUDIO SUB TITLE ANGLE REPEAT SETUP REPEAT MENU TOP MENU A-B - Pioneer DV-440 | Owner's Manual - Page 37
SETTING THE LANGUAGE OPTIONS 5 5 When [Other] is selected When you want to select one of the 136 languages as the main audio language, follow the steps below when the following screen appears. A language code list can be found on page 58. 1, 2, 3 AUDIO SUB TITLE ANGLE REPEAT SETUP REPEAT MENU - Pioneer DV-440 | Owner's Manual - Page 38
Selecting a DVD menu language preference Expert In addition to containing different audio languages, DVD may also contain menu screens in different languages as well. Setting a DVD language preference, sets the selected language as a default when DVDs with menu information in that language are - Pioneer DV-440 | Owner's Manual - Page 39
CD, and CD formats. Users already familiar with Super VCD playback: Viewing one frame at a time You can't use frame review (e) with Super VCD/Video CDs. 1 Press PAUSE 8, STEP/SLOW restores normal playback operation. Notes • There is no sound when viewing still frames or slow playback, or when - Pioneer DV-440 | Owner's Manual - Page 40
Searching for a Title, Folder, Chapter, Track, or Location on a Disc - DVD/Super VCD/Video CD/CD/MP3 This player offers different ways of accessing the information on a DVD, Super VCD/Video CD, CD or MP3. Using SEARCH MODE, you can search for titles or chapters on a DVD, tracks on a Super VCD/Video - Pioneer DV-440 | Owner's Manual - Page 41
or tracks, press and hold the cursor buttons (5/∞). ENTER - Play the currently selected folder or track. MP3 tracks that are unplayable on this system are automatically skipped and the display shows "UNPLAYABLE MP3 FORMAT". MENU - Exit the MP3 Navigator PROGRAM - Add the currently selected track to - Pioneer DV-440 | Owner's Manual - Page 42
Repeat Play - DVD/Super VCD/Video CD/CD/MP3 You can repeat an entire title, folder, chapter or track, or just a part. OPEN/ LAST CONDITION CLOSE MEMORY MEMORY AUDIO SUB TITLE ANGLE REPEAT SETUP REPEAT MENU TOP MENU A-B DISPLAY RETURN ¶ 5 ¶ ENTER 2 5 5 3 PREV 4 NEXT ¢ 5 ¶ ∞ ¶ STOP - Pioneer DV-440 | Owner's Manual - Page 43
ADVANCED FUNCTIONS 5 5 Random Play - DVD/Super VCD/Video CD/CD/MP3 Play titles, chapters, or tracks on a disc in random order. ENTER PREV 4 RANDOM OPEN/ LAST CONDITION CLOSE MEMORY MEMORY AUDIO SUB TITLE ANGLE REPEAT SETUP REPEAT MENU TOP MENU A-B DISPLAY RETURN ¶ 5 ¶ ENTER 2 3 PREV 4 - Pioneer DV-440 | Owner's Manual - Page 44
Playback in a Desired Order (Program Play) - DVD/Super VCD/Video CD/CD/MP3 The titles and chapters within a title on a DVD and similarly MP3, CD and Super VCD/Video CD tracks can be arranged to play in the order you want. Programming DVDs A program with a maximum of 24 steps can be memorized. 2, 3 - Pioneer DV-440 | Owner's Manual - Page 45
ADVANCED FUNCTIONS 5 5 Programming Super VCDs/Video CDs, CDs A program with a maximum of 24 steps can be memorized. Cursor buttons 2 OPEN/ LAST CONDITION CLOSE MEMORY MEMORY AUDIO SUB TITLE ANGLE REPEAT SETUP REPEAT MENU TOP MENU A-B DISPLAY RETURN ¶ 5 ¶ ENTER 2 3 PREV 4 ¶ ∞ 5 - Pioneer DV-440 | Owner's Manual - Page 46
Programming MP3s A program with a maximum of 24 steps can be memorized. Cursor buttons 2, 3 OPEN/ LAST CONDITION CLOSE MEMORY MEMORY AUDIO SUB TITLE ANGLE REPEAT SETUP REPEAT MENU TOP MENU A-B DISPLAY RETURN ¶ 5 ¶ ENTER 2 5 5 3 PREV 4 ¶ ∞ 5 NEXT ¢ ¶ STOP 7 PLAY 3 PAUSE 8 ¶ - Pioneer DV-440 | Owner's Manual - Page 47
the player from erasing older programs that you may still use regularly, or when you don't want to use a program anymore, it is possible to manually erase programs stored in memory. 1 Load a DVD that has a program stored in memory. 2 Press PROGRAM. The program screen appears. 3 Use the cursor button - Pioneer DV-440 | Owner's Manual - Page 48
Continuing Playback from a Specified Location (Last Memory) - DVD/Super VCD/Video CD The Last Memory function is convenient when you want to continue viewing a disc from the point where you were watching before. Unlike the resume function, the Last Memory function is effective even if the DVD is - Pioneer DV-440 | Owner's Manual - Page 49
ADVANCED FUNCTIONS 5 5 Memorizing Settings for Often Viewed DVDs (Condition Memory) - DVD You can store in memory settings for DVDs you often watch. Settings remain in memory even if you remove the disc from the player, or switch power to the player to standby. If you load a disc that has its - Pioneer DV-440 | Owner's Manual - Page 50
from the speakers is picked up by a mic and output again through the speakers, the result is a screeching sound known as "howling". To eliminate howling: • Point the mic away from the speakers. • Move the mic away from the speakers. • Turn VOLUME counterclockwise to lower - Pioneer DV-440 | Owner's Manual - Page 51
not to forget your password. If you should forget it, reset the system, and enter a new password. To reset the system, see 'Resetting the Player to System Settings' (page 53). Please note that this procedure resets the system, and clears all saved settings, not just the password. ADVANCED FUNCTIONS - Pioneer DV-440 | Owner's Manual - Page 52
Setting the Parental Lock Level Change the Parental Lock level to a higher or lower level according to the settings printed on the DVD disc jacket or accompanying documentation. If you use the Condition Memory function to save the settings for a particular disc, the Parental Lock level is saved as - Pioneer DV-440 | Owner's Manual - Page 53
Video2 Language General Background - Pioneer Logo Video Adjust Black Put Background Selections Move Settings: Pioneer Logo* Black SETUP Exit Off Move Settings: On* Off SETUP Exit *Factory setting Resetting the Player to System Settings To reset the player, press and hold 7 (stop) on the front - Pioneer DV-440 | Owner's Manual - Page 54
Viewing Disc Information - DVD/Super VCD/Video CD/CD/MP3 Use DISPLAY to get current information about the disc currently loaded. You can get information about the titles and chapters on a DVD or tracks on a Super VCD/Video CD or CD or folders and tracks on a MP3. When viewing DVDs, you can also - Pioneer DV-440 | Owner's Manual - Page 55
Super VCD current track number elapsed time of current track Play 1 0.03 CD current track number elapsed time of current track 3 0.03 Track -3.29/ 3.32 remaining time of current track remaining total time of current tracks « current track number current total time of tracks Play All - Pioneer DV-440 | Owner's Manual - Page 56
playing surfaces. Cleaning Fingerprints or other dirt on the disc may affect sound and picture quality. To clean your discs, use a soft clean the side of a TV set or stereo system to be connected to the unit. • When using the unit with a stereo system, install the speakers a little bit away from - Pioneer DV-440 | Owner's Manual - Page 57
operating section of the player if the player is brought from cool surroundings into a warm room or if the temperature of the room rises once in a while. When you find it damaged, ask your nearest PIONEER authorized service center or your dealer for a replacement. Cleaning the player To clean the - Pioneer DV-440 | Owner's Manual - Page 58
Language Code List Language codes are used when setting the audio and subtitle language preferences (page 37). Language Japanese (ja) English (en) French (fr) German (de) Italian (it) Spanish (es) Chinese (zh) Dutch (nl) Portuguese (pt) Swedish (sv) Russian (ru) Korean (ko) Greek (el) Afar (aa) - Pioneer DV-440 | Owner's Manual - Page 59
may lie in another component. Inspect the other components and electrical appliances being used. If the trouble cannot be rectified even after exercising the checks listed below, ask your nearest PIONEER authorized service center or your dealer to carry out repair work. The disc table comes back out - Pioneer DV-440 | Owner's Manual - Page 60
a Super VCD that contains only one stereo soundtrack, there may be no sound at all. To restore the sound, return the AUDIO button back to its original position (page 35). There is a howling operation. If this does not correct the problem, please consult your nearest PIONEER service center. 60 En - Pioneer DV-440 | Owner's Manual - Page 61
5.1 channels of audio, this high quality surround system is used in many of the finer movie theaters around the world. 1 DTS DTS stands for Digital Theater System. DTS is a surround system different from Dolby Digital that has become a popular surround sound format for movies. In order to enjoy - Pioneer DV-440 | Owner's Manual - Page 62
corresponding region numbers. System control When you connect this player via a cord with a mini plug to another Pioneer component such as a surround system which produces a surround sound effect from stereo speakers. Sampling Frequency When a sound wave is converted to a digital signal, the sound - Pioneer DV-440 | Owner's Manual - Page 63
General System DVD, unit 1 AA (R6P) dry cell batteries 2 Operating Instructions 1 Note The specifications and design of this product are lifetime. We Want You Listening For A Lifetime Used wisely, your new sound equipment will provide a lifetime of fun and enjoyment. Since hearing damage - Pioneer DV-440 | Owner's Manual - Page 64
EUROPE NV Haven 1087, Keetberglaan 1, B-9120 Melsele, Belgium TEL: 03/570.05.11 PIONEER ELECTRONICS AUSTRALIA PTY. LTD. 178-184 Boundary Road, Braeside, Victoria 3195, Australia, TEL: [03] 9586-6300 PIONEER ELECTRONICS DE MEXICO S.A. DE C.V. San Lorenzo 1009 3er Piso Desp. 302 Col. Del Valle Mexico
-
 1
1 -
 2
2 -
 3
3 -
 4
4 -
 5
5 -
 6
6 -
 7
7 -
8
-
9
-
10
-
11
-
12
-
13
-
14
-
15
-
16
-
17
-
18
-
19
-
20
-
21
-
22
-
23
-
24
-
25
-
26
-
27
-
28
-
29
-
30
-
31
-
32
-
33
-
34
-
35
-
36
-
37
-
38
-
39
-
40
-
41
-
42
-
43
-
44
-
45
-
46
-
47
-
48
-
49
-
50
-
51
-
52
-
53
-
54
-
55
-
56
-
57
-
58
-
59
-
60
-
61
-
62
-
63
-
64
 |
 |

DV-533
DV-533K
DV-440
Operating Instructions
DVD PLAYER