Plantronics WO100 User Guide - Page 8
Headset Set Up - convertible
 |
View all Plantronics WO100 manuals
Add to My Manuals
Save this manual to your list of manuals |
Page 8 highlights
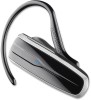
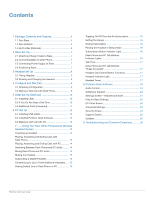
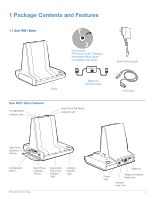
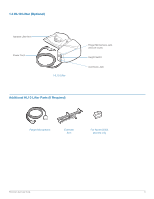
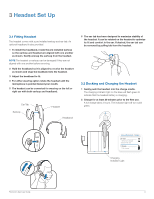
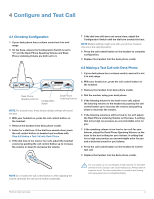
3 Headset Set Up 3.1 Fitting Headset The headset comes with a pre-installed earloop and ear tab. An optional headband is also provided. 1 To install the headband, rotate the pre-installed earloop so the earloop and headset are aligned with one another as shown. Gently unsnap the earloop from the headset. NOTE The headset or earloop can be damaged if they are not aligned with one another before removing. 2 Hold the headband so it is aligned to receive the headset as shown and snap the headband into the headset. 3 Adjust the headband to fit. 4 For either wearing option rotate the headset until the microphone is pointed toward your mouth. 5 The headset can be converted for wearing on the left or right ear with both earloop and headband. Ear Tab Earloop Headset Headband 6 The ear tab has been designed to maximize stability of the headset. It can be rotated on the headset to optimize its fit and comfort in the ear. If desired, the ear tab can be removed by pulling tab from the headset. 3.2 Docking and Charging the Headset 1 Gently push the headset into the charge cradle. The charging indicator light on the base will flash green to indicate that the headset battery is charging. 2 Charge for at least 20 minutes prior to the first use. A full charge takes 3 hours. The indicator light will turn solid green. Charging time 20 min Minimum charge before first use 3 hours Full charge Charging Indicator Light Plantronics Savi User Guide 8
-
 1
1 -
2
-
 3
3 -
 4
4 -
 5
5 -
 6
6 -
 7
7 -
 8
8 -
 9
9 -
 10
10 -
 11
11 -
 12
12 -
 13
13 -
14
-
15
-
16
-
17
-
18
-
19
-
20
-
21
-
22
-
23
-
24
-
25
-
26
-
27
-
28
 |
 |