ProForm 475 Audio Series Treadmill Uk Manual - Page 10
Identify the Gas Spring 21. Note that the Gas
 |
View all ProForm 475 Audio Series Treadmill manuals
Add to My Manuals
Save this manual to your list of manuals |
Page 10 highlights
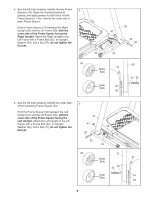
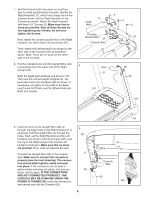
10. Tighten the four Handrail Bolts (20) with the four Handrail Star Washers (19) into the Left and Right Uprights (31, 36) and the Left and Right Handrails (18, 11). Start all four Handrail Bolts before tightening any of them. 10 18 20 19 31 20 19 11 20 19 36 20 19 11. Have a second person raise and hold the treadmill Frame (74). Identify the Gas Spring (21). Note that the Gas Spring has a cylinder end and a rod end. See the two small inset drawings. Locate the Spring Clip (105) in the rod end of the Gas Spring. Using your fingernail or the end of a screwdriver, press on the end of the Spring Clip to loosen it, rotate the Spring Clip, and then pull the Spring Clip out of the Gas Spring. Be careful to avoid losing the Spring Clip. Note: Extra Spring Clips are included. Next, hold the rod end of the Gas Spring (21) near the bracket in the center of the Frame (74). Press the end of the Gas Spring as far as possible onto the ball on the bracket. See drawing 11a. Insert the Spring Clip (105) into the two indicated small holes in the rod end of the Gas Spring (21). Then, rotate the Spring Clip until it clips onto the Gas Spring. 11 Cylinder 21 74 Rod Bracket 105 11a 74 21 105 Holes 105 105 Bracket 10
-
 1
1 -
2
-
3
-
4
-
 5
5 -
 6
6 -
 7
7 -
 8
8 -
 9
9 -
 10
10 -
 11
11 -
 12
12 -
 13
13 -
 14
14 -
 15
15 -
16
-
17
-
18
-
19
-
20
-
21
-
22
-
23
-
24
-
25
-
26
-
27
-
28
-
29
-
30
-
31
 |
 |
