Reebok Trainer Rx 3.5 Bike English Manual
Reebok Trainer Rx 3.5 Bike Manual
 |
View all Reebok Trainer Rx 3.5 Bike manuals
Add to My Manuals
Save this manual to your list of manuals |
Reebok Trainer Rx 3.5 Bike manual content summary:
- Reebok Trainer Rx 3.5 Bike | English Manual - Page 1
? If you have questions, or if parts are damaged or missing, DO NOT CONTACT manual) before contacting Customer Care. CALL TOLL-FREE: 1-877-994-4999 Mon.–-Fri. 6 a.m.–-6 p.m. MT Sat. 8 a.m.–-4 p.m. MT ON THE WEB: www.reebokservice.com CAUTION Read all precautions and instructions in this manual - Reebok Trainer Rx 3.5 Bike | English Manual - Page 2
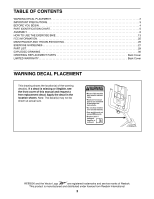
IDENTIFICATION CHART 5 ASSEMBLY 6 HOW TO USE THE EXERCISE BIKE 13 FCC INFORMATION 25 MAINTENANCE AND TROUBLESHOOTING 26 EXERCISE GUIDELINES 27 PART LIST 29 EXPLODED DRAWING 30 ORDERING REPLACEMENT PARTS Back Cover LIMITED WARRANTY Back Cover WARNING DECAL PLACEMENT This drawing shows the - Reebok Trainer Rx 3.5 Bike | English Manual - Page 3
and instructions in this manual and all warnings on your exercise bike before using your exercise bike. problems. 2. Use the exercise bike only as described in this manual. 8. Keep children under age 12 and pets away from the exercise bike at all times. 9. Wear appropriate clothes while exercising - Reebok Trainer Rx 3.5 Bike | English Manual - Page 4
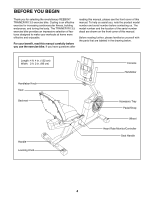
REEBOK® TRAINER RX 3.5 exercise bike. Cycling is an effective exercise for increasing cardiovascular tness, building endurance, and toning the body. The TRAINER RX 3.5 exercise bike front cover of this manual. Before reading further, please familiarize yourself with the parts that are labeled in - Reebok Trainer Rx 3.5 Bike | English Manual - Page 5
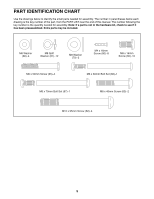
assembly. The number in parentheses below each drawing is the key number of the part, from the PART LIST near the end of this manual. The number following the key number is the quantity needed for assembly. Note: If a part is not in the hardware kit, check to see if it has been preassembled - Reebok Trainer Rx 3.5 Bike | English Manual - Page 6
ASSEMBLY •• To hire an authorized service technician to assemble this product, call 1-800-445-2480. •• Assembly requires two persons. •• Place all parts in a cleared area and remove the packing materials. Do not dispose of the packing materials until you complete all assembly steps. •• To identify - Reebok Trainer Rx 3.5 Bike | English Manual - Page 7
3. Slide the Shield Cover (5) upward onto the Upright (4). 3 Have a second person hold the Shield Cover (5) around the Upright (4) until you complete step 4. Tip: Avoid pinching the wires inside the Frame (1). Slide the Upright (4) onto the Frame. Attach the Upright (4) with five M8 x 16mm - Reebok Trainer Rx 3.5 Bike | English Manual - Page 8
5. Make sure that the Main Wire Harness (89) and the Upper Wire Harness (41) are in the location shown. Using a small plastic bag to keep your fingers clean, apply a coat of the included grease to an M6 x 70mm Bolt Set (67). Tip: Avoid pinching the wires. Attach the Handlebar (6) to the Upright (4) - Reebok Trainer Rx 3.5 Bike | English Manual - Page 9
the battery compartment. Then, reattach the battery cover. To purchase an optional power adapter, call the telephone number on the cover of this manual. To avoid damaging the console, use only a manufacturer-supplied power adapter. Plug one end of the power adapter into the receptacle on the - Reebok Trainer Rx 3.5 Bike | English Manual - Page 10
9. Identify the Right and Left Handlebar Covers (8, 9), which are marked with “"Right”" and “"Left”" stickers. Attach the Right and Left Handlebar Covers (8, 9) around the Handlebar (6) and the Upright (4) with four M4 x 16mm Screws (80). 9 9 80 6 8 80 4 10. Attach the Seat (15) to the Seat - Reebok Trainer Rx 3.5 Bike | English Manual - Page 11
11. Attach the Backrest (13) to the Seat Carriage (11) with five M8 x 16mm Screws (60) and five 11 M8 Split Washers (61). Tip: It may be helpful to adjust the seat dur- ing this step. See HOW TO ADJUST THE 13 SEAT on page 13. 11 61 60 12. Orient the Seat Handlebar (12) as shown. Tip: Avoid - Reebok Trainer Rx 3.5 Bike | English Manual - Page 12
on the Left Pedal (not shown) in the same way. 12 91 Wire 17 Strap 16 Tab 15. Make sure that all parts are properly tightened before you use the exercise bike. Note: After assembly is completed, some extra parts may be left over. Place a mat beneath the exercise bike to protect the floor. 12 - Reebok Trainer Rx 3.5 Bike | English Manual - Page 13
pedals. Adjust the straps to the desired position, and then press the ends of the straps onto the tabs. Strap Tab HOW TO MOVE THE EXERCISE BIKE Handle HOW TO ADJUST THE ANGLE OF THE HANDLEBAR To adjust the angle of the handlebar, rst loosen the knob a few turns. Next, pull the - Reebok Trainer Rx 3.5 Bike | English Manual - Page 14
the pedals while the voice of a personal trainer coaches you through your workouts. iFit cards exercise. To use the manual mode, see page 15. To use a preset workout, see page 17. To play the Fat Blocker game, see page 18. To play the Calorie Destroyer game, see page 19. To play the Blackjack game - Reebok Trainer Rx 3.5 Bike | English Manual - Page 15
on. The console will then be ready for use. 2. Select the manual mode. Each time you turn on the console, the manual mode will be selected. If you have selected a workout, press any of the Workouts buttons or the Fitness Games button (see the drawing on page 14) repeatedly until zeros appear in - Reebok Trainer Rx 3.5 Bike | English Manual - Page 16
performance, clean the metal contacts using a soft cloth; never use alcohol, abrasives, or chemicals to clean the contacts. 6. When you are finished exercising, the console will turn off automatically. If the pedals do not move for several seconds, a tone will sound, the console will pause, and - Reebok Trainer Rx 3.5 Bike | English Manual - Page 17
to alert you. The resistance of the pedals will then change. As you exercise, you will be prompted to keep your pedaling speed near the target speed for the current segment is too high or too low, you can manually override the setting by pressing the resistance buttons. IMPORTANT: When the current - Reebok Trainer Rx 3.5 Bike | English Manual - Page 18
more slowly the blocks will fall, giving you extra time to position and orient the blocks. The game will continue until any part of a stacked block reaches the top of the arena. When the game ends, the display will show your final score and the level of play that you reached. The display - Reebok Trainer Rx 3.5 Bike | English Manual - Page 19
1. Begin pedaling or press any button on the console to turn on the console. 4. Follow your progress with the display. While you exercise and play the Fat Blocker game, the corners of the display will show the elapsed time, the approximate number of calories you have burned, and your pedaling speed - Reebok Trainer Rx 3.5 Bike | English Manual - Page 20
again. The display will then show the four highest scores recorded since the scores were reset. 4. Follow your progress with the display. While you exercise and play the Calorie Destroyer game, the upper left corner of the display will show the elapsed time. In addition, the display will show the - Reebok Trainer Rx 3.5 Bike | English Manual - Page 21
. You will use the interactive touch screen on the display to play the game. Follow the steps below to play Blackjack. Note: For detailed instructions on how to play Blackjack, consult a card game rule book or other card game resource. 1. Begin pedaling or press any button on the console to turn on - Reebok Trainer Rx 3.5 Bike | English Manual - Page 22
will use the interactive touch screen on the display to play the game. Follow the steps below to play Texas Hold ’'Em. Note: For detailed instructions on how to play Texas Hold ’'Em, consult a card game rule book or other card game resource. 1. Begin pedaling or press any button on the console to - Reebok Trainer Rx 3.5 Bike | English Manual - Page 23
com or see the front cover of this manual. iFit cards are also available at select select a workout, the voice of a personal trainer will begin guiding you through your workout. iFit workouts function in the books through the console sound system while you exercise, plug one end of your audio cable - Reebok Trainer Rx 3.5 Bike | English Manual - Page 24
features a display settings mode that allows you to select a backlight option, to select a unit of measurement for the console, and to turn the game sounds on or off. Follow the steps below to change the console settings. 1. Enter the display settings mode. The console can show pedaling speed and - Reebok Trainer Rx 3.5 Bike | English Manual - Page 25
comply with the limits for a Class B digital device, pursuant to part 15 of the FCC Rules. These limits are designed to provide reasonable protection energy and, if not installed and used in accordance with the instructions, may cause harmful interference to radio communications. However, there is - Reebok Trainer Rx 3.5 Bike | English Manual - Page 26
. Replace any worn parts immediately. To clean the exercise bike, use a damp cloth and a small amount of mild soap. IMPORTANT: To avoid damaging the console, keep liquids away from the console and keep the console out of direct sunlight. CONSOLE TROUBLESHOOTING Most console problems are the result - Reebok Trainer Rx 3.5 Bike | English Manual - Page 27
guide to find the proper intensity level. The chart below shows recommended heart rates for fat burning and aerobic exercise -exercise problems. EXERCISE exercise, you may complete up to five workouts each week, if desired. Remember, the key to success is to make exercise a regular and enjoyable part - Reebok Trainer Rx 3.5 Bike | English Manual - Page 28
SUGGESTED STRETCHES The correct form for several basic stretches is shown at the right. Move slowly as you stretch—-never bounce. 1. Toe Touch Stretch Stand with your knees bent slightly and slowly bend forward from 1 your hips. Allow your back and shoulders to relax as you reach down toward - Reebok Trainer Rx 3.5 Bike | English Manual - Page 29
PART LIST Model No. RBEX13911.0 R0212A Key No. Qty. Description Key No. Qty. Description 1 1 Frame 2 1 Front Stabilizer Spacer 94 2 M4 Nut 95 2 M3.5 x 13mm Screw * –- User’'s Manual * –- Assembly Tool * –- Grease Packet Note: Specifications are subject to change without - Reebok Trainer Rx 3.5 Bike | English Manual - Page 30
EXPLODED DRAWING A 42 71 72 7 67 70 80 6 42 4 80 72 12 71 30 61 61 63 63 68 60 61 60 61 61 9 60 61 80 32 68 59 70 64 67 61 60 60 8 89 5 53 88 25 44 41 54 18 27 61 11 60 69 61 66 37 39 85 33 85 35 55 39 66 55 83 38 66 82 55 66 69 55 66 28 40 69 29 31 3 - Reebok Trainer Rx 3.5 Bike | English Manual - Page 31
31 22 75 13 76 88 10 87 87 88 88 95 88 76 14 24 88 88 15 65 66 66 88 65 23 88 57 88 75 88 50 21 88 75 88 Model No. RBEX13911.0 R0212A EXPLODED DRAWING B - Reebok Trainer Rx 3.5 Bike | English Manual - Page 32
part(s) (see the PART LIST and the EXPLODED DRAWING near the end of this manual) LIMITED WARRANTY IMPORTANT: You must register this product within 30 days of the purchase date to avoid added fees for service transported outside the USA, if all instructions in this manual are not followed, if the
-
 1
1 -
 2
2 -
 3
3 -
 4
4 -
 5
5 -
 6
6 -
 7
7 -
8
-
9
-
10
-
11
-
12
-
13
-
14
-
15
-
16
-
17
-
18
-
19
-
20
-
21
-
22
-
23
-
24
-
25
-
26
-
27
-
28
-
29
-
30
-
31
-
32
 |
 |

USER°S MANUAL
Serial Number
Decal
Model No. RBEX13911.0
Serial No.
Write the serial number in the
space above for reference.
QUESTIONS?
If you have questions, or if parts are
damaged or missing,
DO NOT
CONTACT THE STORE; please
contact Customer Care.
IMPORTANT: Please register this
product (see the limited warranty
on the back cover of this manual)
before contacting Customer Care.
CALL TOLL-FREE:
1-877-994-4999
Mon.±Fri. 6 a.m.±6 p.m. MT
Sat. 8 a.m.±4 p.m. MT
ON THE WEB:
www.reebokservice.com
www.reebokfitness.com
CAUTION
Read all precautions and instruc-
tions in this manual before using
this equipment. Keep this manual
for future reference.