Ryobi RLS1351 Operation Manual - Page 15
Warning, To Make A Cross Cut, To Make A Miter Cut, To Make A Rip Cut
 |
View all Ryobi RLS1351 manuals
Add to My Manuals
Save this manual to your list of manuals |
Page 15 highlights
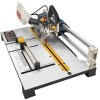
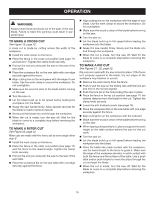
OPERATION WARNING: Always keep hands and body out of the path of the saw blade. Failure to heed this warning could result in personal injury. to make a Cross cut See Figure 19, page 22. A cross cut is made by cutting across the width of the workpiece. Install the work clamp on the fence. Place the fence in the cross cut position (see page 11) and set at 0°. Tighten the clamp knob securely. Pull out the lock pin and push the saw to the rear of the saw table. Place the workpiece flat on the saw table with one edge securely against the fence. Align cutting line on the workpiece with the edge of saw blade. Use the work clamp to secure the workpiece. Do not overtighten. Make sure the wood is clear of the blade before turning on the saw. Turn the saw on. Let the blade build up to full speed before feeding the workpiece into the blade. Grasp the saw handle firmly. Allow several seconds for the blade to reach maximum speed. Slowly pull the blade into and through the workpiece. When the cut is made, turn the saw off. Wait for the blade to come to a complete stop before removing the workpiece. to make a miter cut See Figure 20, page 22. Miter cuts are made with the fence set at some angle other than 0°. Install the work clamp on the fence. Place the fence in the miter cut position (see page 11) and the fence to the desired angle. Tighten the clamp knob securely. Pull out the lock pin and push the saw to the rear of the saw table. Place the workpiece flat on the saw table with one edge securely against the fence. Align cutting line on the workpiece with the edge of saw blade. Use the work clamp to secure the workpiece. Do not overtighten. Make sure the wood is clear of the blade before turning on the saw. Turn the saw on. Let the blade build up to full speed before feeding the workpiece into the blade. Grasp the saw handle firmly. Slowly pull the blade into and through the workpiece. When the cut is made, turn the saw off. Wait for the blade to come to a complete stop before removing the workpiece. TO make a RIP Cut See Figures 21 - 22, page 22. Rip cuts are made with the saw locked in place. If the fence isn't properly squared to the blade, the cut edges of the workpiece may blacken or scorch. Remove the work clamp from the fence. Push or pull the saw on the sliding rails until the lock pin and hole in the rail are aligned. Push the lock pin in the hole locking the saw in place. Place the fence in the rip cut position (see page 11) the desired distance from the blade for the cut. Tighten the clamp knob securely. Lower the anti-kickback pawls (see page 14). Place the workpiece flat on the saw table with one edge securely against the fence. Align cutting line on the workpiece with the indicator. Make sure the wood is clear of the blade before turning on the saw. When ripping a long workpiece, place a support the same height as the table surface behind the saw for the cut work. Turn the saw on. Let the blade build up to full speed before feeding the workpiece into the blade. Once the blade has made contact with the workpiece, use the hand closest to the fence to guide it. Make sure the edge of the workpiece remains in solid contact with both the fence and the surface of the table. Use a push stick and/or push blocks to move the piece through the cut and past the blade. When the cut is made, turn the saw off. Wait for the blade to come to a complete stop before removing the workpiece. 15
-
 1
1 -
2
-
3
-
4
-
5
-
6
-
7
-
8
-
9
-
 10
10 -
 11
11 -
 12
12 -
 13
13 -
 14
14 -
 15
15 -
 16
16 -
 17
17 -
 18
18 -
 19
19 -
 20
20 -
21
-
22
-
23
-
24
-
25
-
26
-
27
-
28
-
29
-
30
-
31
-
32
-
33
-
34
-
35
-
36
-
37
-
38
-
39
-
40
-
41
-
42
-
43
-
44
-
45
-
46
-
47
-
48
-
49
-
50
-
51
-
52
-
53
-
54
-
55
-
56
 |
 |