Samsung 920XT User Manual (ENGLISH) - Page 14
POWER IN port, VGA OUT port - thin client
 |
UPC - 729507803289
View all Samsung 920XT manuals
Add to My Manuals
Save this manual to your list of manuals |
Page 14 highlights
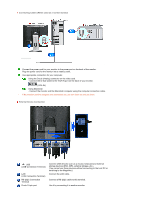
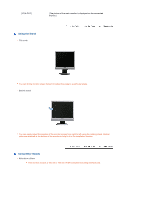
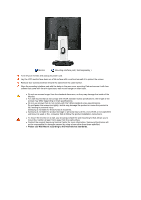
/ SOURCE button AUTO button Power button [ ] Power indicator Push the 'SOURCE', then selects the video signal while the OSD is off. (When the SOURCE button is pressed to change the input mode, a message appears in the upper left of the screen displaying the current mode -- Analog or MagicNet input signal.) Use this button for auto adjustment. >> Click here to see an animation clip Use this button for turn the monitor on and off. Be careful as pressing the Power button in client mode will shut down Windows XPe. Be careful that if you force shut down Windows it may cause damage. In these cases your monitor will be forcefully shut down and this may cause damage to your operating sysetm. Therefore ensure that the EWF function is enabled. 1. Turn the power off by holding down the Power button after switching to Monitor mode from Client mode. 2. Turn the power off by holding down the Power button for more than five(5) seconds in Client mode. When unable to boot up your computer because of a Windows crash, please contact your Administrator. This light glows green during normal operation, and blinks green once as the monitor saves your adjustments. See PowerSaver described in the manual for further information regarding power saving functions. For energy conservation, turn your monitor OFF when it is not needed, or when leaving it unattended for long periods. Rear The configuration at the back of the monitor may vary from product to product. POWER IN port VGA IN port RS-232C Connection Terminal VGA OUT port Kensington Lock Cable Fix Ring Connect the power cord for your monitor to the power port on the back of the monitor. Connect the signal cable to the 15-pin, D-sub port on the back of your monitor. Connect a RS-232C cable to this terminal. Connect a monitor to another monitor through a D-Sub cable. The Kensington lock is a device used to physically fix the system when using it in a public place. The locking device has to be purchased separately. For using a locking device, contact where you purchase it. When connecting the cable is finished, fix the cables to the Cable Fix Ring.
-
 1
1 -
2
-
3
-
4
-
5
-
6
-
7
-
8
-
 9
9 -
 10
10 -
 11
11 -
 12
12 -
 13
13 -
 14
14 -
 15
15 -
 16
16 -
 17
17 -
 18
18 -
 19
19 -
20
-
21
-
22
-
23
-
24
-
25
-
26
-
27
-
28
-
29
-
30
-
31
-
32
-
33
-
34
-
35
-
36
-
37
-
38
-
39
-
40
-
41
-
42
-
43
-
44
-
45
-
46
-
47
-
48
-
49
-
50
-
51
-
52
-
53
-
54
-
55
-
56
-
57
-
58
-
59
-
60
-
61
-
62
-
63
-
64
-
65
-
66
-
67
-
68
-
69
-
70
-
71
-
72
-
73
-
74
-
75
-
76
 |
 |