Samsung HMX-R10BN User Manual (ENGLISH) - Page 120
printing photos, DPOF PRINTING SETTING
 |
UPC - 036725302419
View all Samsung HMX-R10BN manuals
Add to My Manuals
Save this manual to your list of manuals |
Page 120 highlights
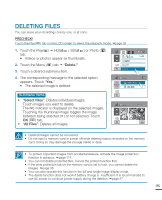
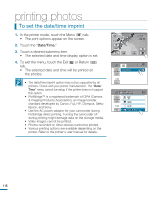
printing photos DPOF PRINTING SETTING On your memory card, you can write the print-out information including the number of copies to print. The saved information is used when you connect your camcorder with a DPOF-compatible printer. PRECHECK! • Insert the memory card in your camcorder. • This function works in Photo play mode only. • Touch the Play ( ) tab on the LCD screen to select the playback mode. page 33 1. Touch the Photo ( ) tab. • The photo thumbnails are displayed. 2. Touch the Menu ( ) tab "Print Mark (DPOF)." 3. You can choose the following submenu options: • Select Files: Print-marks individual images. The print marks indicator is displayed on the selected images. Touching the thumbnail image toggles the image between being selected or not selected. Touch the ( OK ) tab. • Set All: Print-marks all images. • Reset All: Removes all the print-marks. 160 MIN Print Mark (DPOF) File Info 2 / 2 Print Mark (DPOF) Select Files Set All 1 / 1 Reset All 4. The corresponding message appears to the selected option. Touch "Yes." • The print mark is selected or removed. • The ( 1) indicator appears on the print-marked photos. Print Mark (DPOF) 160 MIN 1 1 10 / 10 OK Understanding DPOF DPOF (Digital Print Order Format) allows you to set which still images on the memory card are to be printed, together with information on the number of copies to be printed. Tip In single display mode, you can set the number of prints by using the decrease ( ) or increase ( ) tab. - Touch the Menu ( ) tab "Print Mark(DPOF)" decrease ( ) or increase ( ) tab. - Up to 99 copies can be set to print of each image. • When you select the "Set All" option, the number of copies to be printed is set to 1. 116 • Selecting the "Set All" or "Reset All" options may take a long time depending on the number of the selected copies.
-
 1
1 -
2
-
3
-
4
-
5
-
6
-
7
-
8
-
9
-
10
-
11
-
12
-
13
-
14
-
15
-
16
-
17
-
18
-
19
-
20
-
21
-
22
-
23
-
24
-
25
-
26
-
27
-
28
-
29
-
30
-
31
-
32
-
33
-
34
-
35
-
36
-
37
-
38
-
39
-
40
-
41
-
42
-
43
-
44
-
45
-
46
-
47
-
48
-
49
-
50
-
51
-
52
-
53
-
54
-
55
-
56
-
57
-
58
-
59
-
60
-
61
-
62
-
63
-
64
-
65
-
66
-
67
-
68
-
69
-
70
-
71
-
72
-
73
-
74
-
75
-
76
-
77
-
78
-
79
-
80
-
81
-
82
-
83
-
84
-
85
-
86
-
87
-
88
-
89
-
90
-
91
-
92
-
93
-
94
-
95
-
96
-
97
-
98
-
99
-
100
-
101
-
102
-
103
-
104
-
105
-
106
-
107
-
108
-
109
-
110
-
111
-
112
-
113
-
114
-
 115
115 -
 116
116 -
 117
117 -
 118
118 -
 119
119 -
 120
120 -
 121
121 -
 122
122 -
 123
123 -
 124
124 -
 125
125 -
126
-
127
-
128
-
129
-
130
-
131
-
132
-
133
-
134
-
135
-
136
-
137
-
138
-
139
-
140
-
141
-
142
-
143
-
144
-
145
-
146
-
147
-
148
-
149
-
150
-
151
-
152
-
153
-
154
-
155
-
156
-
157
 |
 |
