Samsung HMX-R10BN User Manual (ENGLISH) - Page 76
Flash
 |
UPC - 036725302419
View all Samsung HMX-R10BN manuals
Add to My Manuals
Save this manual to your list of manuals |
Page 76 highlights
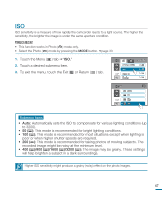
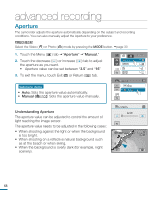
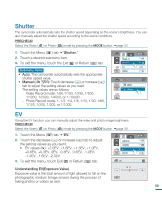
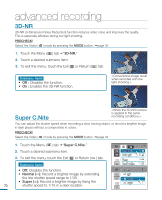
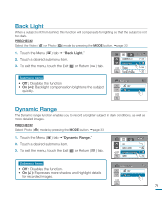
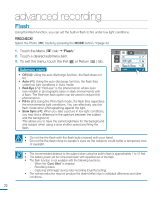
advanced recording Flash Using the Flash function, you can set the built-in flash to fire under low light conditions. PRECHECK! Select the Photo ( ) mode by pressing the MODE button. page 33 1. Touch the Menu ( ) tab "Flash." 2. Touch a desired submenu item. 3. To exit the menu, touch the Exit ( ) or Return ( ) tab. Submenu items • Off ( ): Using the auto discharge function, the flash does not fire. • Auto ( ): Using the auto discharge function, the flash fires under low light conditions in Auto mode. • Red-Eye ( ): "Red-eye" is the phenomenon where eyes look reddish in photographs taken in dark environments with a flash. The Red-eye flash option can be used to reduce this phenomenon. • Fill-In ( ): Using the Fill-In flash mode, the flash fires regardless the environmental light conditions. You can effectively use this flash mode when photographing against the light. • Slow Sync ( ): When you take a picture in low light conditions, you may find a difference in the aperture between the subject and the background. This allows you to have the same brightness for the background and subject when using a slow shutter speed and firing the flash. 90 MIN EV 0 Back Light 3 / 7 Dynamic Range Flash • Do not fire the flash with the flash bulb covered with your hand. • Do not fire the flash close to people's eyes as the subjects could suffer a temporary loss of eyesight. • The recommended distance to the subject when using the built-in flash is approximately 7 to 10 feet. • The battery power will be consumed faster with repeated use of the flash. • The flash function is not available with the following functions: - When the "Cont. Shot" is enabled - Recording videos - Capturing still images during video recording (Dual Recording). • The red-eye reduction may not produce the desired effect due to individual differences and other conditions. 72
-
 1
1 -
2
-
3
-
4
-
5
-
6
-
7
-
8
-
9
-
10
-
11
-
12
-
13
-
14
-
15
-
16
-
17
-
18
-
19
-
20
-
21
-
22
-
23
-
24
-
25
-
26
-
27
-
28
-
29
-
30
-
31
-
32
-
33
-
34
-
35
-
36
-
37
-
38
-
39
-
40
-
41
-
42
-
43
-
44
-
45
-
46
-
47
-
48
-
49
-
50
-
51
-
52
-
53
-
54
-
55
-
56
-
57
-
58
-
59
-
60
-
61
-
62
-
63
-
64
-
65
-
66
-
67
-
68
-
69
-
70
-
 71
71 -
 72
72 -
 73
73 -
 74
74 -
 75
75 -
 76
76 -
 77
77 -
 78
78 -
 79
79 -
 80
80 -
 81
81 -
82
-
83
-
84
-
85
-
86
-
87
-
88
-
89
-
90
-
91
-
92
-
93
-
94
-
95
-
96
-
97
-
98
-
99
-
100
-
101
-
102
-
103
-
104
-
105
-
106
-
107
-
108
-
109
-
110
-
111
-
112
-
113
-
114
-
115
-
116
-
117
-
118
-
119
-
120
-
121
-
122
-
123
-
124
-
125
-
126
-
127
-
128
-
129
-
130
-
131
-
132
-
133
-
134
-
135
-
136
-
137
-
138
-
139
-
140
-
141
-
142
-
143
-
144
-
145
-
146
-
147
-
148
-
149
-
150
-
151
-
152
-
153
-
154
-
155
-
156
-
157
 |
 |
