Samsung HMX-W200TN User Manual (user Manual) (ver.1.0) (English) - Page 59
Delete, buttons,
 |
View all Samsung HMX-W200TN manuals
Add to My Manuals
Save this manual to your list of manuals |
Page 59 highlights
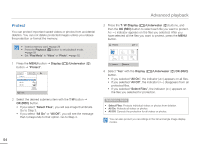
Advanced playback Delete You can erase your recordings one by one or all at once. • Insert a memory card. ¬page 29 • Press the Playback ( ) button to set playback mode. ¬page 39 • Set "Play Mode" to "Video" or "Photo". ¬page 52 1 Press the MENU button J Display ( )/Underwater ( ) button J "Delete". 4 Select "Yes" with the Display ( )/Underwater ( )/OK (REC) button. • If you selected "All Files", the product deletes all the files in storage media, except for those that are protected. • If you selected "Select Files", the product deletes the files you selected. Submenu items • Select Files: Deletes selected videos or photos. • All Files: Deletes all videos or photos. Delete Select Files All Files Menu Exit 2 Select the desired submenu item with the T / W button J OK (REC) button. • If you select "Select Files", you will see image thumbnails. Go to Step 3. • If you select "All Files", you will see the message that corresponds to that option. Go to Step 4. 3 Press the T / W /Display ( )/Underwater ( ) buttons, and then the OK (REC) button to select each file you want to delete. An indicator ( ) appears on the files you selected. After you have selected all the files you want to delete, press the MENU button. • The message corresponding to the selected option appears. Delete 1/10 Menu Delete Cancel Deleting files by using the Delete ( ) button Select the file to be deleted, and then press the Delete ( ) button. • Deleted images can not be recovered. • Do not eject a memory card or power off the product while deleting videos recorded on the storage media. Doing so may damage the storage media or data. • You can also delete your recordings in the full and single image display modes. • To protect important images from accidental erasure, activate the image protection function in advance. ¬page 54 • You can not delete protected files. Cancel the protect function first. ¬page 54 • The delete function does not work if the battery charge is insufficient. Charge the battery enough so that it does not become exhausted during the delete operation. • You can also format the storage media to delete all the images at once. Be aware that all files and data including protected files will be erased. ¬page 62 53
-
 1
1 -
2
-
3
-
4
-
5
-
6
-
7
-
8
-
9
-
10
-
11
-
12
-
13
-
14
-
15
-
16
-
17
-
18
-
19
-
20
-
21
-
22
-
23
-
24
-
25
-
26
-
27
-
28
-
29
-
30
-
31
-
32
-
33
-
34
-
35
-
36
-
37
-
38
-
39
-
40
-
41
-
42
-
43
-
44
-
45
-
46
-
47
-
48
-
49
-
50
-
51
-
52
-
53
-
 54
54 -
 55
55 -
 56
56 -
 57
57 -
 58
58 -
 59
59 -
 60
60 -
 61
61 -
 62
62 -
 63
63 -
 64
64 -
65
-
66
-
67
-
68
-
69
-
70
-
71
-
72
-
73
-
74
-
75
-
76
-
77
-
78
-
79
-
80
-
81
-
82
-
83
-
84
-
85
-
86
-
87
-
88
-
89
-
90
-
91
-
92
-
93
 |
 |
