Samsung HT BD8200 User Manual (ENGLISH) - Page 35
System setup - update
 |
UPC - 036725616981
View all Samsung HT BD8200 manuals
Add to My Manuals
Save this manual to your list of manuals |
Page 35 highlights
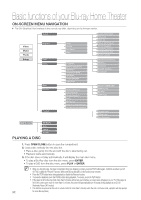
ENG ● SYSTEM SETUP System setup SETTING THE CLOCK Choose your time zone 1. With the unit in Stop mode, press the MENU button. Music 2. Press the buttons to select Setup, then press the Photo System Information ENTER or ► button. DVD Setup System ◄ Time Zone ► 3. Press the ▲▼ buttons to select System, then press the Language Audio Clock Set Power On/Off sound : On ENTER or ► button. Display HDMI BD data management DivX(R) Registration 4. Press the ▲▼ buttons to select Time Zone, then press the ENTER or ► button. Network Parental DivX(R) Deactivation System Update 5. Use the ◄ ► button to place the cursor to the appropriate time zone for your area and press the ENTER button. Music Photo Time Zone System Information DVD Setup System Setup ◄ Time Zone ► Language Setup Clock Set Audio Setup Power On/Off sound : On Display Setup BD data management HDMI Setup DivX(R) Registration ◄ Network SetupGMT + 0D0iv:0X0(R) Deactivation ► Parental SetuLopndon, LSisybsotenm Update Save Return M To set the time automatically, set the NTP server to On (see page 53). Set the clock To setup, follow steps 1 through 3 above. Music 4. Press the ▲▼ buttons to select Clock Set, then press the Photo System Information Time Zone ENTER or ► button. DVD Setup System ◄ Clock Set ► Language Power On/Off sound : On Audio BD data management Display DivX(R) Registration HDMI DivX(R) Deactivation Network System Update Parental 5. Press the ◄ ► buttons to move to "da."(date), "hr" (hour), "min" (minute). Set the date and time by pressing the ▲▼ Music System Information Photo buttons, then press the ENTER button. Time Zone Clock Set DVD Setup System ◄ Clock Set ► da. hr. min. Language Power On/Off sound : On Audio JAN/01/2009 BD da0t1a mana0g1ement Display Thursday DivX(R) Registration HDMI DivX(R) Deactivation Network SavSeystem UpdateReturn Parental 35
-
 1
1 -
2
-
3
-
4
-
5
-
6
-
7
-
8
-
9
-
10
-
11
-
12
-
13
-
14
-
15
-
16
-
17
-
18
-
19
-
20
-
21
-
22
-
23
-
24
-
25
-
26
-
27
-
28
-
29
-
 30
30 -
 31
31 -
 32
32 -
 33
33 -
 34
34 -
 35
35 -
 36
36 -
 37
37 -
 38
38 -
 39
39 -
 40
40 -
41
-
42
-
43
-
44
-
45
-
46
-
47
-
48
-
49
-
50
-
51
-
52
-
53
-
54
-
55
-
56
-
57
-
58
-
59
-
60
-
61
-
62
-
63
-
64
-
65
-
66
-
67
-
68
-
69
-
70
-
71
-
72
-
73
-
74
-
75
-
76
-
77
-
78
-
79
-
80
-
81
-
82
-
83
-
84
-
85
-
86
-
87
-
88
-
89
-
90
-
91
-
92
-
93
-
94
-
95
-
96
 |
 |
