Samsung HT BD8200 User Manual (ENGLISH) - Page 49
Network setup
 |
UPC - 036725616981
View all Samsung HT BD8200 manuals
Add to My Manuals
Save this manual to your list of manuals |
Page 49 highlights
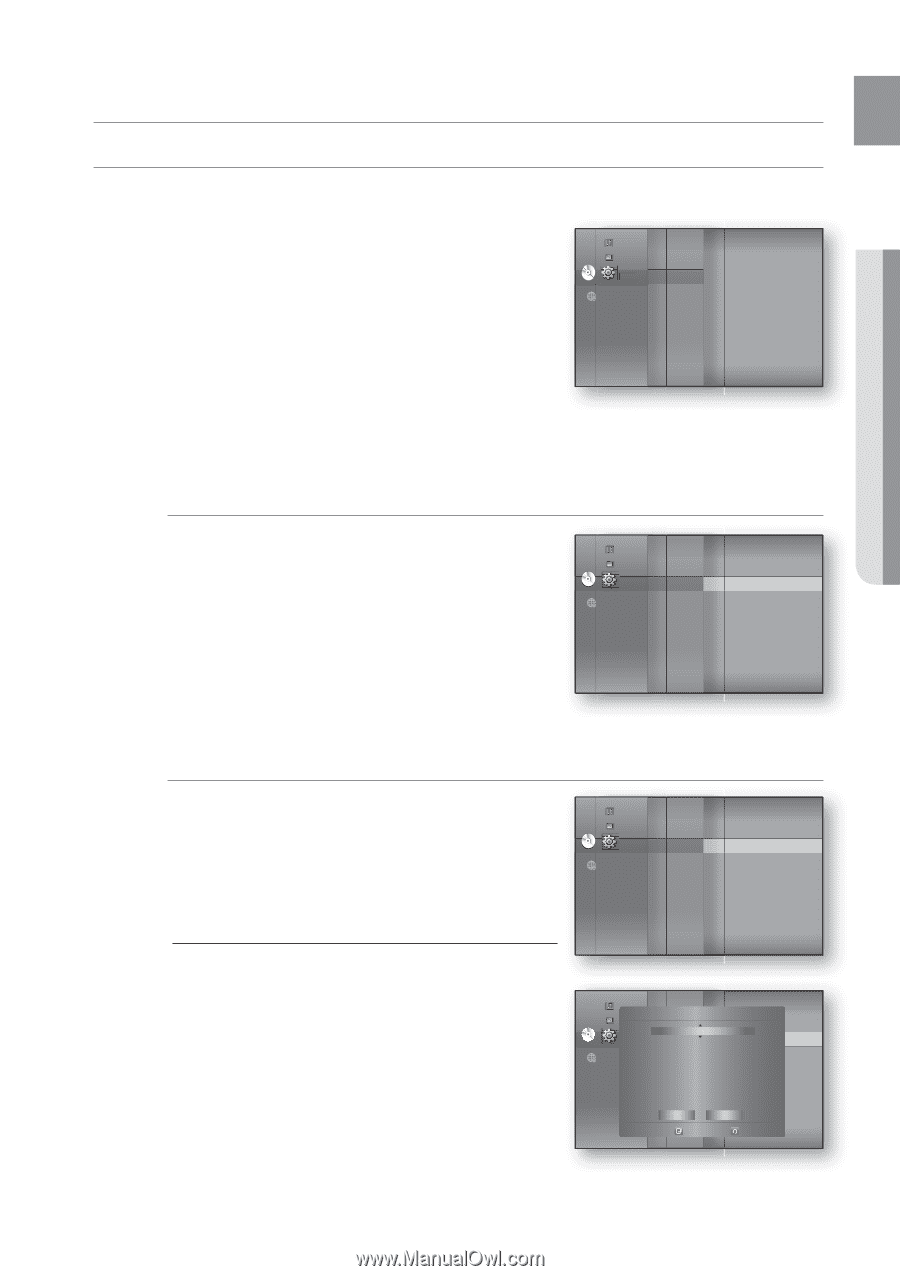
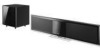
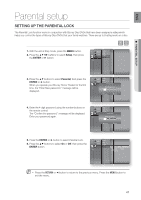
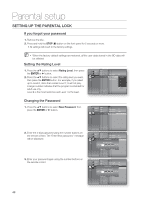
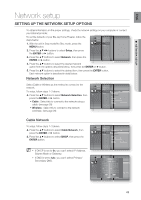
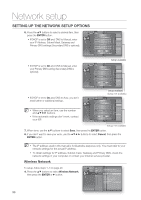
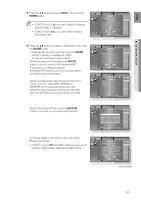
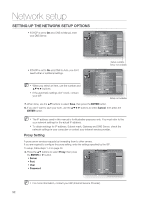
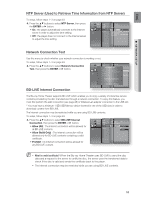
ENG ● NETWORK SETUP Network setup SETTING UP THE NETWORK SETUP OPTIONS To obtain information on the proper settings, check the network settings on your computer or contact your Internet provider. To set the network of your Blu-ray Home Theater, follow the steps below. 1. With the unit in Stop mode/No Disc mode, press the MENU button. Music Photo Display HDMI DVD Setup Network ◄ Parental 2. Press the buttons to select Setup, then press the ENTER or ► button. 3. Press the ▲▼ buttons to select Network, then press the ENTER or ► button. 4. Press the ▲▼ buttons to select the desired network option from the options described below, then press the ENTER or ► button. 5. Press the ▲▼ buttons to select the desired item, then press the ENTER button. Each network option is described in detail below. Network Selection Select Cable or Wireless as the method to connect to the network. Music Photo Display HDMI To setup, follow steps 1~3 above. DVD Setup Network ◄ Network Selection : Cable ► 4. Press the ▲▼ buttons to select Network Selection, then Parental Cable Network Wireless Network press the ENTER or ► button. Proxy NTP Server : Off • Cable : Select this to connect to the network using a cable. (see page 28) Network Connection Test BD-LIVE Connection : Allow (Valid Only) • Wireless : Select this to connect to the network wirelessly. (see page 29) Cable Network To setup, follow steps 1~3 above. 4. Press the ▲▼ buttons to select Cable Network, then press the ENTER or ► button. 5. Press the ▲▼ buttons to select DHCP, then press the ENTER button. M If DHCP is set to On, you can't select IP Address, Subnet Mask or Gateway. If DNS is set to Auto, you can't select Primary/ Secondary DNS. Music Photo Display HDMI Network Selection : Cable DVD Setup Network ◄ Cable Network ► Parental Wireless Network Proxy NTP Server : Off Network Connection Test BD-LIVE Connection : Allow (Valid Only) Music Display Photo HDMI Cable Network DNHeCtwPork Network Selection : Cable ◄: On DVD Setup IPPaAredndtraelss ◄ : 00C0a.b0l0e0N. 0e0t0w.o0r0k0 ► Subnet Mask : 25W5 i.r2e5le5s.s25N5e.t0w0o0rk Gateway : 00P0r.o0x0y0 . 000 . 000 DNS : AuNtoTP Server : Off Primary DNS : 00N0e.tw00o0rk. 0C00on. 0n0e0ction Test Secondary DNS : 00B0D.-0L0I0VE. 0I0n0te. r0n0e0t Connection : Allow (Vaild Only) Save Cancel Select Return 49
-
 1
1 -
2
-
3
-
4
-
5
-
6
-
7
-
8
-
9
-
10
-
11
-
12
-
13
-
14
-
15
-
16
-
17
-
18
-
19
-
20
-
21
-
22
-
23
-
24
-
25
-
26
-
27
-
28
-
29
-
30
-
31
-
32
-
33
-
34
-
35
-
36
-
37
-
38
-
39
-
40
-
41
-
42
-
43
-
 44
44 -
 45
45 -
 46
46 -
 47
47 -
 48
48 -
 49
49 -
 50
50 -
 51
51 -
 52
52 -
 53
53 -
 54
54 -
55
-
56
-
57
-
58
-
59
-
60
-
61
-
62
-
63
-
64
-
65
-
66
-
67
-
68
-
69
-
70
-
71
-
72
-
73
-
74
-
75
-
76
-
77
-
78
-
79
-
80
-
81
-
82
-
83
-
84
-
85
-
86
-
87
-
88
-
89
-
90
-
91
-
92
-
93
-
94
-
95
-
96
 |
 |