Samsung NP-RF710E User Manual Xp/vista/windows7 Ver.1.8 (English) - Page 83
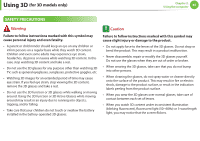
The LED indicator for the battery-operated 3D active, glasses
 |
View all Samsung NP-RF710E manuals
Add to My Manuals
Save this manual to your list of manuals |
Page 83 highlights
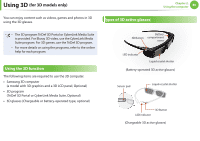
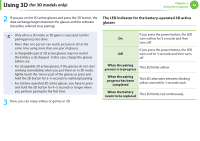
Using 3D (for 3D models only) Chapter 2. Using the computer 82 2 If you put on the 3D active glasses and press the 3D button, the data exchange begins between the glasses and the software (hereafter, referred to as pairing). The LED indicator for the battery-operated 3D active glasses • Only when a 3D video or 3D game is executed can the pairing process be done. • More than one person can watch pictures in 3D at the same time using more than one pair of glasses. • A chargeable pair of 3D active glasses may not work if the battery is discharged. In this case, charge the glasses before use. • For chargeable 3D active glasses, if the glasses do not start working immediately when you put them on in 3D mode, lightly touch the 'sensor pad' of the glasses or press and hold the 3D button for 3~5 seconds to reattempt pairing. • For battery-operated 3D active glasses, you have to press and hold the 3D button for 4~5 seconds or longer when you perform pairing for the first time. 3 Now, you can enjoy videos or games in 3D. If you press the power button, the LED On turns yellow for 3 seconds and then turns off. If you press the power button, the LED Off turns red for 3 seconds and then turns off. When the pairing process is in progress The LED blinks yellow. When the pairing progress has been completed The LED alternates between blinking yellow and red for 3 seconds each. When the battery needs to be replaced The LED blinks red continuously.
-
 1
1 -
2
-
3
-
4
-
5
-
6
-
7
-
8
-
9
-
10
-
11
-
12
-
13
-
14
-
15
-
16
-
17
-
18
-
19
-
20
-
21
-
22
-
23
-
24
-
25
-
26
-
27
-
28
-
29
-
30
-
31
-
32
-
33
-
34
-
35
-
36
-
37
-
38
-
39
-
40
-
41
-
42
-
43
-
44
-
45
-
46
-
47
-
48
-
49
-
50
-
51
-
52
-
53
-
54
-
55
-
56
-
57
-
58
-
59
-
60
-
61
-
62
-
63
-
64
-
65
-
66
-
67
-
68
-
69
-
70
-
71
-
72
-
73
-
74
-
75
-
76
-
77
-
 78
78 -
 79
79 -
 80
80 -
 81
81 -
 82
82 -
 83
83 -
 84
84 -
 85
85 -
 86
86 -
 87
87 -
 88
88 -
89
-
90
-
91
-
92
-
93
-
94
-
95
-
96
-
97
-
98
-
99
-
100
-
101
-
102
-
103
-
104
-
105
-
106
-
107
-
108
-
109
-
110
-
111
-
112
-
113
-
114
-
115
-
116
-
117
-
118
-
119
-
120
-
121
-
122
-
123
-
124
-
125
-
126
-
127
-
128
-
129
-
130
-
131
-
132
-
133
-
134
-
135
-
136
-
137
-
138
-
139
-
140
-
141
-
142
-
143
-
144
-
145
-
146
-
147
-
148
 |
 |
