Samsung SCX-4300 User Manual (ENGLISH) - Page 38
Maintenance, Printing reports, Clearing memory, Cleaning your machine, Cleaning the outside - crack
 |
UPC - 635753611021
View all Samsung SCX-4300 manuals
Add to My Manuals
Save this manual to your list of manuals |
Page 38 highlights
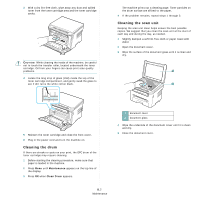
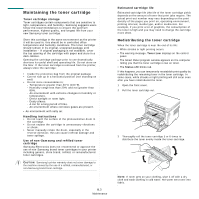
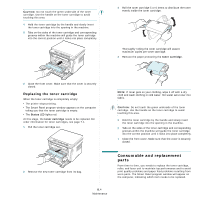
8 Maintenance This chapter provides information for maintaining your machine and the toner cartridge. This chapter includes: • Printing reports • Clearing memory • Cleaning your machine • Maintaining the toner cartridge • Consumable and replacement parts Printing reports Your machine can print report containing system data information. 1 Press Menu until Report appears on the top line of the display. 2 Press OK when System Data appears. The system data information will be printed. Clearing memory You can selectively clear information stored in your machine's memory. 1 Press Menu until Maintenance appears on the top line of the display. 2 Press the scroll button ( or ) until Clear Settings appears and press OK. 3 Press the scroll button ( or ) to select the item you want to clear. • Paper Setting: Resets all of the Paper Setting options to the factory default. • Copy Setup: Resets all of the Copy Setup options to the factory default. • All Settings: Resets all of your settings to the factory default. • Machine Setup: Resets all of the system settings, such as the display language and save mode, to the factory default. 4 Press OK to confirm clearing. The selected setting is cleared. 5 Repeat steps 3 through 4 to clear another setting. 6 Press Stop/Clear to return to Standby mode. 8.1 Maintenance Cleaning your machine To maintain print and scan quality, follow the cleaning procedures below each time the toner cartridge is replaced or if print and scan quality problems occur. CAUTION: Cleaning the cabinet of the machine with cleaning materials containing large amounts of alcohol, solvent, or other strong substances can discolor or crack the cabinet. Cleaning the outside Clean the cabinet of the machine with a soft lint-free cloth. You can dampen the cloth slightly with water, but be careful not to let any water drip onto or into the machine. Cleaning the inside During the printing process, paper, toner, and dust particles can accumulate inside the machine. This buildup can cause print quality problems, such as toner specks or smearing. Cleaning the inside of the machine clears or reduces these problems. 1 Turn the machine off and unplug the power cord. Wait for the machine to cool down. 2 Open the front cover and pull the toner cartridge out. Set it on a clean flat surface. CAUTION: • To prevent damage to the toner cartridge, do not expose it to light for more than a few minutes. Cover it with a piece of paper, if necessary. • Do not touch the green surface underside of the toner cartridge. Use the handle on the toner cartridge to avoid touching this area.
-
 1
1 -
2
-
3
-
4
-
5
-
6
-
7
-
8
-
9
-
10
-
11
-
12
-
13
-
14
-
15
-
16
-
17
-
18
-
19
-
20
-
21
-
22
-
23
-
24
-
25
-
26
-
27
-
28
-
29
-
30
-
31
-
32
-
 33
33 -
 34
34 -
 35
35 -
 36
36 -
 37
37 -
 38
38 -
 39
39 -
 40
40 -
 41
41 -
 42
42 -
 43
43 -
44
-
45
-
46
-
47
-
48
-
49
-
50
-
51
-
52
-
53
-
54
-
55
-
56
-
57
-
58
-
59
-
60
-
61
-
62
-
63
-
64
-
65
-
66
-
67
-
68
-
69
-
70
-
71
-
72
-
73
-
74
-
75
-
76
-
77
-
78
-
79
-
80
-
81
-
82
-
83
-
84
-
85
-
86
-
87
-
88
-
89
-
90
-
91
-
92
-
93
-
94
-
95
-
96
-
97
 |
 |
