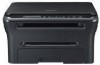
Samsung SCX-4300 User Manual (ENGLISH) - Page 81
Using Onscreen Help File, Scan To, Application, E-mail, Cancel - 1 21
 |
UPC - 635753611021
View all Samsung SCX-4300 manuals
Add to My Manuals
Save this manual to your list of manuals |
Page 81 highlights
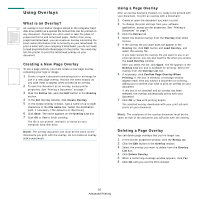
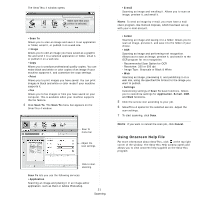
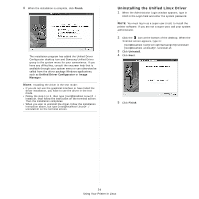
The SmarThru 4 window opens. Make sure that your printer is selected. •Scan To Allows you to scan an image and save it to an application or folder, email it, or publish it on a web site. •Image Allows you to edit an image you have saved as a graphic file and send it to a selected application or folder, email it, or publish it on a web site. •Copy Allows you to produce professional quality copies. You can make black and white or color copies of an image if your machine supports it, and customize the copy settings. •Print Allows you to print images you have saved. You can print images in black and white or color mode if your machine supports it. •Fax Allows you to fax images or files you have saved on your computer. This is available when your machine supports the fax feature. 4 Click Scan To. The Scan To menu bar appears on the SmarThru 4 window. Scan To menu bar Adjust the scan settings. Click to start scanning. Scan To lets you use the following services: •Application Scanning an image and placing it in an image editor application, such as Paint or Adobe Photoshop. 21 Scanning •E-mail Scanning an image and emailing it. Allows you to scan an image, preview it, and email it. NOTE: To send an image by e-mail, you must have a mail client program, like Outlook Express, which has been set up with your e-mail account. •Folder Scanning an image and saving it to a folder. Allows you to scan an image, preview it, and save it to the folder of your choice. •OCR Scanning an image and performing text recognition. Allows you to scan an image, preview it, and send it to the OCR program for text recognition. - Recommended Scan Option for OCR - Resolution: 200 or 300 dpi - Image Type: Grayscale or Black & White •Web Scanning an image, previewing it, and publishing it on a web site, using the specified file format for the image you want to publish. •Settings Customizing settings of Scan To basic functions. Allows you to customize settings for Application, E-mail, OCR, and Web functions. 5 Click the service icon according to your job. 6 SmarThru 4 opens for the selected service. Adjust the scan settings. 7 To start scanning, click Scan. NOTE: If you want to cancel the scan job, click Cancel. Using Onscreen Help File For more information about SmarThru, click at the top right corner of the window. The SmarThru Help window opens and allows you to view onscreen help supplied on the SmarThru program.
-
 1
1 -
2
-
3
-
4
-
5
-
6
-
7
-
8
-
9
-
10
-
11
-
12
-
13
-
14
-
15
-
16
-
17
-
18
-
19
-
20
-
21
-
22
-
23
-
24
-
25
-
26
-
27
-
28
-
29
-
30
-
31
-
32
-
33
-
34
-
35
-
36
-
37
-
38
-
39
-
40
-
41
-
42
-
43
-
44
-
45
-
46
-
47
-
48
-
49
-
50
-
51
-
52
-
53
-
54
-
55
-
56
-
57
-
58
-
59
-
60
-
61
-
62
-
63
-
64
-
65
-
66
-
67
-
68
-
69
-
70
-
71
-
72
-
73
-
74
-
75
-
 76
76 -
 77
77 -
 78
78 -
 79
79 -
 80
80 -
 81
81 -
 82
82 -
 83
83 -
 84
84 -
 85
85 -
 86
86 -
87
-
88
-
89
-
90
-
91
-
92
-
93
-
94
-
95
-
96
-
97
 |
 |
