Samsung UN55B8000 User Manual (ENGLISH) - Page 72
English - 70, Screen display
 |
UPC - 036725229938
View all Samsung UN55B8000 manuals
Add to My Manuals
Save this manual to your list of manuals |
Page 72 highlights
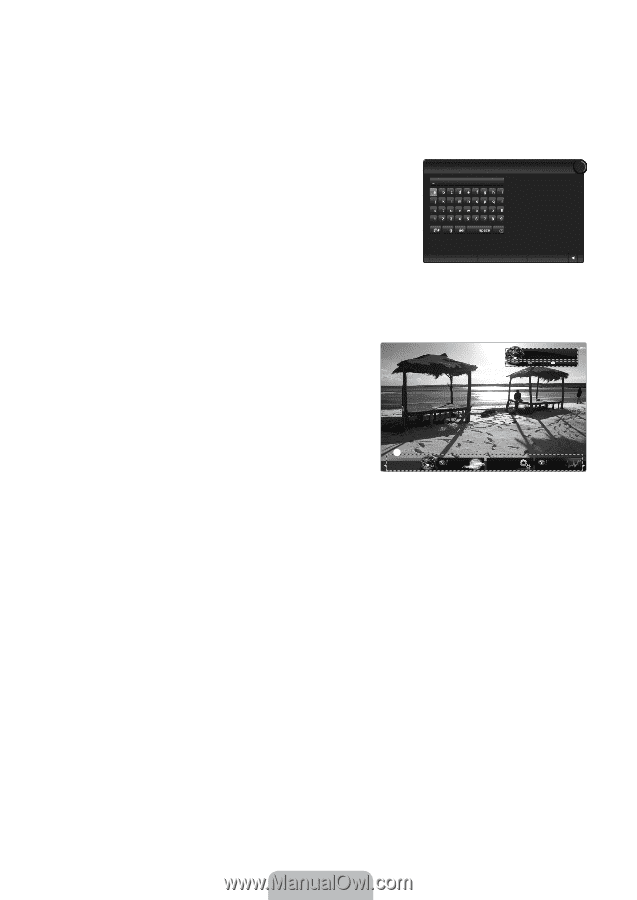
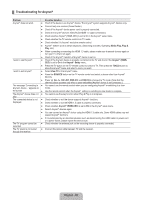
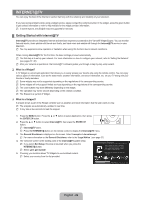
6. Accepting the Yahoo!® TV Widget Engine Privacy Policy is required to use Internet@TV. N Select OK, I Accept. 7. Accepting the Yahoo!® TV Widget System Terms of Service is required to use Internet@TV. N Select OK, I Accept. 8. Enter your name to setup your profile. Each profile has its own list of widgets. You can create a profile for each person who uses Internet@TV. N Enter your name and select Save this name. N For more information, refer to 'Using the Profile Widget'. (see page 72) 9. Internet@TV tests the network connection. What's your name? 5 N If the test fails, configure your network again. N For more information, refer to 'Setting the Network'. (see pages 31~36) 10. The guided setup is complete. A tutorial on how to use Internet@TV is next. N Select Continue to view the tutorial. Each person in the house who uses the TV can have their own personalized set of widgets. We'll keep track of these individual widget profiles by the name you enter, Enter the name YOU want to use now. N Select Exit setup to start using Internet@TV now. N To run the tutorial again, select Profile Widget → System Setting → Repeat Tutorial. Save this name Skip this step Exit setup 11. Press the INTERNET@ button on the remote control to display the Internet@TV user interface. ❑ Screen display ■ Dock mode 1 A welcome banner is shown with your profile name in the top right corner. N This banner disappears after a short delay. 1 Hello John! 5:15 AM Mon January 19th 2 Viewport Edit Snippet 2 The banner highlights two remote control shortcuts. N If you press the blue button (Viewport) on your remote control, the display is toggled between 'Viewport mode' and 'Overlay mode'. In Viewport mode, the TV or video plays in a scaled-down area with graphics outside. In overlay mode, the graphics are displayed on top of the TV or video. N If you press the yellow button (Edit Snippet) on your remote control, a help window is displayed and the snippet with focus can be edited. 33 Signed in as John WEATHER Widget Gallery FINANCE 3 Press the INTERNET@ button on the remote control to begin. N The horizontal list at the bottom of your TV screen is called 'the dock'. N The items in the list are called 'snippets'. N A snippet is a shortcut which launches a TV Widget. N A TV Widget is an Internet application designed to run on your TV. N Move between snippets by pressing the ◄ or ► buttons on the remote control. N Focus is located in the left-most region (highlighted in blue). N The dock slides snippets under that focal point. N Launch a TV Widget by pressing the ENTERE button on the remote control when its snippet is in focus. N When you add snippets, they form a stack which you can navigate by pressing the ▲ or ▼ buttons. N Two special TV Widgets appear in the dock: the Profile Widget and the Gallery Widget. These cannot be deleted. N The dock will slide off screen after a timeout period. English - 70
-
 1
1 -
2
-
3
-
4
-
5
-
6
-
7
-
8
-
9
-
10
-
11
-
12
-
13
-
14
-
15
-
16
-
17
-
18
-
19
-
20
-
21
-
22
-
23
-
24
-
25
-
26
-
27
-
28
-
29
-
30
-
31
-
32
-
33
-
34
-
35
-
36
-
37
-
38
-
39
-
40
-
41
-
42
-
43
-
44
-
45
-
46
-
47
-
48
-
49
-
50
-
51
-
52
-
53
-
54
-
55
-
56
-
57
-
58
-
59
-
60
-
61
-
62
-
63
-
64
-
65
-
66
-
 67
67 -
 68
68 -
 69
69 -
 70
70 -
 71
71 -
 72
72 -
 73
73 -
 74
74 -
 75
75 -
 76
76 -
 77
77 -
78
-
79
-
80
-
81
-
82
-
83
-
84
-
85
-
86
-
87
-
88
-
89
-
90
-
91
-
92
-
93
-
94
-
95
-
96
-
97
-
98
-
99
-
100
-
101
-
102
-
103
-
104
-
105
-
106
-
107
-
108
-
109
-
110
-
111
-
112
-
113
-
114
-
115
-
116
-
117
-
118
-
119
-
120
-
121
-
122
-
123
-
124
-
125
-
126
-
127
-
128
-
129
-
130
-
131
-
132
-
133
-
134
-
135
-
136
-
137
-
138
-
139
-
140
-
141
-
142
-
143
-
144
-
145
-
146
-
147
-
148
-
149
-
150
-
151
-
152
-
153
-
154
-
155
-
156
-
157
-
158
-
159
-
160
-
161
-
162
-
163
-
164
-
165
-
166
-
167
-
168
-
169
-
170
-
171
-
172
-
173
-
174
-
175
-
176
-
177
-
178
-
179
-
180
-
181
-
182
-
183
-
184
-
185
-
186
-
187
-
188
-
189
-
190
-
191
-
192
-
193
-
194
-
195
-
196
-
197
-
198
-
199
-
200
-
201
-
202
-
203
-
204
-
205
-
206
-
207
-
208
-
209
-
210
-
211
-
212
-
213
-
214
-
215
-
216
-
217
-
218
-
219
-
220
-
221
-
222
-
223
-
224
-
225
-
226
-
227
-
228
-
229
-
230
-
231
-
232
-
233
-
234
-
235
-
236
-
237
-
238
-
239
-
240
-
241
-
242
-
243
-
244
-
245
-
246
-
247
-
248
-
249
-
250
-
251
-
252
-
253
-
254
-
255
-
256
-
257
-
258
-
259
-
260
-
261
-
262
-
263
-
264
-
265
-
266
-
267
-
268
-
269
-
270
-
271
-
272
-
273
-
274
-
275
-
276
-
277
-
278
-
279
-
280
-
281
-
282
-
283
-
284
-
285
-
286
-
287
-
288
-
289
-
290
 |
 |