Samsung XE700T1C User Manual Windows 8 User Manual Ver.1.1 (English) - Page 117
Export Disk Image Function, Recovery, Factory Default, Point
 |
View all Samsung XE700T1C manuals
Add to My Manuals
Save this manual to your list of manuals |
Page 117 highlights
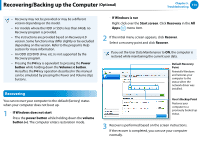
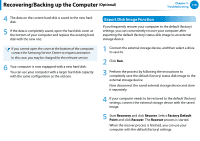
Recovering/Backing up the Computer (Optional) Chapter 5. Troubleshooting 116 4 The data on the current hard disk is saved to the new hard disk. 5 If the data is completely saved, open the hard disk cover at the bottom of your computer and replace the existing hard disk with the new one. If you cannot open the cover at the bottom of the computer, contact the Samsung Service Center to request assistance. In this case, you may be charged for the relevant service. 6 Your computer is now equipped with a new hard disk. You can use your computer with a larger hard disk capacity with the same configuration as the old one. Export Disk Image Function If you frequently recover your computer to the default (factory) settings, you can conveniently recover your computer after exporting the default (factory) status disk image to an external storage device. 1 Connect the external storage device, and then select a drive to save to. 2 Click Run. 3 Perform the process by following the instructions to completely save the default (factory) status disk image to the external storage device. Now disconnect the saved external storage device and store it separately. 4 If your computer needs to be restored to the default (factory) settings, connect the external storage device with the saved image. 5 Start Recovery and click Recover. Select Factory Default Point and click Recover. The Recover process is started. When the recover process is finished, you can use your computer with the default (factory) settings.
-
 1
1 -
2
-
3
-
4
-
5
-
6
-
7
-
8
-
9
-
10
-
11
-
12
-
13
-
14
-
15
-
16
-
17
-
18
-
19
-
20
-
21
-
22
-
23
-
24
-
25
-
26
-
27
-
28
-
29
-
30
-
31
-
32
-
33
-
34
-
35
-
36
-
37
-
38
-
39
-
40
-
41
-
42
-
43
-
44
-
45
-
46
-
47
-
48
-
49
-
50
-
51
-
52
-
53
-
54
-
55
-
56
-
57
-
58
-
59
-
60
-
61
-
62
-
63
-
64
-
65
-
66
-
67
-
68
-
69
-
70
-
71
-
72
-
73
-
74
-
75
-
76
-
77
-
78
-
79
-
80
-
81
-
82
-
83
-
84
-
85
-
86
-
87
-
88
-
89
-
90
-
91
-
92
-
93
-
94
-
95
-
96
-
97
-
98
-
99
-
100
-
101
-
102
-
103
-
104
-
105
-
106
-
107
-
108
-
109
-
110
-
111
-
 112
112 -
 113
113 -
 114
114 -
 115
115 -
 116
116 -
 117
117 -
 118
118 -
 119
119 -
 120
120 -
 121
121 -
 122
122 -
123
-
124
-
125
-
126
-
127
-
128
-
129
-
130
-
131
-
132
-
133
-
134
-
135
-
136
-
137
-
138
-
139
-
140
-
141
-
142
-
143
-
144
-
145
-
146
-
147
-
148
-
149
-
150
-
151
-
152
-
153
-
154
-
155
-
156
-
157
-
158
 |
 |