Sanyo AWM-2800 Instruction Manual - Page 10
Compact, Preparations
 |
View all Sanyo AWM-2800 manuals
Add to My Manuals
Save this manual to your list of manuals |
Page 10 highlights
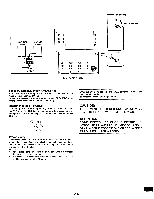
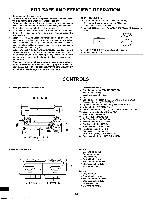
COMPACT DISC PREPARATIONS • This unit is designed to play compact discs bearing the identification logo below. Discs that do not carry this logo may not conform to the CD standard and may not play properly. COMPACT DIGITAL AUDIO • Fingerprints and dust should be carefully wiped from the signal surface of the disc (glossy side) with a soft cloth. Wipe in a straight motion from the center to the outside of the disc. • Never use chemicals such as record cleaning sprays, antistatic sprays or fluids, benzene or thinner to clean compact discs. These chemicals will permanently damage the plastic surface of the disc. • Always place the compact disc on the disc tray with the label facing upward. Compact discs can be played on only one side. • To remove a disc from its storage case, press down on the center of the case and lift the disc out, holding it carefully by the edges. • Discs should be returned to their cases after use to protect them from dust and scratches. • To prevent warping the disc, do not expose it to direct sunlight, high humidity or high temperatures for extended periods of time. • Do not apply paper or write anything on either side of the compact disc. Sharp writing instruments, or the inks used in some felt-tip pens, may damage the surfaces of the disc. IMPORTANT INFORMATION Sanyo CD changers have built-in error compensation circuits to correct for minor manufacturing defects in a disc, There are limits, however, to the amount of correction possible. In some cases, the CD changer may skip some tracks on a disc during play. This problem may be caused by defects (such as scratches) in the disc being played, which are too large for the error compensation circuits to handle. If you encounter this problem, check the operation of the CD changer as follows, before having the unit serviced. Play a new disc. If the CD changer operates normally, the skipping problem is most likely due to a defective disc. CD PLAY NOTES: • Do not touch the disc tray while it is moving. • Never place anything except a compact disc on the disc tray. Foreign objects can damage the unit. • Do not apply excessive force to the disc tray. • Discs must be placed on the disc tray one at a time. • Place the unit in a stable location, and use it in a horizontal position. BASIC CD PLAY 5 4. Place each disc in the tray with the label facing up. Please use 5-inch CDs only. 1 O CD) 5 0 /AK 2 3,6 8 7 1. Press [c!)/ON] to turn the power on. 2. Press [FUNCTION] to select the "CD" function. "CD" blinks on the display, then "no DISC" appears. FUNCTION D 1 3. Press [CD OPEN/CLOSE]. "OPEN" appears. The disc tray slides out. CD OPEN/ CLOSE Caution: Do not attempt to load a 3-inch CD with or without a snap-on adapter. Doing so may cause damage to the disc and the changer. 5. Press [DISC CHANGE] to turn the carousel to the next tray position. NOTE: Do not touch the carousel while it is rotating. DISC CHANGE 6. Press [CD OPEN/CLOSE] again to close the disc tray. "CLOSE" appears briefly. CD OPEN/ CLOSE NOTE: To open or close the disc tray , be sure to use [CD OPEN/CLOSE]. Do not press the disc tray with your hand. -E9-
-
 1
1 -
2
-
3
-
4
-
 5
5 -
 6
6 -
 7
7 -
 8
8 -
 9
9 -
 10
10 -
 11
11 -
 12
12 -
 13
13 -
 14
14 -
 15
15 -
16
-
17
-
18
-
19
-
20
-
21
-
22
 |
 |
