Sanyo AWM-2800 Instruction Manual - Page 6
Efficient, Operation
 |
View all Sanyo AWM-2800 manuals
Add to My Manuals
Save this manual to your list of manuals |
Page 6 highlights
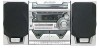
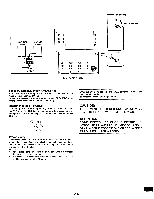
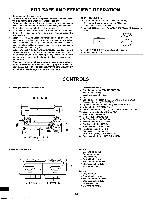
FOR SAFE AND EFFICIENT OPERATION • Do not damage the power cord. • When not in use, disconnect the power cord from the outlet. Grasp the plug, not the cord, when disconnecting the unit. • If water should enter the unit, electrical shock or a malfunction may result. Use in an area where there is low humidity and little dust. • Do not disassemble or alter the unit in any way. • Do not use the unit in areas where extremes in temperature occur (below 40°F or exceeding 95°F), or where it may be exposed to direct sunlight. • Because of the CD changer's extremely low noise and wide dynamic range, there is a tendency to set the volume on the amplifier higher than necessary. Doing so may produce an excessively high output from the amplifier which can cause damage to your speakers. Please be careful in this regard. • Sudden changes in the surrounding temperature can cause dew to form on the optical pickup lens inside the unit. Under this condition the unit may be unable to operate properly. If this should occur, remove the disc and allow the changer to adjust to the surrounding temperature. • When carrying the unit, be sure to remove any discs which may be inside and turn the power off. Then unplug the power cord from the AC outlet after 10 seconds. Carrying the unit with any discs inside may damage the discs and/or the unit. WHAT TO DO IF ... If the operation of the unit or display is not normal, 1. Disconnect the power cord from the AC outlet. 2. Connect the power cord again. 3. Within 5 seconds, press [VOLUME V] and [CLEAR ■] at the same time. CLEAR VOLUME Press [CD OPEN/CLOSE] when closing the disc tray. Do not push the disc tray. CD changer/Amplifier/Tuner section 34 5 6 who 2 1 20 19 18 17 16 14 12 11 15 13 CONTROLS 1. Power button (o/ON) 2. Sound preset button (SOUND PRESET) 3. Remote sensor (IR) 4. Disc trays (inside the door) 5. Display 6. Sound preset indicators (ROCK, CLASSIC, POPS, JAZZ) 7. Preset tuning button (V PRESET A) 8. Open/Close button for disc tray (CD OPEN/CLOSE) 9. Volume button (V VOLUME A) 10. Disc select buttons (DISC 1, DISC 2, DISC 3, DISC 4, DISC 5) 11. Disc change button (DISC CHANGE) 12. Play/Pause button (►/uq 13. Memory button (MEMORY) 7 14. Stop/Clear button (CLEAR ■) 15. FM mode button (FM MODE) 8 16. Band select button (BAND) 9 17. Function button (FUNCTION) 10 18. Headphone jack (PHONES) 19. Skip/Search/Tuning buttons /-41-itrTUNING II010-/10-0-I/TUNING +) 20. Bass expander button (BASSXPANDER) Cassette deck section B A WA va 2 3 4 5 6 7 8 9101112 Deck B 1. Cassette holder (B) 2. Record button (•) 3. Play button (►) 4. Rewind button (4I4I) 5. Fast forward button (►►) 6. Stop/Eject button (M/1!) 13 7. Pause button (II) Deck A 8. Play button (►) 9. Rewind button (44) 10. Fast forward button (►►) 11. Stop/Eject button (0.4) 12. Pause button (II) 13. Cassette holder (A) -E5-
-
 1
1 -
 2
2 -
 3
3 -
 4
4 -
 5
5 -
 6
6 -
 7
7 -
 8
8 -
 9
9 -
 10
10 -
 11
11 -
 12
12 -
13
-
14
-
15
-
16
-
17
-
18
-
19
-
20
-
21
-
22
 |
 |
