Sanyo VCC-HD5400 VCC-HD5400 Setup and Summary Manual - Page 8
Network Connection
 |
UPC - 086483075698
View all Sanyo VCC-HD5400 manuals
Add to My Manuals
Save this manual to your list of manuals |
Page 8 highlights
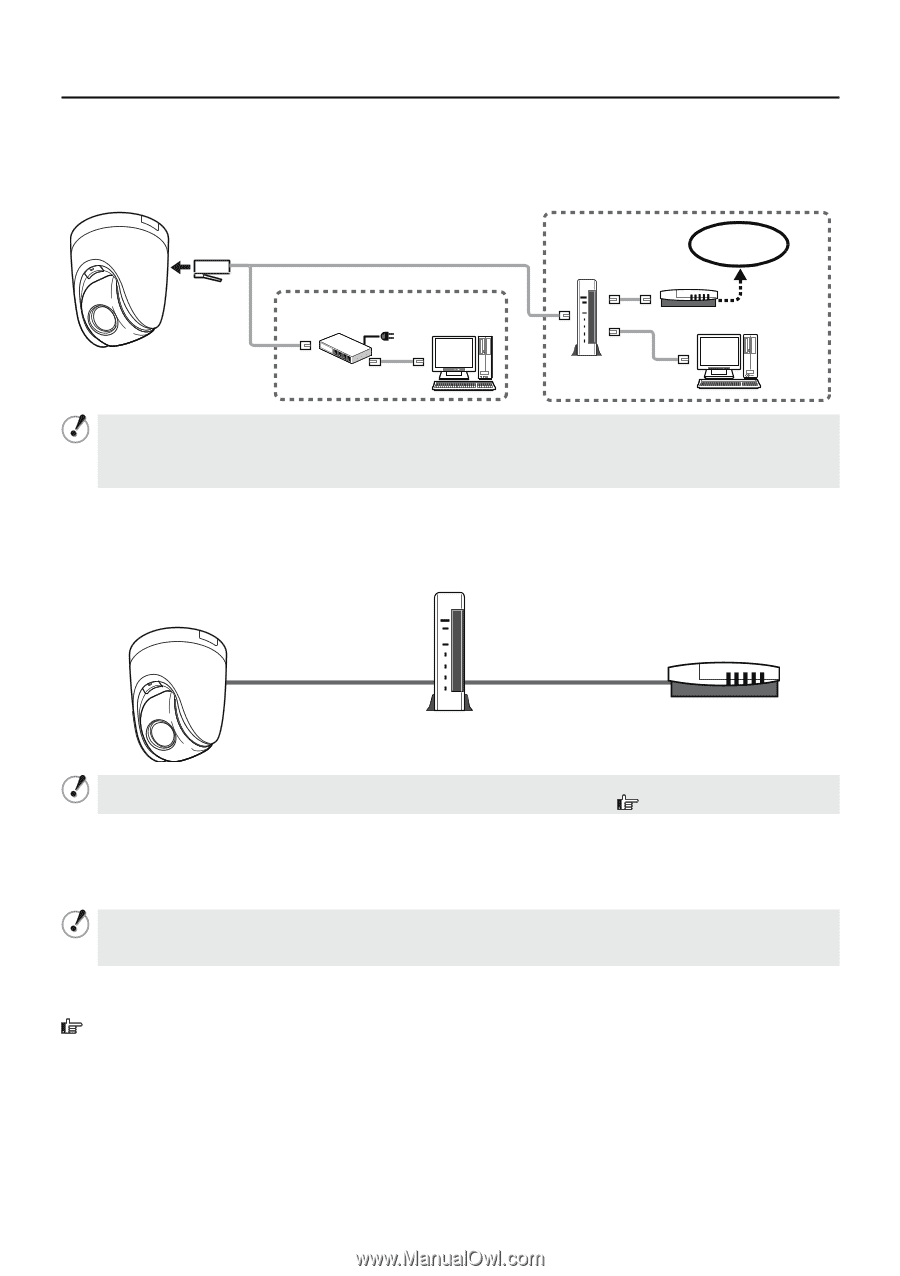
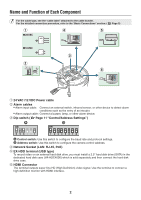
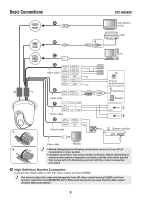
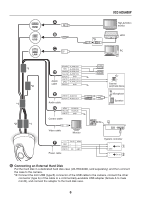
Basic Connections ⦉ Network Connection This camera is designed so that you can use all of its functions via network operation. By connecting the network (LAN) socket of the camera to your PC using a LAN cable, you can configure and operate it from the Web browser installed on your PC. Internet connection Internet LAN connection PC Modem Switching hub Router PC • Use a LAN cable no longer than 100 m (109.4 yards) with the shield type CAT5 or higher. • Use a straight-type cable if connecting to LAN, and use a cross-type cable if directly connecting the camera to a PC. • The supported Web browser is Internet Explorer Ver.6.0 SP2 or higher, or Internet Explorer Ver.7.0. ■ About the internet connection Port forwarding for the video port must be enabled on the broadband router. For details on how to set port forwarding, please refer to your router's Instruction manual. Port number (default): 80 (TCP) IP address (default): 192.168.0.2 Port number (default): 80 (TCP) • Set to same value as on LAN To LAN port To WAN port Router Modem To connect two or more cameras, via network operation on the NETWORK SETTINGS screen, assign them with port numbers that are different from that of the first camera. ( Electronic manual) ■ Using PoE This camera supports PoE (Power over Ethernet). This means that you can install the camera in locations where there is no 24 VAC/12 VDC power outlet nearby. • If you are using PoE, do not use the camera's power terminals (24 VAC/12 VDC). • Do not power the PoE hub or PoE power adapter until you finish connecting the camera. • When the PoE power supply is used, you cannot record video to an external hard disk drive. You can use a PoE-compatible switching hub to extend the transmission distance. For details on the extendable distance, please refer to the hub performance in the specifications, etc. For how to connect the PoE power supply, refer to the electronic manual. 7
-
 1
1 -
2
-
 3
3 -
 4
4 -
 5
5 -
 6
6 -
 7
7 -
 8
8 -
 9
9 -
 10
10 -
 11
11 -
 12
12 -
 13
13 -
14
-
15
-
16
-
17
 |
 |