Seagate ST3500601XS-RK Quick Start Guide - Page 7
Macintosh OS
 |
UPC - 763649002087
View all Seagate ST3500601XS-RK manuals
Add to My Manuals
Save this manual to your list of manuals |
Page 7 highlights
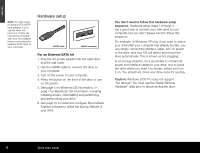
ENGLISH Dismounting your drive with the Windows OS Mounting is the beginning and dismounting is the end of the conversation between your computer and your external hard drive. Mounting occurs automatically when you connect and turn on your drive, but you must initiate the dismounting action yourself. If you disconnect or turn off the drive before you dismount it, neither your drive nor your OS understands that the conversation is finished. It's like hanging up the telephone without saying goodbye. Caution: Never turn off power to the drive or physically disconnect any cable attached to the drive when the LED indicates disc activity. That's like hanging up in mid-sentence, and it will probably result in data loss. How to dismount the drive 1. Close all windows and quit all running applications that are stored on the drive or that are using data stored on the drive. 2. Click the icon in your system tray that represents the Safely Remove Hardware function, and then select the Seagate external drive. Note: The system tray is the area in the lower right portion of your desktop near the clock. Windows OS displays a message when it is safe to disconnect the interface cable or turn off the drive. Macintosh OS Mac OS 10.4 (or higher) eSATA host bus adapter (card) installation Turn the power off to your computer. Open the computer case. Install the PCI eSATA card in an available PCI slot on your computer's motherboard. Make sure the card is seated firmly in the slot, install the mounting screw, and tighten down firmly. Close the computer. Turn on the power to the computer. After installing the eSATA300 TX2 Serial ATA Controller card and rebooting your system, Mac OS X will not recognise or report the presence of the eSATA300 TX2 Controller. Follow these steps to install the drivers in order for the system to recognise the PCI card: 1. Insert the CD into the CD-ROM drive. 2. The Seagate eSATA drive menu will appear: click on eSATA PCI Card Menu button. If the main menu does not automatically launch, you can manually open it by clicking welcome.htm on the CD. 3. Click the MacOS PCI Installer button. 4. The installer launches and the Introduction window displays. Click Continue. 5. The Read Me window displays. Click Continue. 6. The License Agreement displays. Click Continue, then click the Agree button. 7. The Select Destination window displays. Click on the icon of the drive where your operating system is installed. 8. The Easy Install window displays. Click Update. External Hard Drive 7
-
 1
1 -
 2
2 -
 3
3 -
 4
4 -
 5
5 -
 6
6 -
 7
7 -
 8
8 -
 9
9 -
 10
10 -
 11
11 -
 12
12 -
13
-
14
-
15
-
16
 |
 |
