Sharp AR-M205 AR-M160 AR-M205 Interactive Operation Manual - Page 24
Scanner Driver Settings, Set-up screen
 |
View all Sharp AR-M205 manuals
Add to My Manuals
Save this manual to your list of manuals |
Page 24 highlights
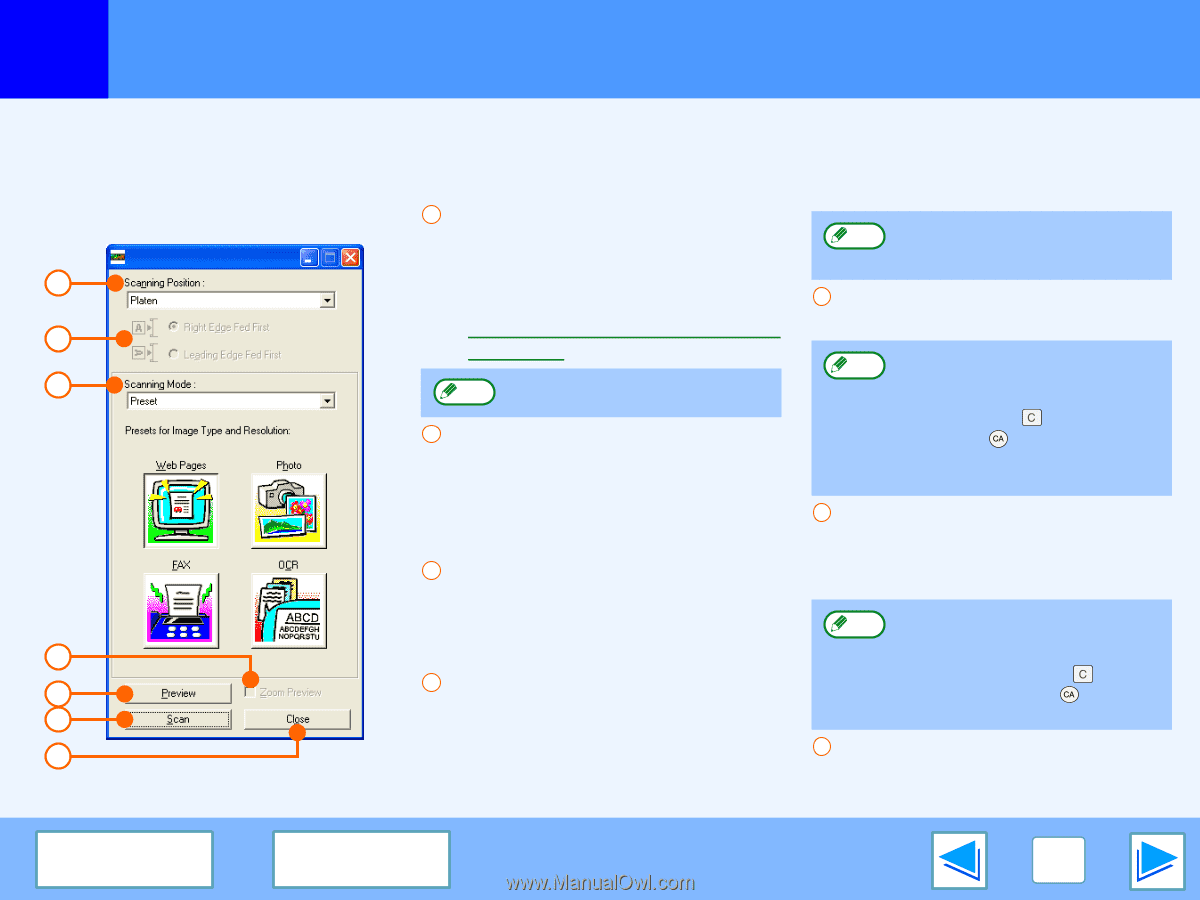
3 SCAN Scanning from a TWAIN-Compliant Application (part 4) Scanner Driver Settings The scanner driver setup screen consists of the "Set-up screen", which lets you select scan settings, and the "Preview screen", which shows the scanned image. For details on the scan settings, click the "Help" button in the preview screen to display Help. Set-up screen 1 2 3 4 5 6 7 1 "Scanning Position" menu Select the location where the original is placed. Selections are "Platen" (document glass), "SPF (Simplex)", "SPF (Duplex-Book)" or "SPF (Duplex-Tablet)". ☞Scanning from a TWAIN-Compliant Application On machines without an SPF/RSPF, Note this setting is fixed at "Platen". 2 Scan side menu (only appears when RSPF is installed) If you placed a two-sided original in the RSPF, select "Right Edge Fed First" or "Leading Edge Fed First" from the scan side menu according to the orientation of the placed original. 3 "Scanning Mode" menu Select "Preset" or "Custom Settings" for the scanning mode. For details on the settings, click the "Help" button in the preview screen to display Help. 4 "Zoom Preview" Checkbox When this is selected, the selected part of the preview image will be enlarged when the "Preview" button is clicked. To return to the regular view, remove the checkmark. "Zoom Preview" cannot be used Note when "SPF" is selected in the "Scanning Position" menu. 5 "Preview" button Previews the document. If "Preview" is canceled by Note immediately pressing the [Esc] key on your keyboard, or the [CLEAR] key ( ) or [CLEAR ALL] key ( ) on the machine, nothing will appear in the preview screen. 6 "Scan" button Click to scan an original using the selected settings. Before clicking the "Scan" button, make sure the settings are correct. To cancel a scanning job after Note clicking the "Scan" button, press the [Esc] key on your keyboard, or the [CLEAR] key ( ) or [CLEAR ALL] key ( ) on the machine. 7 "Close" button Click to close the scanner driver setup screen. CONTENTS INDEX 24
-
 1
1 -
2
-
3
-
4
-
5
-
6
-
7
-
8
-
9
-
10
-
11
-
12
-
13
-
14
-
15
-
16
-
17
-
18
-
 19
19 -
 20
20 -
 21
21 -
 22
22 -
 23
23 -
 24
24 -
 25
25 -
 26
26 -
 27
27 -
 28
28 -
 29
29 -
30
-
31
-
32
-
33
 |
 |