Sharp AR-M205 AR-M160 AR-M205 Interactive Operation Manual - Page 8
Printer Driver Settings
 |
View all Sharp AR-M205 manuals
Add to My Manuals
Save this manual to your list of manuals |
Page 8 highlights
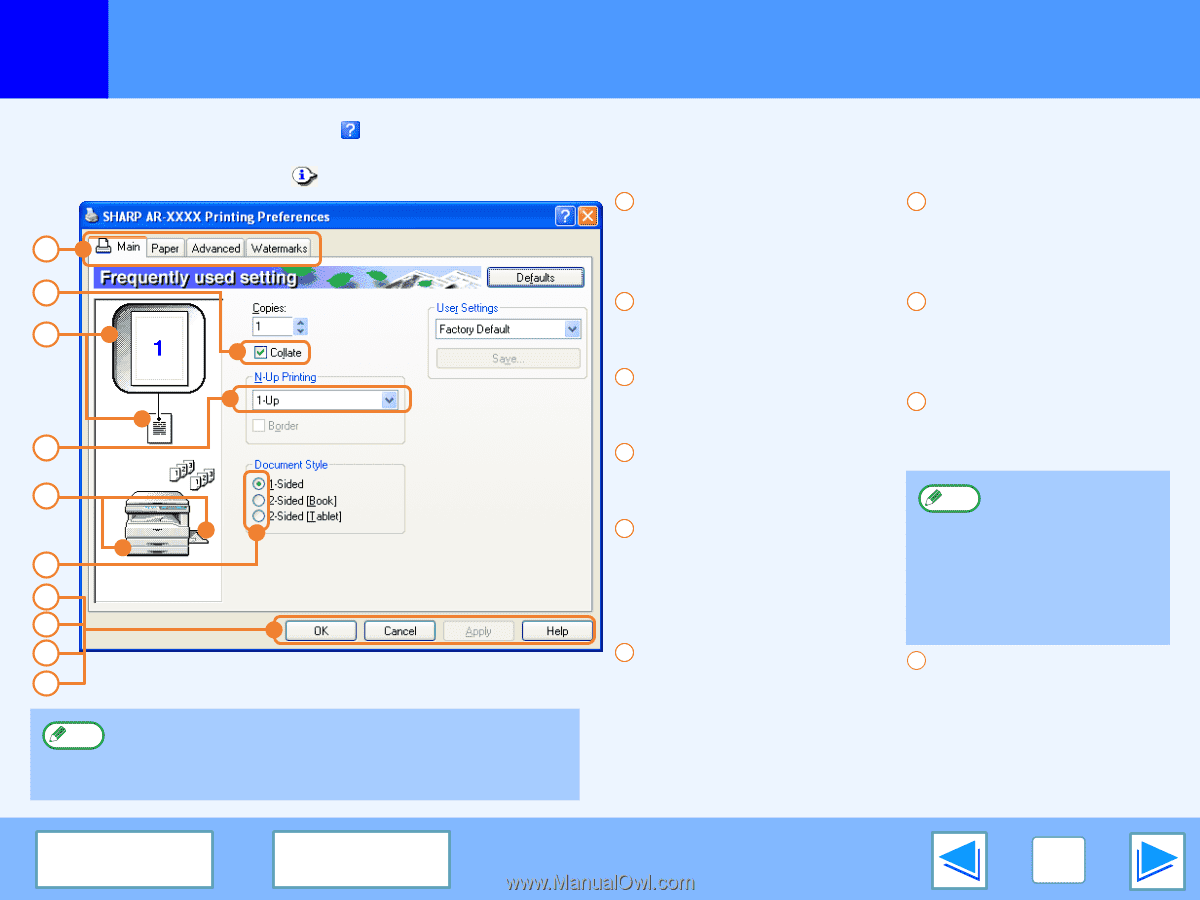
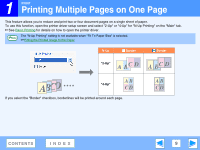
1 PRINT Printer Driver Settings To view Help for a setting, click the button in the upper right-hand corner of the window and then click the setting. Some restrictions exist on the combinations of settings that can be selected in the printer driver setup screen. When a restriction is in effect, an information icon ( ) will appear next to the setting. Click the icon to view an explanation of the restriction. 1 Tab 7 "OK" button The settings are grouped Click this button to save 1 on tabs. Click on a tab to your settings and exit the bring it to the front. dialog box. 2 2 Checkbox 8 "Cancel" button 3 Click on a checkbox to activate Click this button to exit the or deactivate a function. dialog box without making any 3 Print setting image changes to the settings. This shows the effect of the 9 "Apply" button selected print settings. Click to save your settings 4 4 Drop-down list without closing the dialog box. 5 Allows you to make a selection from a list of choices. Windows NT 4.0 Note does not have the 5 Image of paper trays "Apply" button. 6 The tray selected in "Paper Selection" in the "Paper" tab The "Apply" button does not appear when 7 appears in blue. You can also you open this window 8 click on a tray to select it. from an application. 9 10 The above screen is the printer driver setup screen for Note models that support two-sided printing. The settings and the image of the machine will vary depending on the model. 6 Check button Allows you to select one item from a list of options. 10 "Help" button Click this button to display the help file for the printer driver. CONTENTS INDEX 8
-
 1
1 -
2
-
 3
3 -
 4
4 -
 5
5 -
 6
6 -
 7
7 -
 8
8 -
 9
9 -
 10
10 -
 11
11 -
 12
12 -
 13
13 -
14
-
15
-
16
-
17
-
18
-
19
-
20
-
21
-
22
-
23
-
24
-
25
-
26
-
27
-
28
-
29
-
30
-
31
-
32
-
33
 |
 |