Sharp DT-200L Operation Manual
Sharp DT-200L Manual
 |
View all Sharp DT-200L manuals
Add to My Manuals
Save this manual to your list of manuals |
Sharp DT-200L manual content summary:
- Sharp DT-200L | Operation Manual - Page 1
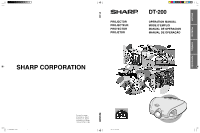
ENGLISH FRANÇAIS DT-200 PROJECTOR PROJECTEUR PROYECTOR PROJETOR DT-200 OPERATION MANUAL MODE D'EMPLOI MANUAL DE OPERACION MANUAL DE OPERAÇÃO SHARP CORPORATION ESPAÑOL PORTUGUÊS DT-200(E)#Hyo1+4.p65 1 DT-200 Printed in Japan Imprimé au Japon Impreso en Japón Impresso no Japão TINS-A287WJZZA - Sharp DT-200L | Operation Manual - Page 2
DT-200 Serial No.: There are two important reasons for prompt warranty registration of your new SHARP Projector, using the REGISTRATION CARD packed with the projector. 1. WARRANTY This is to assure that you immediately receive the full benefit of the parts, service (servicing) instructions in - Sharp DT-200L | Operation Manual - Page 3
SHARP PROJECTOR, MODEL DT- LAMP. REPLACE WITH SAME SHARP LAMP UNIT TYPE BQC-XVZ90+++1 ONLY. UV RADIATION : CAN CAUSE EYE DAMAGE. TURN OFF LAMP BEFORE SERVICING. MEDIUM PRESSURE LAMP : RISK OF EXPLOSION. POTENTIAL HAZARD OF GLASS PARTICLES IF LAMP HAS RUPTURED. HANDLE WITH CARE. SEE OPERATION MANUAL - Sharp DT-200L | Operation Manual - Page 4
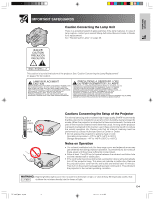
servicing. For your own protection and reliable usage of your Projector, please be sure to read these "IMPORTANT SAFEGUARDS" carefully before use. 1. Read Instructions All the safety and operating instructions (including amplifiers) that produce heat. DT-200(E)#p01_07.p65 3 02.11.21, 11:27 AM - Sharp DT-200L | Operation Manual - Page 5
CAS D'ECLATEMENT DE LA LAMPE. A MANIPULER AVEC PRECAUTION, SE REPORTER AU MODE D'EMPLOI. 95˚F (+35˚C) 41˚F DT-200 (+5˚C) DT-200 Cautions Concerning the Setup of the Projector For minimal servicing and to maintain high image quality, SHARP recommends that this projector be installed in an area - Sharp DT-200L | Operation Manual - Page 6
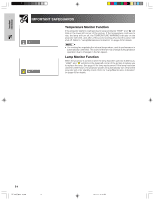
Important Information IMPORTANT SAFEGUARDS Temperature Monitor Function If the projector starts to overheat due to setup problems "TEMP" and " " will blink in the lower-left corner of the picture. If the temperature continues to rise, the lamp will turn off, the TEMPERATURE WARNING indicator on the - Sharp DT-200L | Operation Manual - Page 7
Troubleshooting Lamp/Maintenance Indicators 43 Lamp Maintenance 44 Confirming the Lamp Usage Time 44 Replacing the Lamp 45 Cleaning the Ventilative Holes 48 Using the Kensington Lock 49 Troubleshooting 49 Service Basic Operation Maintenance & Troubleshooting Appendix Basic Operation Using - Sharp DT-200L | Operation Manual - Page 8
used to adjust the color temperature to suit the type of image input to the projector. 11. Gamma Correction Function The gamma value setting can be adjusted according to the 13" compatible computers) without the need for any additional hardware. E-7 DT-200(E)#p01_07.p65 7 02.11.21, 11:27 AM - Sharp DT-200L | Operation Manual - Page 9
names refer to the main pages in this manual where the topic is explained. Projector Front and Top View Lens shift dial 18 Zoom knob 16 Exhaust ventilative hole 4 DT-200 Focus ring 16 Remote control sensor 15 5 TEMPERATURE WARNING indicator 5 LAMP REPLACEMENT indicator 16 POWER indicator 4 Exhaust - Sharp DT-200L | Operation Manual - Page 10
the part names refer to the main pages in this manual where the topic is explained. Projector Side and Rear View Remote control sensor 15 Intake terminal (RCA) 13 14 DIGITAL INPUT TYPE switch Attaching the Lens Cap DT-200 After putting the lens cap strap on the lens cap, pass the other end - Sharp DT-200L | Operation Manual - Page 11
match the the opening, and press and marks inside the cover until it clicks the battery compartment. in place. Battery cover Battery compartment Battery cover DT-200(E)#p08_11.pm6 10 02.11.21, 11:29 AM E-10 - Sharp DT-200L | Operation Manual - Page 12
Important Information Supplied Accessories Remote control RRMCGA088WJSA Two AA size batteries Power cord QACCDA007WJPZ Video cable QCNWGA001WJZZ Lens cap CCAPHA004WJ01 Lens cap strap UBNDT0013CEZZ Operation manual TINS-A287WJZZA E-11 DT-200(E)#p08_11.pm6 11 02.11.21, 11:29 AM - Sharp DT-200L | Operation Manual - Page 13
projector. Power cord CAUTION • Make sure the power cord is firmly connected into the AC socket. • The projector projector was turned off by disconnecting the power cord or by a power failure, the projector projector and the video equipment off, before connecting. • As this projector projector projector - Sharp DT-200L | Operation Manual - Page 14
and the video equipment off, before switching the "DIGITAL INPUT TYPE" swich and connecting. Projector E-13 DVI to 15-pin D-sub adaptor (sold separately AN-A1DV) DT-200(E)#p12_14.p65 13 3 RCA to 15-pin D-sub cable (sold separately AN-C3CP) DVD player or DTV decoder 02.11.21, 11:30 AM - Sharp DT-200L | Operation Manual - Page 15
player and DTV decorder. When connecting this projector to analog RGB output of the DTV decoder projector to a DVD player or DTV decoder, select "RGB" for "Signal Type" on the OSD menu or press RGB/COMP. on the remote control. (See page 36.) DVI to D-sub 15-pin cable 2 (sold separately AN-A1DV) 1 DT - Sharp DT-200L | Operation Manual - Page 16
be required for use with some Macintosh computers. Contact your nearest Sharp Authorized Service Center or Dealer. Operating the Remote Control Remote Control 23Ј (7 m) 30˚ 45˚ 30˚ The remote control can be used to control the projector within the range shown on the left. • The signal from the - Sharp DT-200L | Operation Manual - Page 17
on again, it may take a short while before the lamp turns on. • After the projector is unpacked and turned on for the first time, a slight seconds) to reduce lamp damage. Zooming and Focusing The picture can be zoomed in or out, and focused by the Zoom knob and the Focus ring. 1 DT-200 2 1 - Sharp DT-200L | Operation Manual - Page 18
the standard position. Adjustable up to 3 ± 3° from the standard position. E-17 DT-200(E)#p15_21.p65 2 1 Removing the Swivel Stand Lift the projector (2) with pressing the removing-stand button on the back of the projector (1). Attaching the Swivel Stand Align the tabs on the front bottom of - Sharp DT-200L | Operation Manual - Page 19
Using the Lens Shift The picture can be adjusted within the shift range of the lens by rotating the lens shift dial on the top of the projector using your finger. Projector Projected Image Lens shift dial UP DOWN Setup & Connections DT-200(E)#p15_21.p65 18 02.11.21, 11:30 AM E-18 - Sharp DT-200L | Operation Manual - Page 20
factory preset settings. Horizontal Keystone Correction FREEZE Vertical Keystone Correction 1 Press KEYSTONE on the projector or on the remote control. 2 Press / to select "H Keystone" or "V cannot be adjusted when Keystone correction is applied. E-19 DT-200(E)#p15_21.p65 19 02.11.21, 11:30 AM - Sharp DT-200L | Operation Manual - Page 21
(See page 17). 3 Align the edge of the screen closest to the projector with the test pattern by adjusting the zoom and the Swivel Stand. (See the size of the projected image matches the screen size. (See page 19.) DT-200(E)#p15_21.p65 20 5 Align the image on the screen by adjusting the zoom - Sharp DT-200L | Operation Manual - Page 22
projector 106" 14' 2" (4.3 m) 4' 3" (1.3 m) 2'11" (0.9 m) 2' 4" (0.7 m) 2'11" (0.9 m) 11' 8" (3.6 m) 2' 7" (0.8 m) 1'12" (0.6 m) 1' 8" (0.5 m) 2' 7" (0.8 m) 100 0.033286)/0.3048 (b) = (0.033972x - 0.033542)/0.3048 x : Screen size (diag.) (inches) E-21 DT-200(E)#p15_21.p65 21 02.11.21, 11:31 AM - Sharp DT-200L | Operation Manual - Page 23
Lens Shift Position (Ceiling Mount) When the projector is in the inverted position, use the upper edge of the screen as the base line, and exchange the lower and upper lens shift values. Screen size: 100 inches (254 cm) Aspect ratio: 4:3 Screen 90° 90° DT-200(E)#p22_23.p65 22 02.11.21, 11 - Sharp DT-200L | Operation Manual - Page 24
mounting the projector, contact your nearest Sharp Authorized Service Center or projector is in the inverted position, use the upper edge of the screen as the base line. • Use the projector's menu screen to select the appropriate projection mode. (See page 42 for use of this function.) E-23 DT - Sharp DT-200L | Operation Manual - Page 25
button • When no signal is received, "NO SIGNAL" will be displayed. When a signal that the projector is not preset to receive is received, "NOT REG." will be displayed. On-screen Display INPUT 1 picture mode changes as shown on the next page. 1 DT-200(E)#p24_25.p65 24 02.11.21, 11:40 AM E-24 - Sharp DT-200L | Operation Manual - Page 26
1080i - * Operation Buttons * Mode for projecting an image with the original aspect ratio without cutting any portions. Freeze Function FREEZE FREEZE button E-25 DT-200(E)#p24_25.p65 FREEZE END 25 : Cutout area on which images cannot be projected. : Area on which the image is not included in - Sharp DT-200L | Operation Manual - Page 27
be operated from the projector or the remote control with the following procedure. 64 2, 3, 5 1, 7 On-screen Display INPUT 1 (COMPONENT), 2 (COMPONENT or analog RGB) or DIGITAL INPUT (digital RGB) mode 1 2 INPUT 3 or 4 (VIDEO) mode 1 2 3 3 Basic Operation 4 5 DT-200(E)#p26_32.p65 26 - Sharp DT-200L | Operation Manual - Page 28
menu Picture ( ) Contrast Bright Color Tint Sharp Red Blue Reset CLR Temp מ30 ם30 * Subtitle מ10 ם10 Reset Lamp Timer OSD Display [ON/OFF] "Color", "Tint", and "Sharp" do not appear when " • "Contrast", "Bright", "Color", "Tint" and "Sharp", "Clock", "Phase", "H-Pos" and "V-Pos", and - Sharp DT-200L | Operation Manual - Page 29
Bright מ30 ם30 Color מ30 ם30 Tint מ30 ם30 Sharp מ30 ם30 Red מ30 ם30 Blue מ30 ם30 * 3MDemProorgyrOesFsFive Subtitle מ10 ם10 Reset Lamp Timer OSD Display [ON/OFF] Video , SECAM, PAL-M, PAL-N or PAL-60. E-28 DT-200(E)#p26_32.p65 28 02.11.21, 11:38 AM - Sharp DT-200L | Operation Manual - Page 30
input in INPUT 3 or 4 mode) 1 2 You can adjust the projector's picture to your preferences with the following picture settings. To save the settings "Bright", "Color", "Tint" and "Sharp" cannot be used in the DIGITAL INPUT mode. Basic Operation E-29 DT-200(E)#p26_32.p65 29 02.11.21, 11:38 AM - Sharp DT-200L | Operation Manual - Page 31
" menu screen appears. 2 Press / to select "White Emphasis". 3 Press / to select the desired white emphasis setting. 4 To exit the menu screen, press MENU. Basic Operation DT-200(E)#p26_32.p65 30 02.11.21, 11:38 AM E-30 - Sharp DT-200L | Operation Manual - Page 32
. 4 Press ENTER to save the setting. 5 To exit the menu screen, press MENU. • Gamma cannot be used in the DIGITAL INPUT mode. Basic Operation E-31 DT-200(E)#p26_32.p65 31 02.11.21, 11:38 AM - Sharp DT-200L | Operation Manual - Page 33
the stored settings. • This function can be operated using the PICTURE SETTING button on the projector or on the remote control, as well as the OSD menu screen. Description of Picture . 5 To exit the menu screen, press MENU. Basic Operation DT-200(E)#p26_32.p65 32 02.11.21, 11:38 AM E-32 - Sharp DT-200L | Operation Manual - Page 34
the "Fine Sync" menu screen and press ENTER. • The adjustable area of each item may be changed according to the input signal. Basic Operation E-33 DT-200(E)#p33.p65 33 02.11.21, 11:44 AM - Sharp DT-200L | Operation Manual - Page 35
" menu screen. 3 Press / to select "Signal Info" to display the current input signal. 4 To exit the menu screen, press MENU. On-screen Display Basic Operation DT-200(E)#p34_35.p65 34 02.11.21, 11:43 AM E-34 - Sharp DT-200L | Operation Manual - Page 36
performed. • Press AUTO SYNC to perform manual adjustment. ON ( ) • Synchronized adjustment image cannot be achieved with Auto Sync adjustment, use manual adjustments. (See page 33.) • The Auto Sync adjustment the image of the computer connected to the projector. • "Auto Sync" cannot be used in - Sharp DT-200L | Operation Manual - Page 37
". 5 To exit the menu screen, press MENU. "RGB" or "Component" can be selected with the RGB/COMP. button on the remote control only in INPUT 2. DT-200(E)#p36_40.p65 36 02.11.21, 11:42 AM E-36 - Sharp DT-200L | Operation Manual - Page 38
function allows you to select the image displayed when no signal is being sent to the projector. Description of Background Images Selected item Blue ( ) None ( ) Description Blue screen Black 5 To exit the menu screen, press MENU. Basic Operation E-37 DT-200(E)#p36_40.p65 37 02.11.21, 11:42 AM - Sharp DT-200L | Operation Manual - Page 39
of the Digital Shift setting. 5 To exit the menu screen, press MENU. • The "Digital Shift" cannot be adjusted when Keystone correction is applied. Basic Operation DT-200(E)#p36_40.p65 38 02.11.21, 11:42 AM E-38 - Sharp DT-200L | Operation Manual - Page 40
subtitle setting can be adjusted more effectively with the Digital Shift function. • The "Subtitle" cannot be adjusted when Keystone correction is applied. Basic Operation E-39 DT-200(E)#p36_40.p65 39 02.11.21, 11:42 AM - Sharp DT-200L | Operation Manual - Page 41
display the "Options" menu screen. 3 Press / to select "Menu Color". 4 Press / to select "Opaque" ( ) or "Translucent"( ). 5 To exit the menu screen, press MENU. Basic Operation DT-200(E)#p36_40.p65 40 02.11.21, 11:43 AM E-40 - Sharp DT-200L | Operation Manual - Page 42
1, 5 When no input signal is detected for more than 15 minutes, the projector will automatically shut off. The on-screen message on the left will appear five minutes will appear on the screen to indicate the remaining minutes. Basic Operation E-41 DT-200(E)#p41_42.p65 41 02.11.21, 11:42 AM - Sharp DT-200L | Operation Manual - Page 43
Reversing/Inverting Projected Images 2,3 4 1, 5 On-screen Display This projector is equipped with a reverse/invert image function which allows you to reverse or in the language selected. 5 To exit the menu screen, press MENU. Basic Operation DT-200(E)#p41_42.p65 42 02.11.21, 11:42 AM E-42 - Sharp DT-200L | Operation Manual - Page 44
Clean the ventilative holes. (See page 48.) • Take the projector to your nearest Sharp Authorized Service Center or Dealer for repair. • Carefully replace the lamp. (See page 45.) • Take the projector to your nearest Sharp Authorized Service Center or Dealer for repair. • If the TEMPERATURE WARNING - Sharp DT-200L | Operation Manual - Page 45
/cage module) of the current type BQC-XVZ90+++1 from your nearest Sharp Authorized Service Center or Dealer. • Replace the lamp. (See page 45.) If you wish, you may have the lamp replaced at your nearest Sharp Authorized Service Center or Dealer. E-44 DT-200(E)#p44_45.p65 44 02.11.21, 11:46 AM - Sharp DT-200L | Operation Manual - Page 46
Center or Dealer. Then carefully change the lamp by following the instructions on the next page. If you wish, you may have the lamp replaced at your nearest Sharp Authorized Service Center. IMPORTANT NOTE TO U.S. CUSTOMERS: The lamp included with this projector is backed by a 90-day parts and - Sharp DT-200L | Operation Manual - Page 47
and remove the three-securing screws from the lamp cage. User service screws 7 8 9 Remove the lamp cage. Insert the new lamp cage firmly into the lamp cage Tighten the threesecuring screws to compartment. fasten the lamp cage. Maintenance & Troubleshooting DT-200(E)#p46_47.p65 46 02.11.21 - Sharp DT-200L | Operation Manual - Page 48
ON on the projector to reset the lamp timer. Press , , , , order. Then press . and in DT-200 "LAMP 0000H" is displayed on the screen. • You need to reset the lamp timer every time you replace the lamp and confirm it is reset on the "Lamp Timer" menu. Maintenance & Troubleshooting E-47 DT-200 - Sharp DT-200L | Operation Manual - Page 49
vacuum cleaner. • The ventilative holes should be cleaned every 100 hours of use. Clean the ventilative holes more often when the projector is used in a dirty or smoky location. Side and stand Intake ventilative holes Maintenance & Troubleshooting DT-200(E)#p48_49.p65 48 02.11.21, 11:46 AM E-48 - Sharp DT-200L | Operation Manual - Page 50
with a Kensington MicroSaver Security System. Refer to the information that came with the system for instructions on how to use it to secure the projector. Troubleshooting Problem No picture appears. Check • Projector power cord is not plugged into the wall outlet. • Selected input is wrong. (See - Sharp DT-200L | Operation Manual - Page 51
connected Not connected Not connected Not connected Not connected Not connected Analog input Pr/Cr Analog input Y Analog input Pb/Cb Not connected Ground Appendix DT-200(E)#p50_59.p65 50 02.11.21, 11:45 AM E-50 - Sharp DT-200L | Operation Manual - Page 52
1,024 ן768 60.0 75 ✔ DVI Support Display Upscale True ✔ ✔ Intelligent Compression Upscale Intelligent Compression Appendix • This projector may not be able to display images from notebook in your notebook computer's operation manual. E-51 DT-200(E)#p50_59.p65 51 02.11.21, 11:45 AM - Sharp DT-200L | Operation Manual - Page 53
Dimensions Rear View Side View Top View Side View 12 7/8 (327) (153.8) Appendix 4 5/8 (118) Front View Bottom View DT-200(E)#p50_59.p65 52 6 9/ 1 6 14 1/2 (368) 02.11.21, 11:45 AM Units: inches (mm) E-52 - Sharp DT-200L | Operation Manual - Page 54
AC 100- manual Replacement parts Lamp unit (Lamp/cage module) (BQC-XVZ90+++1), Remote control (RRMCGA088WJSA), AA size batteries, Power cord (QACCDA007WJPZ), Video cable (QCNWGA001WJZZ), Lens cap (CCAPHA004WJ01), Lens cap strap (UBNDT0013CEZZ), Operation manual (TINS-A287WJZZA) This SHARP projector - Sharp DT-200L | Operation Manual - Page 55
temperature to suit the type of image input to the projector. Decrease the color temperature to create warmer, reddish images Visual Interface) Display digital interface that also supports Analog interfaces. GAMMA Image quality enhancement function DT-200(E)#p50_59.p65 54 02.11.21, 11:45 AM E-54 - Sharp DT-200L | Operation Manual - Page 56
FREEZE button 25 H HDCP 7 I INPUT buttons 24 K Kensington Lock 49 KEYSTONE button 19 L LAMP REPLACEMENT indicator 43 Lens shift 18 M MENU button 26 O On-screen display 36 On-screen display 12 Video Systems 37 Z Zoom knob 16 Appendix E-55 DT-200(E)#p50_59.p65 55 02.11.21, 11:45 AM - Sharp DT-200L | Operation Manual - Page 57
) Your Product Model Number & Description: DT-200 Projector (Be sure to have this information available when you need service for your Product.) Warranty Period for this Product: One (1) year parts and labor from date of purchase except for the Projector Lamp for which the warranty period is - Sharp DT-200L | Operation Manual - Page 58
installation or inappropriate use as outlined in the owner's manual. (b) Any Sharp product tampered with, modified, adjusted or repaired by any party other than Sharp, Sharp's Authorized Service Centres or Sharp's Authorized Servicing Dealers. (c) Damage caused or repairs required as a result of - Sharp DT-200L | Operation Manual - Page 59
Memo DT-200(E)#memo.p65 26 02.11.21, 11:47 AM
-
 1
1 -
 2
2 -
 3
3 -
 4
4 -
 5
5 -
 6
6 -
 7
7 -
8
-
9
-
10
-
11
-
12
-
13
-
14
-
15
-
16
-
17
-
18
-
19
-
20
-
21
-
22
-
23
-
24
-
25
-
26
-
27
-
28
-
29
-
30
-
31
-
32
-
33
-
34
-
35
-
36
-
37
-
38
-
39
-
40
-
41
-
42
-
43
-
44
-
45
-
46
-
47
-
48
-
49
-
50
-
51
-
52
-
53
-
54
-
55
-
56
-
57
-
58
-
59
 |
 |
OPERATION MANUAL
MODE D’EMPLOI
MANUAL DE OPERACION
MANUAL DE OPERAÇÃO
DT
-
200
PROJECTOR
PROJECTEUR
PROYECTOR
PROJETOR
DT-200
SHARP CORPORATION
Printed in Japan
Imprimé au Japon
Impreso en Japón
Impresso no Japão
TINS-A287WJZZ
A
DT-200
ENGLISH
FRANÇAIS
ESPAÑOL
PORTUGUÊS
DT-200(E)#Hyo1+4.p65
02.11.21, 12:59 PM
1