Sharp HTSB200 HT-SB200 Operation Manual - Page 12
Speaker preparation continued
 |
UPC - 074000369399
View all Sharp HTSB200 manuals
Add to My Manuals
Save this manual to your list of manuals |
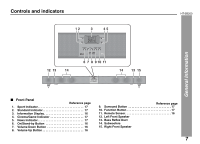
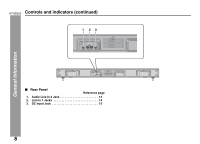
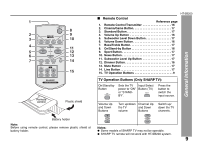
Page 12 highlights
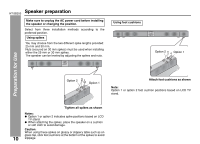
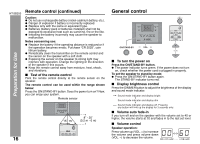
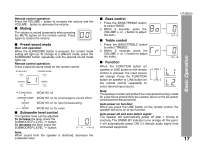
HT-SB200 Speaker preparation (continued) 4 Screw the wall mount angle to the wall as shown in the illustration. (Total screw is 8 pieces) Wall mount angle Wall surface Wall mount angle (screws x 4) ■ Installing the speaker 1 Align the wall mount slot at the speaker to the wall mount angle. 2 Slot the speaker into the wall mount angle. 3 Fix them securely. Wall surface (screws x 4) Preparation for Use Wall surface Wall mount angle Wall surface Note: Make sure all screws are fully tighten. (screws are not supplied) 12
-
 1
1 -
2
-
3
-
4
-
5
-
6
-
 7
7 -
 8
8 -
 9
9 -
 10
10 -
 11
11 -
 12
12 -
 13
13 -
 14
14 -
 15
15 -
 16
16 -
 17
17 -
18
-
19
-
20
 |
 |
12
HT-SB200
Preparation for Use
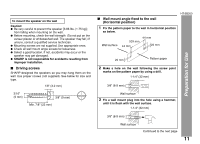
Speaker preparation (continued)
Note:
Make sure all screws are fully tighten. (screws are not supplied)
■
Installing the speaker
4
Screw the wall mount angle to the wall as shown in the
illustration. (Total screw is 8 pieces)
Wall surface
Wall mount angle
Wall mount angle
Wall surface
Wall surface
Wall mount angle
(screws x 4)
(screws x 4)
1
Align the wall mount slot at the speaker to the wall
mount angle.
2
Slot the speaker into the wall mount angle.
3
Fix them securely.
Wall surface