Singer 14T968DC PROFESIONAL 5 Instruction Manual 31 - Page 18
Threading the, Green, To Thread The Machine Correctly
 |
View all Singer 14T968DC PROFESIONAL 5 manuals
Add to My Manuals
Save this manual to your list of manuals |
Page 18 highlights
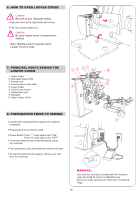
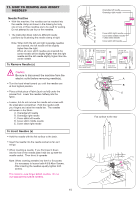
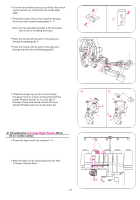
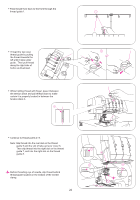
To Thread The Machine Correctly Caution: Be sure to turn off power switch. Note: The instructions on this page and the following pages will guide you through the proper threading for each color coded threading path. Before threading, refer to the Handy Reference Chart for information on Stitch Types, Settings, Needle Sockets and Color Coded Threading Paths. 1) Threading the Upper Looper (Green) Thread the upper looper as indicated 1~9. Raise Presser foot to release tension discs. Note: The presser foot is raised by lowering the Presser bar lifter. The motion allows a clear path for the fabric when sewing. Pass thread from back to the front through the thread guide 1. 1 2 3 4 9 5 8 7 6 C L 1 Thread the top cover thread guide by pulling 2 the thread towards the left until it slips under guide. Then pull 2 thread along the right side of button as illustrated. While holding thread with fingers, pass it between the tension discs and pull thread down to make certain it is properly located in between the tension discs 3. 3 3 17
-
 1
1 -
2
-
3
-
4
-
5
-
6
-
7
-
8
-
9
-
10
-
11
-
12
-
 13
13 -
 14
14 -
 15
15 -
 16
16 -
 17
17 -
 18
18 -
 19
19 -
 20
20 -
 21
21 -
 22
22 -
 23
23 -
24
-
25
-
26
-
27
-
28
-
29
-
30
-
31
-
32
-
33
-
34
-
35
-
36
-
37
-
38
-
39
-
40
-
41
-
42
-
43
-
44
-
45
-
46
-
47
-
48
-
49
-
50
-
51
-
52
-
53
-
54
-
55
-
56
-
57
-
58
-
59
-
60
-
61
-
62
-
63
-
64
-
65
-
66
-
67
-
68
-
69
-
70
-
71
-
72
-
73
-
74
 |
 |
