Singer 14T968DC PROFESIONAL 5 Instruction Manual 31 - Page 68
Replacement, Snap-On Type Presser Foot, Removal
 |
View all Singer 14T968DC PROFESIONAL 5 manuals
Add to My Manuals
Save this manual to your list of manuals |
Page 68 highlights
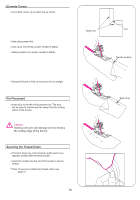
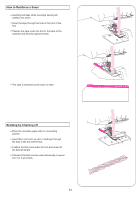
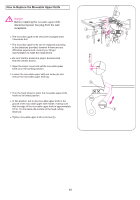
27. OPTIONAL ACCESSORIES The following optional presser feet specially prepared for this machine are available at extra-charge. Note: Do not use presser foot made for other machines. Use of such presser foot may result in interference with the needle and knife and can be hazardous. A The snap-on type presser foot of this machine permits easy removal and replacement. Caution: Be sure to disconnect the power line plug or turn off the power switch when changing the presser foot. Snap-On Type Presser Foot Removal Raise presser foot by lowering presser bar lifter and raise needle bar to ist highest position. Press red colored lever (A) located on back of clamp under the presser foot shank, raise presser bar lifter to its High Lift position by pressing down on the presser bar lifter and while holding the presser bar lifter in this position, remove the presser foot plate. Replacement Place presser foot on needle plate under presser foot shank so that hinge pin (C) will fit in slot (B) of the shank. Then lower presser foot by raising presser bar lifter. If presser foot can not be placed under presser foot shank easily, raise presser bar by pressing down on the presser bar lifter to its High Lift position and while holding it in this position, place presser foot plate under presser foot shank. Then lower presser by raising presser bar lifter. Raise presser bar lifter and make sure the presser foot is properly attached to the presser foot shank. C B 67
-
 1
1 -
2
-
3
-
4
-
5
-
6
-
7
-
8
-
9
-
10
-
11
-
12
-
13
-
14
-
15
-
16
-
17
-
18
-
19
-
20
-
21
-
22
-
23
-
24
-
25
-
26
-
27
-
28
-
29
-
30
-
31
-
32
-
33
-
34
-
35
-
36
-
37
-
38
-
39
-
40
-
41
-
42
-
43
-
44
-
45
-
46
-
47
-
48
-
49
-
50
-
51
-
52
-
53
-
54
-
55
-
56
-
57
-
58
-
59
-
60
-
61
-
62
-
 63
63 -
 64
64 -
 65
65 -
 66
66 -
 67
67 -
 68
68 -
 69
69 -
 70
70 -
 71
71 -
 72
72 -
 73
73 -
74
 |
 |
