Singer 14T968DC PROFESIONAL 5 Instruction Manual 31 - Page 44
How to Balance, 3-thread Overlock, Correct Balance
 |
View all Singer 14T968DC PROFESIONAL 5 manuals
Add to My Manuals
Save this manual to your list of manuals |
Page 44 highlights
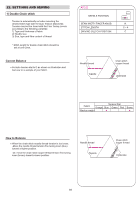
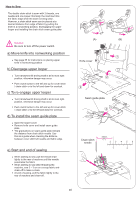
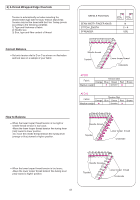
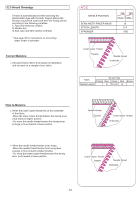
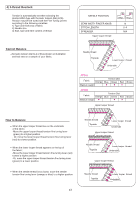
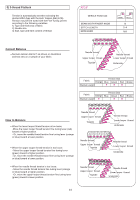
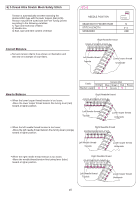
4) 3-thread Overlock Tension is automatically set when seiecting the desired stitch type with the Auto Tension Dial (ATD). Tension may be fine tuned with the Fine Tuning Levers according to the following variables: 1) Type and thickness of fabric 2) Needle size 3) Size, type and fibre content of thread Correct Balance Set auto tension dial to A or B as shown on illustration and test sew on a sample of your fabric. NEEDLE POSITION SEAM WIDTH FINGER KNOB N STITCH LENGTH 2~4 SPREADER N/A Upper looper thread Needle thread Topside Lower looper thread Underside ATD:A Fabric Tension Dial Orange Blue Green Red Medium weight Brown ATD:B Fabric Tension Dial Orange Blue Green Red Medium weight Brown Upper looper thread How to Balance When the upper looper thread lies on the underside of the fabric; -Move the upper looper thread tension fine tuning lever (green) to a higher position. - Or, move the lower looper thread tension fine tuning lever (red) to a lower position. When the lower looper thread appears on the top of the fabric; -Move the lower looper thread tension fine tuning lever (red) toward a higher position. -Or, move the upper looper thread tension fine tuning lever (green) to a lower position. When the needle thread is too loose, move the needle tension fine tuning lever (orange or blue) to a higher position. 43 Needle thread Topside Lower looper thread Underside Upper looper thread Needle thread Topside Lower looper thread Underside Upper looper thread Needle thread Topside Lower looper thread Underside
-
 1
1 -
2
-
3
-
4
-
5
-
6
-
7
-
8
-
9
-
10
-
11
-
12
-
13
-
14
-
15
-
16
-
17
-
18
-
19
-
20
-
21
-
22
-
23
-
24
-
25
-
26
-
27
-
28
-
29
-
30
-
31
-
32
-
33
-
34
-
35
-
36
-
37
-
38
-
 39
39 -
 40
40 -
 41
41 -
 42
42 -
 43
43 -
 44
44 -
 45
45 -
 46
46 -
 47
47 -
 48
48 -
 49
49 -
50
-
51
-
52
-
53
-
54
-
55
-
56
-
57
-
58
-
59
-
60
-
61
-
62
-
63
-
64
-
65
-
66
-
67
-
68
-
69
-
70
-
71
-
72
-
73
-
74
 |
 |
