Singer M1000 Mending Machine M1000 Stitch Applications Guide - Page 1
Singer M1000 Mending Machine Manual
 |
View all Singer M1000 Mending Machine manuals
Add to My Manuals
Save this manual to your list of manuals |
Page 1 highlights
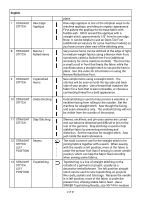
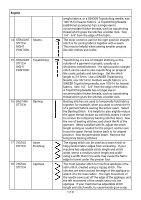
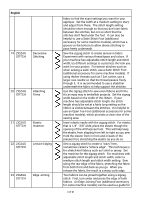
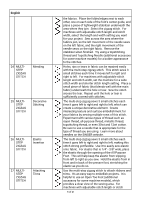
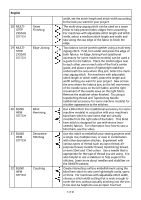
SINGER® M1000 English | Spanish | French English 1 STRAIGHT Seams STITCH 2 STRAIGHT Quilt Piecing STITCH 3 STRAIGHT Topstitching STITCH 4 STRAIGHT Edge Stitching STITCH 5 STRAIGHT Decorative STITCH Stitching 6 STRAIGHT Attaching STITCH Trims The most common use for the straight stitch is for joining fabrics together with a seam. The machine needle plate has a series of etched markings to the right of the presser foot which serve as guidelines for various widths of seam allowances when sewing with the needle in center position. Line up the raw edges of the fabric with the desired seam allowance guideline to sew a seam. Quilt piecing is done using a 1/4" seam allowance. After sewing, press seams toward the darker of the two fabrics, to help prevent the seam allowance from being visible on the top side of the quilt. It may be helpful to use a Quarter Inch Foot (additional accessory for some machine models). Topstitching is a line of straight stitching on the outside of a garment or project, usually as a decorative embellishment. Set the machine for straight stitch, with a stitch length of 3 to 3.5mm. Sew 1/4" - 3/8" from the edge of the fabric. If sewing with topstitching thread, use a SINGER Topstitching Needle, size 90/14 for medium weight fabrics, or a SINGER Topstitching needle, size 100/16 for heavier fabrics. A Topstitching Needle (additional accessory) has a longer eye to accommodate thicker threads, such as topstitching thread which gives the stitches a bolder look. Edgestitching can be used to add stability to projects like tote bags, or it can be used simply as a decorative embellishment. Set the machine for straight stitch. Sew approximately 1/8" from the edge of the fabric. The basic straight stitch can be used to embellish fabrics. Experiment with various thread types to create your own unique design. It can be helpful to draw stitch guidelines on the fabric with a removable fabric marking tool, but make sure to use a fabric marker that is appropriate for the type of fabric being sewn. Attach ribbons and trims to embellish fabrics. To attach aribbon or trim, set the machine for straight stitch. When stitching wider trims or those that tend to shift on top of the fabric while sewing, it can be helpful to use a fusible basting tape to hold it in 1 of 21
-
 1
1 -
 2
2 -
 3
3 -
 4
4 -
 5
5 -
 6
6 -
 7
7 -
8
-
9
-
10
-
11
-
12
-
13
-
14
-
15
-
16
-
17
-
18
-
19
-
20
-
21
 |
 |
