Sony DCR-SR46 Handycam® Handbook - Page 21
Inserting the Memory Stick PRO Duo
 |
View all Sony DCR-SR46 manuals
Add to My Manuals
Save this manual to your list of manuals |
Page 21 highlights
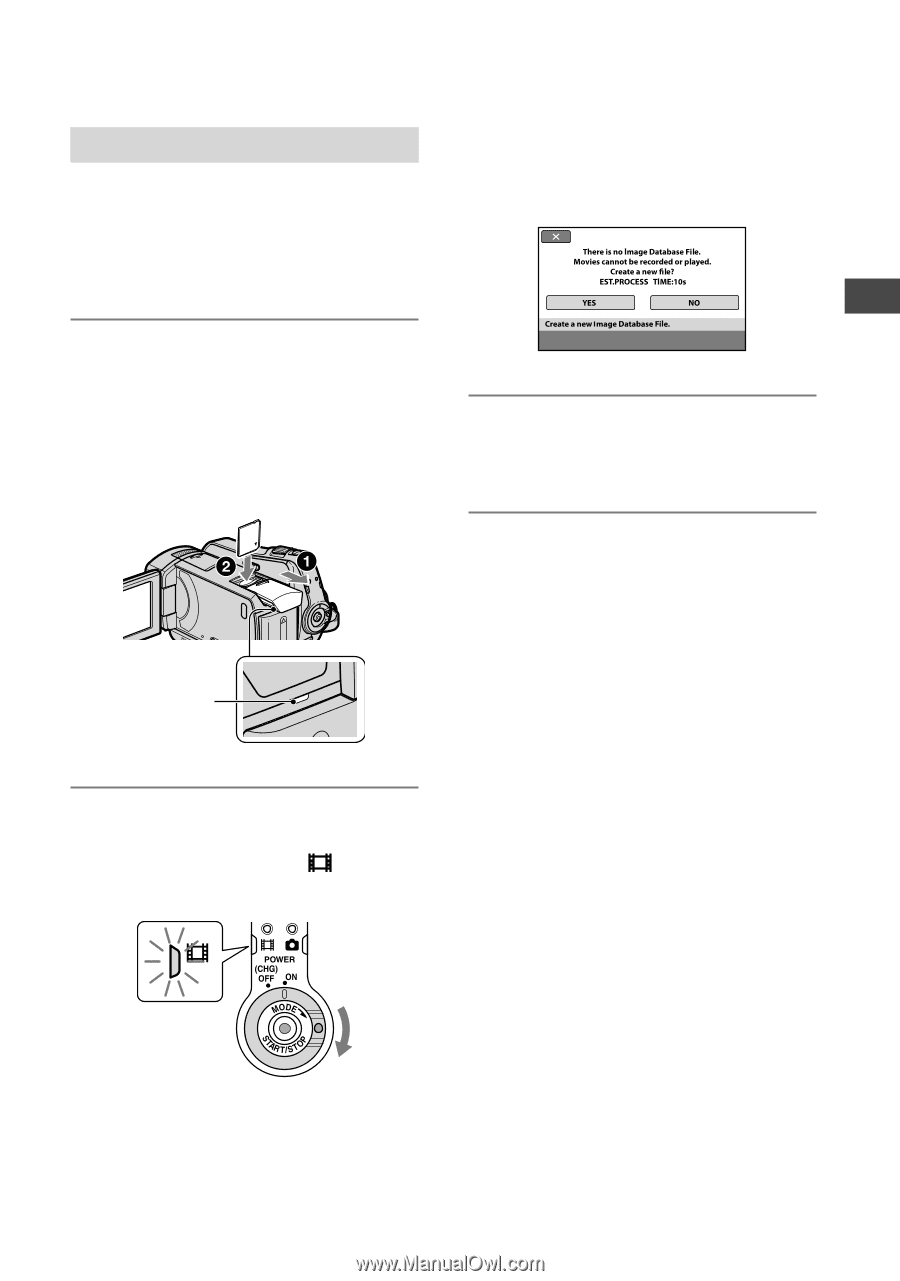
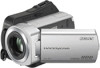
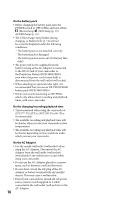
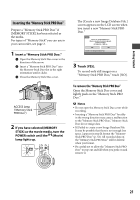
Getting Started Inserting the "Memory Stick PRO Duo" Prepare a "Memory Stick PRO Duo" if [MEMORY STICK] has been selected as the media. For types of "Memory Stick" you can use in your camcorder, see page 2. 1 Insert a "Memory Stick PRO Duo." Open the Memory Stick Duo cover in the direction of the arrow. Insert a "Memory Stick PRO Duo" into the Memory Stick Duo slot in the right orientation until it clicks. Close the Memory Stick Duo cover. ACCESS lamp ("Memory Stick PRO Duo") 2 If you have selected [MEMORY STICK] as the movie media, turn the POWER switch until the (Movie) lamp lights up. The [Create a new Image Database File.] screen appears on the LCD screen when you insert a new "Memory Stick PRO Duo." 3 Touch [YES]. To record only still images on a "Memory Stick PRO Duo," touch [NO]. To remove the "Memory Stick PRO Duo" Open the Memory Stick Duo cover and lightly push on the "Memory Stick PRO Duo." Notes Do not open the Memory Stick Duo cover while recording. Inserting a "Memory Stick PRO Duo" forcibly in the wrong direction may cause a malfunction to the "Memory Stick PRO Duo," Memory Stick Duo slot or image data. If [Failed to create a new Image Database File. It may be possible that there is not enough free space.] appears in step 3, format the "Memory Stick PRO Duo" (p. 52). All recorded data on the "Memory Stick PRO Duo" will be deleted when you format. Be careful not to allow the "Memory Stick PRO Duo" to pop out and fall when you push on and remove it. 21
-
 1
1 -
2
-
3
-
4
-
5
-
6
-
7
-
8
-
9
-
10
-
11
-
12
-
13
-
14
-
15
-
 16
16 -
 17
17 -
 18
18 -
 19
19 -
 20
20 -
 21
21 -
 22
22 -
 23
23 -
 24
24 -
 25
25 -
 26
26 -
27
-
28
-
29
-
30
-
31
-
32
-
33
-
34
-
35
-
36
-
37
-
38
-
39
-
40
-
41
-
42
-
43
-
44
-
45
-
46
-
47
-
48
-
49
-
50
-
51
-
52
-
53
-
54
-
55
-
56
-
57
-
58
-
59
-
60
-
61
-
62
-
63
-
64
-
65
-
66
-
67
-
68
-
69
-
70
-
71
-
72
-
73
-
74
-
75
-
76
-
77
-
78
-
79
-
80
-
81
-
82
-
83
-
84
-
85
-
86
-
87
-
88
-
89
-
90
-
91
-
92
-
93
-
94
-
95
-
96
-
97
-
98
-
99
-
100
-
101
-
102
-
103
-
104
-
105
-
106
-
107
-
108
 |
 |