Sony DCR-SX65 Operating Guide - Page 30
supplied or an A/V connecting cable with S VIDEO, Play back movies and photos on your camcorder p. 26. - instruction manual
 |
UPC - 027242819900
View all Sony DCR-SX65 manuals
Add to My Manuals
Save this manual to your list of manuals |
Page 30 highlights
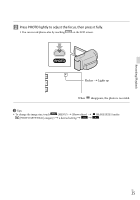
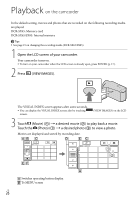
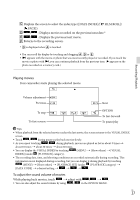
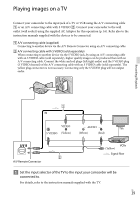
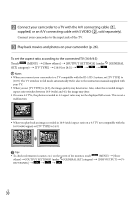
Connect your camcorder to a TV with the A/V connecting cable (, supplied) or an A/V connecting cable with S VIDEO (, sold separately). Connect your camcorder to the input jack of the TV. Play back movies and photos on your camcorder (p. 26). To set the aspect ratio according to the connected TV (16:9/4:3) Touch (MENU) [Show others] [OUTPUT SETTINGS] (under [GENERAL SET] category) [TV TYPE] [16:9] or [4:3] . Notes When you connect your camcorder to a TV compatible with the ID-1/ID-2 system, set [TV TYPE] to [16:9]. The TV switches to full mode automatically. Refer also to the instruction manuals supplied with your TV. When you set [TV TYPE] to [4:3], the image quality may deteriorate. Also, when the recorded image's aspect ratio switches between 16:9 (wide) and 4:3, the image may jitter. On some 4:3 TVs, the photos recorded in 4:3 aspect ratio may not be displayed full screen. This is not a malfunction. When you play back an image recorded in 16:9 (wide) aspect ratio on a 4:3 TV not compatible with the 16:9 (wide) signal, set [TV TYPE] to [4:3]. Tips To check information (counter, etc.) on the screen of the monitor, touch (MENU) [Show others] [OUTPUT SETTINGS] (under [GENERAL SET] category) [DISP OUTPUT] [V- OUT/PANEL] . US 30
-
 1
1 -
2
-
3
-
4
-
5
-
6
-
7
-
8
-
9
-
10
-
11
-
12
-
13
-
14
-
15
-
16
-
17
-
18
-
19
-
20
-
21
-
22
-
23
-
24
-
 25
25 -
 26
26 -
 27
27 -
 28
28 -
 29
29 -
 30
30 -
 31
31 -
 32
32 -
 33
33 -
 34
34 -
 35
35 -
36
-
37
-
38
-
39
-
40
-
41
-
42
-
43
-
44
-
45
-
46
-
47
-
48
-
49
-
50
-
51
-
52
-
53
-
54
-
55
-
56
-
57
-
58
-
59
-
60
-
61
-
62
-
63
-
64
-
65
-
66
-
67
-
68
-
69
-
70
-
71
-
72
-
73
-
74
-
75
-
76
-
77
-
78
-
79
-
80
-
81
-
82
-
83
-
84
-
85
-
86
-
87
-
88
-
89
-
90
-
91
-
92
-
93
-
94
-
95
-
96
-
97
-
98
-
99
-
100
-
101
-
102
-
103
-
104
-
105
-
106
-
107
-
108
-
109
-
110
-
111
-
112
-
113
-
114
-
115
-
116
-
117
-
118
-
119
-
120
-
121
-
122
-
123
-
124
-
125
-
126
-
127
-
128
-
129
-
130
-
131
 |
 |