Sony MVC-FD83 Installations/Connexions - Page 51
To cancel the all print marks, To write a print mark, Display INDEX screen.
 |
View all Sony MVC-FD83 manuals
Add to My Manuals
Save this manual to your list of manuals |
Page 51 highlights
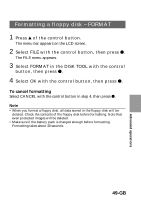
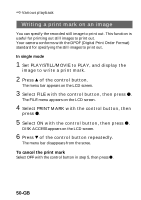
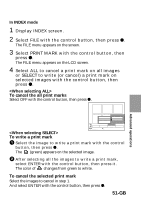
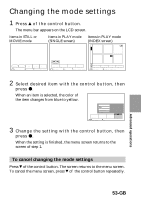
In INDEX mode 1 Display INDEX screen. 2 Select FILE with the control button, then press z. The FILE menu appears on the screen. 3 Select PRINT MARK with the control button, then press z. The FILE menu appears on the LCD screen. 4 Select ALL to cancel a print mark on all images or SELECT to write (or cancel) a print mark on selected images with the control button, then press z. To cancel the all print marks Select OFF with the control button, then press z. Advanced operations FORMAT PRINT MARK PROTECT PRINT MARK: ALL OFF CANCEL To write a print mark RETURN DELETE SELECT OK FILE SETUP 1 Select the image to write a print mark with the control button, then press z. The (green) appears on the selected image. 2 After selecting all the images to write a print mark, select ENTER with the control button, then press it. The color of changes from green to white. To cancel the selected print mark Select the images to cancel in step 1. And select ENTER with the control button, then press z. 51-GB
-
 1
1 -
2
-
3
-
4
-
5
-
6
-
7
-
8
-
9
-
10
-
11
-
12
-
13
-
14
-
15
-
16
-
17
-
18
-
19
-
20
-
21
-
22
-
23
-
24
-
25
-
26
-
27
-
28
-
29
-
30
-
31
-
32
-
33
-
34
-
35
-
36
-
37
-
38
-
39
-
40
-
41
-
42
-
43
-
44
-
45
-
 46
46 -
 47
47 -
 48
48 -
 49
49 -
 50
50 -
 51
51 -
 52
52 -
 53
53 -
 54
54 -
 55
55 -
 56
56 -
57
-
58
-
59
-
60
-
61
-
62
-
63
-
64
-
65
-
66
-
67
-
68
-
69
-
70
-
71
-
72
-
73
-
74
-
75
-
76
-
77
-
78
-
79
-
80
-
81
-
82
-
83
-
84
-
85
-
86
-
87
-
88
-
89
-
90
-
91
-
92
-
93
-
94
-
95
-
96
-
97
-
98
-
99
-
100
-
101
-
102
-
103
-
104
-
105
-
106
-
107
-
108
-
109
-
110
-
111
-
112
-
113
-
114
-
115
-
116
-
117
-
118
-
119
-
120
-
121
-
122
-
123
-
124
-
125
-
126
-
127
-
128
-
129
-
130
-
131
-
132
 |
 |
