Sony PCGA UVC11A Operating Instructions
Sony PCGA UVC11A - VAIO USB Visual Communication Camera Manual
 |
UPC - 027242649156
View all Sony PCGA UVC11A manuals
Add to My Manuals
Save this manual to your list of manuals |
Sony PCGA UVC11A manual content summary:
- Sony PCGA UVC11A | Operating Instructions - Page 1
Visual Communication Camera PCGA-UVC11A Operating Instructions / Manual de instrucciones / IMPORTANTE! POR FAVOR LEA DETALLADAMENTE ESTE MANUAL DE INSTRUCCIONES ANTES DE CONECTAR Y OPERAR ESTE EQUIPO. RECUERDE QUE UN MAL USO DE SU APARATO PODRIA ANULAR LA GARANTIA. - Sony PCGA UVC11A | Operating Instructions - Page 2
camera. Record the serial number in the space provided below. Refer to this number whenever you call your Sony dealer regarding this product. Model No. PCGA-UVC11A Serial No For customers in the U.S.A. This equipment has been tested and found to comply with the limits for a Class B digital device - Sony PCGA UVC11A | Operating Instructions - Page 3
as Windows XP. * Support for Microsoft® Windows® XP Media Center Edition is provided only in the U.S.A. and Canada. Table of Contents Before Using This Product 4 Introduction 4 Supplied Accessories 5 Names of Parts 6 Setting Up the Camera 7 Installing the driver and the software 7 Installing - Sony PCGA UVC11A | Operating Instructions - Page 4
Using This Product This camera is designed for use with Sony VAIO computers running the preinstalled Windows 2000, Windows Me, or Windows XP operating systems, or VAIO computers that are Windows XP Ready and have been upgraded with Windows XP upgrade software provided by Sony Corporation (hereafter - Sony PCGA UVC11A | Operating Instructions - Page 5
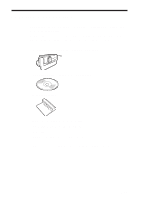
this product or a Sony service representative in your area. • Visual Communication Camera (PCGA-UVC11A) • PCGA-UVC11A installation disc (CD-ROM) • Mounting adapter • Adhesive sheet (Large/medium/small) • Operating instructions (this document) • Warranty* • End User Software License Agreement * The - Sony PCGA UVC11A | Operating Instructions - Page 6
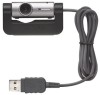
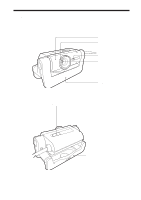
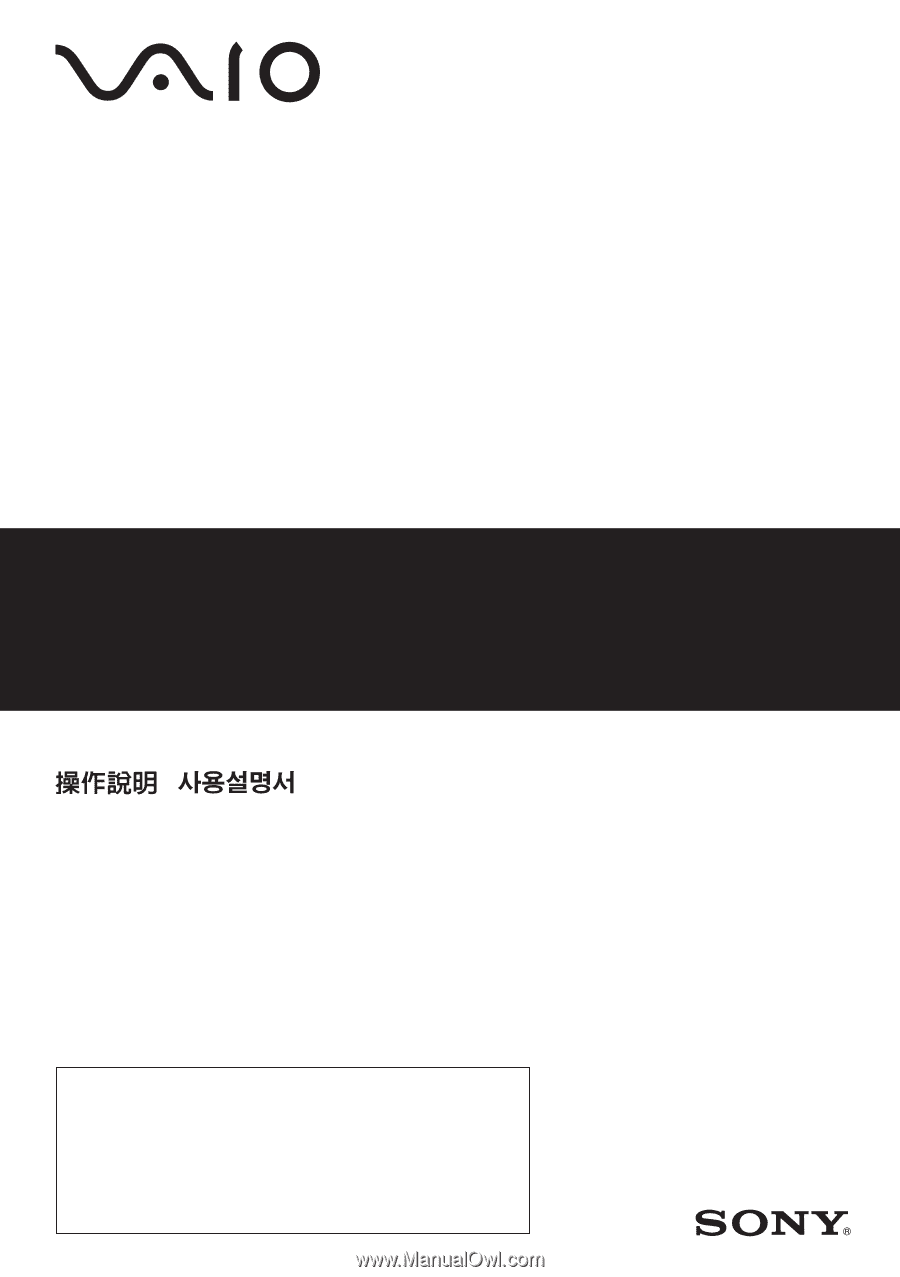
Names of Parts Front Rear CAPTURE button Camera Focus ring Microphone Lens Arm plate Arm 6 GB - Sony PCGA UVC11A | Operating Instructions - Page 7
with the PCGA-UVC11A USB camera. Follow the instructions below. In the U.S.A, for more information visit http://www.sony.com/pcsupport. Installing the driver and the software Install the PCGA-UVC11A device driver and the Network Smart Capture software. Note On a computer running the Windows 2000 - Sony PCGA UVC11A | Operating Instructions - Page 8
your computer may appear. If it does, click "Yes". 5 Connect the camera to your computer. The necessary driver and software are automatically installed. If the message prompting you to restart your computer appears, click "Yes". After your Windows operating system restarts, you can begin using the - Sony PCGA UVC11A | Operating Instructions - Page 9
"Imaging Device" in the "Device Manager" window. If "Sony Visual Communication Camera PCGA-UVC11" appears, the driver is properly installed. 6 Click the plus symbol (+) to the left of "Sound, Video, and Game Controllers" in the "Device Manager" window. If "Sony USB Microphone (PCGA-UVC11)" appears - Sony PCGA UVC11A | Operating Instructions - Page 10
" on some systems, in the "Device Manager" window. 6 Click "Sony Visual Communication Camera (PCGA-UVC11)" or "USB Composite Device", and then click "Uninstall"or "Remove". The "Confirm Device Removal" dialog box appears. 7 Click "OK". 8 Close the "Device Manager" window. Click "OK" in the "System - Sony PCGA UVC11A | Operating Instructions - Page 11
Capture", and then click "Change/Remove". With the Windows Me operating system, in the list of installed software, select "Network Smart Capture", and then click "Add/Remove". A confirmation message appears. 5 Click "OK". Follow the instructions on the screen to complete the procedure. Continued on - Sony PCGA UVC11A | Operating Instructions - Page 12
the "Device Manager" button. The "Device Manager" window appears. 3 Click the plus symbol (+) to the left of "Network adapters", right-click "ORiNOCO Mini PCI Card", and then click "Update Driver" on the shortcut menu. The hardware update wizard starts. 4 In the dialog box, select "Install from - Sony PCGA UVC11A | Operating Instructions - Page 13
. The "Device Manager" window appears. 3 Click the plus symbol (+) to the left of "Network adapters", right-click "ORiNOCO Mini PCI Card", and then click "Update Driver" on the shortcut menu. 4 Click the "Driver" tab. If the version of the driver is "7.16.0.189", then it was installed properly. 13 - Sony PCGA UVC11A | Operating Instructions - Page 14
the first time, make sure that you install the driver and the software before connecting the camera to your computer. For installation details, see "Setting Up the Camera" (page 7). • Do not connect or disconnect the camera's USB cable while your Windows operating system is starting or shutting down - Sony PCGA UVC11A | Operating Instructions - Page 15
Connect the camera USB cable to the computer's USB connector. Refer to the operating instructions manual that came with your computer or the electronic manual to locate the position of the USB connector on your computer. z Hint Depending on the type of computer you use, this camera sometimes cannot - Sony PCGA UVC11A | Operating Instructions - Page 16
in the illustration below, and hang the camera on top of the mounting adapter. Mounting adapter Arm plate Arm Arm plate Arm Mounting adapter Display Panel 4 Connect the camera USB cable to the computer's USB connector. Refer to the manuals provided with your computer to locate the position - Sony PCGA UVC11A | Operating Instructions - Page 17
cover on the top of the adhesive sheet and apply the camera to the location to mount the camera. 3 Connect the camera USB cable to the computer's USB connector. Refer to the manuals provided with your computer to locate the position of the USB connector on your computer. Continued on next page 17 GB - Sony PCGA UVC11A | Operating Instructions - Page 18
adapter. Make sure that you place the mounting adapter on a level, stable surface. Arm plate Arm Mounting adapter 2 Connect the camera USB cable to the computer's USB connector. Refer to the manuals provided with your computer to locate the position of the USB connector on your computer. 18 GB - Sony PCGA UVC11A | Operating Instructions - Page 19
is big enough to support the weight of the camera without tipping. 1 Attach the tripod screw hole on the mounting adapter to the tripod screw. 2 Attach the camera to the mounting adapter. 3 Connect the camera USB cable to the computers USB connector. Refer to the manuals provided with your computer - Sony PCGA UVC11A | Operating Instructions - Page 20
is in power-saving mode, and then connect it again, the camera may not be detected. 1 Close the software used by the camera. 2 Disconnect the USB cable, and then remove the camera. Notes • If you pull on the cable itself when disconnecting the USB cable, you may damage the cable. Make sure that you - Sony PCGA UVC11A | Operating Instructions - Page 21
the cameras USB cable from the USB connector of your computer. Capturing images with the camera You can use the Network Smart Capture software to capture images with the camera. For details about how to install the Network Smart Capture software, see "Installing the driver and the software" (page - Sony PCGA UVC11A | Operating Instructions - Page 22
holding it in your hand, we recommend that you cancel the Network Smart Capture software mirror display function. Note Make sure that the Network Smart Capture software mirror display function was canceled before using the camera in this manner. z Hint If the background is too bright or the subject - Sony PCGA UVC11A | Operating Instructions - Page 23
Setting the camera microphone volume Note Names and screens displayed may differ depending on the operating system that you are using. 1 Double-click ( depending on your operating system) on the taskbar at the bottom of the screen. The "Volume Control" window appears. 2 On the "Options" menu, click - Sony PCGA UVC11A | Operating Instructions - Page 24
"Sony PCGA-UVC11" in the Mixer device list, and then click "OK". The "Capture" dialog box appears. z Hint If the "Capture" dialog box does not appear, the driver may not be properly installed. See "Checking that the driver is installed" (page 8), and check whether the driver is properly installed - Sony PCGA UVC11A | Operating Instructions - Page 25
" does not appear in "Control Panel", click "view all Control Panel options" on the left of the window. 3 On the "Audio" tab, under "Sound Recording", select "Sony PCGA-UVC11" from the "Preferred device" list. 4 Click "OK" to close the "Sounds and Multimedia Properties" dialog box. With the - Sony PCGA UVC11A | Operating Instructions - Page 26
label is properly fixed on the disc surface before using the disc. Sony assumes no liability for any malfunction of your computer or damage to the media caused by improper labeling. Please thoroughly read instruction notes of your label software and label sheets. • Do not touch the data side of the - Sony PCGA UVC11A | Operating Instructions - Page 27
it from the center outwards. Maintenance Cleaning the cabinet Wipe the outside of the camera with a soft, dry cloth. To remove stubborn stains, moisten the cloth with of the disc. • Never use cleaners on an unused disc. Use specific CD cleaners to take off dust. • You may not be able to write on - Sony PCGA UVC11A | Operating Instructions - Page 28
❑ VAIO Web site provides Frequently Asked Questions and solutions. vaio-online.sony.com/ About Sony's support options Sony provides several support options for your Visual Communication Camera. When you have questions about your camera or the software, refer to the following: ❑ This guide explains - Sony PCGA UVC11A | Operating Instructions - Page 29
(hygrometer reading of less than 95°F (35°C)) Supplied accessories • PCGA-UVC11A installation disc (CD-ROM × 1) • Mounting adapter (1) • Adhesive sheet (3) • Operating instructions (1) • Warranty (1)* • End User Software License Agreement (1) * The accessories included vary according to country and - Sony PCGA UVC11A | Operating Instructions - Page 30
USB cable is not connected properly. c Close the currently open software, and reconnect the cable. • The driver is not installed. c Check whether the driver is installed, and if the device does not display properly, install the driver. For details, see "Setting Up the Camera" (page 7). • The driver - Sony PCGA UVC11A | Operating Instructions - Page 31
"Installing the driver and the software" (page 7) to install the driver. • Depending on your software, you may have to set the microphone as the audio input method manually. For details about this setting, refer to your software's documentation or to "If you cannot record with the camera microphone - Sony PCGA UVC11A | Operating Instructions - Page 32
downloaded from the camera appear white. Cause/Remedy The device driver is not installed. c Click "Cancel" in the "Add New Hardware Wizard" dialog box and, after disconnecting the USB cable from the USB connector, follow the procedure described in "Installing the driver and the software manuals - Sony PCGA UVC11A | Operating Instructions - Page 33
to the Help provided with the Network Smart Capture software. Depending on your network environment, the communication bandwidth may not be sufficient. Connect to a network with a higher bandwidth. If you connect the camera with devices equipped with zoom/ rotation buttons or other such buttons - Sony PCGA UVC11A | Operating Instructions - Page 34
: Cámara de comunicación visual Modelo: PCGA-UVC11A ADVERTENCIA Para evitar el riesgo de incendios o electrocuciones, no exponga la unidad a la lluvia ni a la humedad. • Sony, VAIO, y el logotipo Eco Info son marcas comerciales de Sony Corporation. • Microsoft y Windows son marcas comerciales - Sony PCGA UVC11A | Operating Instructions - Page 35
para utilizarse con equipos Sony VAIO que funcionen con los sistemas operativos Windows 2000, Windows Me o Windows XP preinstalados, o equipos VAIO preparados para Windows XP y que se han optimizado con el software de actualización de Windows XP que proporciona Sony Corporation (en adelante "equipos - Sony PCGA UVC11A | Operating Instructions - Page 36
técnico de Sony de su zona. • Cámara de comunicación visual (PCGA-UVC11A) • Disco de instalación de PCGA-UVC11A (CD-ROM) • Adaptador de montaje • Cinta adhesiva (Grande/mediana/pequeña) • Manual de instrucciones (este documento) • Garantía* • CONTRATO DE LICENCIA DE SOFTWARE PARA USUARIO FINAL - Sony PCGA UVC11A | Operating Instructions - Page 37
Nombres de las piezas Parte frontal Parte posterior Botón Captura Cámara Anillo de enfoque Micrófono Lente Abrazadera Brazo 5 ES - Sony PCGA UVC11A | Operating Instructions - Page 38
el sistema operativo Windows. Cierre los demás programas e inserte el disco de instalación suministrado en la unidad de CD-ROM. El programa de instalación se inicia automáticamente y aparece la pantalla "Sony Visual Communication Camera PCGA-UVC11A Application Installer Setup". 2 Seleccione su - Sony PCGA UVC11A | Operating Instructions - Page 39
mara al equipo. Se instalará automáticamente el controlador y el software correspondientes. Si aparece el mensaje indicándole que debe reiniciar el consulte "Conexión de la cámara" (página 13) . 2 En el sistema operativo Windows XP, haga clic en "Inicio" y, con el botón derecho del ratón, haga clic - Sony PCGA UVC11A | Operating Instructions - Page 40
el símbolo más (+) que aparece a la izquierda de "Controladora USB", (o "Controladoras de bus serie universal" en algunos sistemas) en la pantalla "Administrador de dispositivos". Si se muestra la pantalla "Sony Visual Communication Camera (PCGA-UVC11)", significa que el controlador se ha instalado - Sony PCGA UVC11A | Operating Instructions - Page 41
Windows 2000 o Windows XP, inicie una sesión como Administrador antes de desinstalar el controlador. • Antes de desinstalar el controlador, cierre la aplicación de software símbolo más (+) que aparece a la izquierda de "Controladora USB", (o "Controladoras de bus serie universal" en algunos sistemas) - Sony PCGA UVC11A | Operating Instructions - Page 42
6 Haga clic en "Sony Visual Communication Camera (PCGA-UVC11)" o "Dispositivo USB Composite" y, a continuación, haga clic en " software. En un equipo con Windows XP, inicie una sesión como Administrador antes de desinstalar el software. 1 Cierre el software Network Smart Capture. 2 En Windows XP - Sony PCGA UVC11A | Operating Instructions - Page 43
4 En Windows XP, en la lista de software instalado, seleccione "Network Smart Capture" y haga clic en "Cambiar o quitar". En Windows Me, en la lista de software instalado, seleccione "Network Smart Capture" y haga clic en "Agregar o quitar". En Windows 2000, en la lista de software instalado, - Sony PCGA UVC11A | Operating Instructions - Page 44
en "Siguente". 6 En "Adaptador de red", haga clic en "Utilizar disco". 7 Haga clic en "Examinar", seleccione la carpeta UPDATE\WirelessLAN en el CD-ROM y, finalmente, haga clic en "Aceptar". 8 Haga clic en "Siguente". 9 Haga clic en "Finalizar". Confirmación de la instalación del controlador de red - Sony PCGA UVC11A | Operating Instructions - Page 45
software antes de conectarla al equipo. Para obtener más información, consulte "Puesta en funcionamiento de la cámara" (página 6). • No conecte ni desconecte el cable USB de la cámara mientras se inicia o se apaga el sistema operativo Windows se muestra a continuación. 1 Instale la cámara en el panel - Sony PCGA UVC11A | Operating Instructions - Page 46
con el ordenador o el manual electrónico para localizar la posición del conector USB en el ordenador. zSugerencia Dependiendo ón del adaptador de montaje Si el ordenador no permite que la cámara se instale directamente porque el panel de visualización es demasiado grueso, ésta no podrá instalarse - Sony PCGA UVC11A | Operating Instructions - Page 47
ubicación donde se va a instalar la cámara. Adaptador de montaje 3 Instale la cámara en el adaptador de montaje. Mientras sujeta la abrazadera, tire visualización 4 Conecte el cable USB de la cámara al conector USB del ordenador. Consulte los manuales suministrados con el ordenador para localizar - Sony PCGA UVC11A | Operating Instructions - Page 48
polvo ni suciedad. 2 Retire la protección de la parte superior de la cinta adhesiva y coloque la cámara en la ubicación para montarla. 3 Conecte el cable USB de la cámara al conector USB del ordenador. Consulte los manuales suministrados con el ordenador para localizar la posición del conector - Sony PCGA UVC11A | Operating Instructions - Page 49
de montaje. Asegúrese de que coloca el adaptador de montaje en una superficie uniforme y estable. Abrazadera Brazo Adaptador de montaje 2 Conecte el cable USB de la cámara al conector USB del ordenador. Consulte los manuales suministrados con el ordenador para localizar la posición del conector - Sony PCGA UVC11A | Operating Instructions - Page 50
dañarse. • Al colocar la cámara, compruebe que el trípode sea estable e instale la cámara en posición horizontal, ya que si la cámara está inclinada, podría montaje. 3 Conecte el cable USB de la cámara al conector USB del ordenador. Consulte los manuales suministrados con el ordenador para localizar - Sony PCGA UVC11A | Operating Instructions - Page 51
de ahorro de energía y vuelve a conectarlo, es posible que no detecte la cámara. 1 Cierre el software que utiliza la cámara. 2 Desconecte el cable USB y quite la cámara. Notas • No tire del cable USB al desconectarlo, ya que podría dañarlo. Para desconectarlo tire del conector. • Para retirar la - Sony PCGA UVC11A | Operating Instructions - Page 52
cámara. Notas • Cuando utilice la cámara por primera vez, instale el controlador y el software antes de conectarla al equipo. Para obtener más información, consulte " 6). • No conecte ni desconecte el cable USB de la cámara mientras se inicia o apaga el software de la cámara, de lo contrario podría - Sony PCGA UVC11A | Operating Instructions - Page 53
. z Sugerencia Si desea utilizar la cámara manualmente, se recomienda cancelar la función de espejo del software Network Smart Capture. Nota Recuerde que debe cancelar la función de espejo del software Network Smart Capture antes de utilizar la cámara de este modo. z Sugerencia Si, por ejemplo, el - Sony PCGA UVC11A | Operating Instructions - Page 54
", haga clic en "Propiedades" (u "Opciones", dependiendo del sistema operativo que utilice). Aparecerá el cuadro de diálogo "Propiedades". 3 Seleccione "Sony PCGA-UVC11" en la lista Dispositivo Mezclador y a continuación, haga clic en "Aceptar". Aparecerá el cuadro de diálogo "Capturar". 22 ES - Sony PCGA UVC11A | Operating Instructions - Page 55
ófono de la cámara, según el sistema operativo que utilice. z Sugerencia Si utiliza el software Network Smart Capture, no hace falta que realice los siguientes procedimientos. Con el sistema operativo Windows XP 1 Haga clic en "Inicio" y, a continuación, haga clic en "Panel de control". Aparecerá la - Sony PCGA UVC11A | Operating Instructions - Page 56
"Audio", en "Grabación de sonido", seleccione "Sony PCGA-UVC11" de la lista "Dispositivo predeterminado". 5 Haga clic en "Aceptar" para cerrar el cuadro de diálogo "Propiedades de dispositivos de sonido y audio". Con el sistema operativo Windows Me 1 Haga clic en "Inicio", seleccione "Configuraci - Sony PCGA UVC11A | Operating Instructions - Page 57
4 En la parte inferior del cuadro de diálogo "Sonidos y propiedades multimedia", seleccione la casilla de verificación "Usar sólo dispositivos preferidos". 5 Haga clic en "Aceptar" para cerrar el cuadro de diálogo "Propiedades de Sonidos y multimedia". 25 ES - Sony PCGA UVC11A | Operating Instructions - Page 58
cámara cerca de una ventana o en exteriores. Funcionamiento • No retire el cable USB de la cámara cuando ésta esté en funcionamiento, ya que podría causar está firmemente pegada a la superficie del disco antes de utilizarlo. Sony no se hace responsable del mal funcionamiento del equipo ni de los da - Sony PCGA UVC11A | Operating Instructions - Page 59
otras sustancias que puedan dañar la superficie del disco. • No utilice limpiadores en discos vírgenes. Para quitar el polvo, utilice los limpiadores especiales para CD. • Es posible que no pueda grabar en los discos si la parte sin grabar tiene rayas o polvo. No dañe los discos. 27 ES - Sony PCGA UVC11A | Operating Instructions - Page 60
para la resolución de problemas de la Visual Communication Camera. Acerca de las opciones de soporte de Sony Sony proporciona distintas opciones de soporte para Cámara de Communicación Visual. Si desea realizar consultas acerca de la cámara y el software, consulte lo siguiente: ❑ En esta guía se - Sony PCGA UVC11A | Operating Instructions - Page 61
visual energía Aprox. 0,5 W Interfaz USB (energía suministrada directamente desde el ordenador VAIO) Conector USB de tipo A Dimensiones Aprox. 60 PCGA-UVC11A (CD-ROM × 1) • Adaptador de montaje (1) • Cinta adhesiva (3) • Manual de instrucciones (1) • Garantía (1)* • CONTRATO DE LICENCIA DE SOFTWARE - Sony PCGA UVC11A | Operating Instructions - Page 62
más información, consulte "Desinstalación del software" (página 10) e "Instalación del software y el controlador" (página 6). • El equipo no reconoce el concentrador raíz USB. c Vuelva a instalar el sistema operativo Windows correctamente. • No se puede utilizar USB. c Compruebe las propiedades del - Sony PCGA UVC11A | Operating Instructions - Page 63
de la CPU del equipo. Para obtener más información, consulte los manuales del equipo. Es posible que las imágenes se detengan durante unos del CPU es excesiva. • Varias aplicaciones de software se ejecutan a la vez. c Cierre una de las aplicaciones de software. • Según el modo de pantalla y el - Sony PCGA UVC11A | Operating Instructions - Page 64
tras desconectar el cable USB del conector USB, siga el procedimiento descrito en "Instalación del software y el controlador" (página 6) para instalar el controlador. Cierre todas las aplicaciones de software en uso y reinicie el equipo. Si no puede reiniciarlo, consulte los manuales del equipo y ap - Sony PCGA UVC11A | Operating Instructions - Page 65
blanco. Comparado con el fondo, el motivo está oscuro. Al utilizar el software NetMeeting, el audio se corta y se oye con dificultad. Puede ver el obtener información acerca de esta función, consulte la Ayuda incluida con el software Network Smart Capture. En función del entorno de red, es posible - Sony PCGA UVC11A | Operating Instructions - Page 66
ʕ˖ ᙆѓ d f d d f ᅺf • ӻ୕e f d f d f d f d f ͦ 2 CT - Sony PCGA UVC11A | Operating Instructions - Page 67
d d d f f ʧୗ d f f f f f CT z㕐ͪ f 3 CT - Sony PCGA UVC11A | Operating Instructions - Page 68
d f d f 4 CT - Sony PCGA UVC11A | Operating Instructions - Page 69
Τ၈ ࠦۃ ࠦܝ ˕ؐݖ ˕ݖ 5 CT - Sony PCGA UVC11A | Operating Instructions - Page 70
d f fί͉˖ʕd f d f d f d d f f d f f d f f d f d f 1 ͂කཥ໘f f dҪ f d f 2 f 3 d f z㕐ͪ d f 6 CT - Sony PCGA UVC11A | Operating Instructions - Page 71
4 d f z㕐ͪ d f d f 5 f f d f d f 1 f d f 2 d dί¨Ңٙ d f f f d d d f f 3 f f 4 d fઆٙ f f 5 f d f 7 CT - Sony PCGA UVC11A | Operating Instructions - Page 72
6 q f d f 7 f d f 8 f f f d f d d f d d f d ΅೮f d f d f 1 f d f 8 CT - Sony PCGA UVC11A | Operating Instructions - Page 73
2 d dί¨Ңٙ d f f f d d d f f 3 f f 4 d fઆٙ f f 5 f 6 d f f 7 f 8 f f f ৰழ d f ڝൗ d f d f 9 CT - Sony PCGA UVC11A | Operating Instructions - Page 74
1 f 2 d d f d d d f f 3 d ό©f d f e f 4 d d፯ d f d d d f d d d f f 5 f f 10 CT - Sony PCGA UVC11A | Operating Instructions - Page 75
f d f 1 d d f f 2 d f f 3 d d f f 4 d d್ f 5 d d ɨ¨ɨɓӉ©f 6 d f 7 d ࣘѰd f 8 f 9 f 11 CT - Sony PCGA UVC11A | Operating Instructions - Page 76
1 d d f f 2 d f f 3 d d f 4 f d f 12 CT - Sony PCGA UVC11A | Operating Instructions - Page 77
f d όձழf d f d f f f f d f˸הd d f d d d f 1 f ˕ݖ ˕ؐݖ ᜑͪࠦؐ 13 CT - Sony PCGA UVC11A | Operating Instructions - Page 78
2 f f z㕐ͪ d f d d f d f h h h h d f d d f 1 f d f್ܝd f d f 14 CT - Sony PCGA UVC11A | Operating Instructions - Page 79
2 f 3 f d d f ˕ؐݖ ˕ݖ ˕ؐݖ ˕ݖ ᜑͪࠦؐ 4 f f 15 CT - Sony PCGA UVC11A | Operating Instructions - Page 80
d f 1 d f d f 2 d ໄf 3 f f 16 CT - Sony PCGA UVC11A | Operating Instructions - Page 81
˥̻τༀ e d f 1 f d d f e f ˕ؐݖ ˕ݖ 2 f f 17 CT - Sony PCGA UVC11A | Operating Instructions - Page 82
f f d̴̙ঐึա Ցฦᕸf f d d f d d f d f d ໝf e d f d f d f 1 f 2 f 3 f f 18 CT - Sony PCGA UVC11A | Operating Instructions - Page 83
d fν؈આʔܲ d f d fʔཀd d d f 1 f 2 d f d f f d d f 19 CT - Sony PCGA UVC11A | Operating Instructions - Page 84
f d όձழf d f d f f d f f d f d f 1 f f d f 2 f 20 CT - Sony PCGA UVC11A | Operating Instructions - Page 85
3 f 4 f d f z㕐ͪ d f d f z㕐ͪ Էνd d f 21 CT - Sony PCGA UVC11A | Operating Instructions - Page 86
d f ᙲᅂዚ 22 CT ڝൗ d f 1 dɰ̙ ঐ݊㕐 f f 2 d ʔΝd f f 3 d ¨ᆽ֛©f f z㕐ͪ d f d f - Sony PCGA UVC11A | Operating Instructions - Page 87
4 f fν؈݊dሗৰ̴f 5 f f f d f d f d f z ͪ f 1 d f f 2 eႧࠪe f ¨ᑊࠪeႧࠪe f 3 f f 4 d d f 5 d f 23 CT - Sony PCGA UVC11A | Operating Instructions - Page 88
1 d d f f 2 f f z㕐ͪ d f 3 d d f 4 d ࿁༑˙෯f 1 d d f f 2 f f 3 d d f 4 d f 5 d ࿁༑˙෯f 24 CT - Sony PCGA UVC11A | Operating Instructions - Page 89
f f d d d f f d d f d d f f f f ᗝ᎘ f f ῡʔӪd d f f d f d f f f Ъ f f f f d d fщۆd f f f e৷e f f f d f 25 CT - Sony PCGA UVC11A | Operating Instructions - Page 90
ၪᚐ ᆎ̮ಠ f d e f e e f e e f f f d f f ᆎᗝ᎘ f ᆎΈဿ f f d f d f f 26 CT - Sony PCGA UVC11A | Operating Instructions - Page 91
ᐏ՟Ꮝп d f f vaio-online.sony.com/ f d m f f f f d f dၣѧ݊m http://www.sony.com/pcsupport . 27 CT - Sony PCGA UVC11A | Operating Instructions - Page 92
ࣸ f d d d d d d m ʔΝϾᜊʷf Ъุᐑྤ d d f 28 CT - Sony PCGA UVC11A | Operating Instructions - Page 93
ဲᗭરৰ d f d f d f f f f c d f f c d d f d f f c d f d f f c f f c f d f c f d d f d f c f d d fʔཀd f d f d Ѝٙᕏৃf f c f f c f 29 CT - Sony PCGA UVC11A | Operating Instructions - Page 94
f d e f f d f d f d d f f d f d f d f f f c f d f fʔཀd f f f f c f d d f c d f d f f d d f f d f d f f c d್ܝd d f 30 CT - Sony PCGA UVC11A | Operating Instructions - Page 95
d f d f f d d f f f ၾߠ౻ˢd d d f f d d f c d όf c d d f f d f d f d f d d d f c d f eஈଣࠋ༱e d f d d f c dਗ਼ึІਗ f Էνd d f d f d f f d d f c d f c d f 31 CT - Sony PCGA UVC11A | Operating Instructions - Page 96
• Sony, VAIO, , Eco Info Sony Corporation • Microsoft 및 Windows 에 있는 Microsoft Corporation 니다. Microsoft® Windows® 2000 Professional은 Windows 2000 Microsoft® Windows® Millennium Edition은 Windows Me Microsoft® Windows® XP Home Edition 및 Microsoft® Windows® XP - Sony PCGA UVC11A | Operating Instructions - Page 97
Windows 2000, Windows Me, Windows XP Sony VAIO Windows XP Sony Corporation Windows XP VAIO Windows XP 처음에 Network Smart Capture Web Camera Windows Messenger 또는 NetMeeting KR z 힌트 Network Smart Capture 3 KR - Sony PCGA UVC11A | Operating Instructions - Page 98
Sony Sony PCGA-UVC11A) • PCGA-UVC11A CD-ROM) 4 KR - Sony PCGA UVC11A | Operating Instructions - Page 99
앞면 뒷면 CAPTURE 버튼 리어 암 5 KR - Sony PCGA UVC11A | Operating Instructions - Page 100
USB Sony VAIO PCGSRX55TC/SRX55TH/SRX55TL/VX89/VX89P LAN Sony는 PCGA-UVC11A USB LAN http://www.vaio-online.sony.co.kr PCGA-UVC11A Network Smart Capture 주의점 Windows 2000 Administrator Windows XP 1 Windows CDROM Sony Visual Communication Camera PCGA-UVC11A Application Installer - Sony PCGA UVC11A | Operating Instructions - Page 101
3 Next z 힌트 4 Next" 또는 "Previous z 힌트 Yes 5 Yes Windows 1 13 2 Windows XP 4 Windows XP 3 4 7 KR - Sony PCGA UVC11A | Operating Instructions - Page 102
5 Sony Visual Communication Camera PCGA-UVC11 6 Sony USB Microphone (PCGA-UVC11 7 USB Sony Visual Communication Camera (PCGA-UVC11 8 Windows 2000 Administrator Windows XP 1 13 8 KR - Sony PCGA UVC11A | Operating Instructions - Page 103
2 Windows XP 4 Windows XP 3 4 5 USB 6 "Sony Visual Communication Camera (PCGA-UVC11)" 또는 "USB Composite 7 8 Network Smart Capture 주의점 Windows 2000 Administrator Windows XP 9 KR - Sony PCGA UVC11A | Operating Instructions - Page 104
1 Network Smart Capture 2 Windows XP 3 Windows XP 4 Windows XP Network Smart Capture Windows Me Network Smart Capture Windows 2000 Network Smart Capture 5 10 KR - Sony PCGA UVC11A | Operating Instructions - Page 105
무선 LAN PCG-SRX55TC/SRX55TH/SRX55TL/VX89/VX89P 1 2 3 ORiNOCO Mini PCI Card 4 5 6 7 CD-ROM에서 UPDATE\WirelessLAN 8 9 11 KR - Sony PCGA UVC11A | Operating Instructions - Page 106
무선 LAN 1 2 3 ORiNOCO Mini PCI Card 4 7.16.0.189 12 KR - Sony PCGA UVC11A | Operating Instructions - Page 107
6 Windows USB USB USB USB USB LCD 1 리어 암 13 KR - Sony PCGA UVC11A | Operating Instructions - Page 108
2 USB USB USB z 힌트 14 16 17 18 1 14 KR - Sony PCGA UVC11A | Operating Instructions - Page 109
2 3 암 4 USB USB USB 15 KR - Sony PCGA UVC11A | Operating Instructions - Page 110
LCD 1 2 3 USB USB USB 16 KR - Sony PCGA UVC11A | Operating Instructions - Page 111
CRT 1 리어 암 2 USB USB USB 17 KR - Sony PCGA UVC11A | Operating Instructions - Page 112
7 mm 7 mm USB 1 2 3 USB USB USB 18 KR - Sony PCGA UVC11A | Operating Instructions - Page 113
1 USB 1 2 USB USB 19 KR - Sony PCGA UVC11A | Operating Instructions - Page 114
6 USB DVgate Motion DVgate Motion USB USB Network Smart Capture Network Smart Capture 6 Network Smart Capture 1 USB 13 2 Network Smart Capture 20 KR - Sony PCGA UVC11A | Operating Instructions - Page 115
3 4 CAPTURE z 힌트 Network Smart Capture Network Smart Capture z 힌트 Network Smart Capture 21 KR - Sony PCGA UVC11A | Operating Instructions - Page 116
카메라 1 2 22 KR - Sony PCGA UVC11A | Operating Instructions - Page 117
3 Mixer Sony PCGA-UVC11 Capture z 힌트 "Capture 7 4 5 순서 4 z 힌트 Network Smart Capture Windows XP 1 2 3 23 KR - Sony PCGA UVC11A | Operating Instructions - Page 118
4 Sony PCGA-UVC11 5 Windows Me 1 2 z 힌트 3 Sony PCGA-UVC11 4 Windows 2000 1 2 3 Sony PCGA-UVC11 4 5 24 KR - Sony PCGA UVC11A | Operating Instructions - Page 119
렌즈 Sony 조작 USB 25 KR - Sony PCGA UVC11A | Operating Instructions - Page 120
손질법 CD 26 KR - Sony PCGA UVC11A | Operating Instructions - Page 121
Sony Sony Sony ❑ VAIO Support Center Sony VAIO Support Center (080-777-2000, 02-3273-2000 ❑ VAIO Support Center VAIO Support Center [email protected] ❑ VAIO vaio-online.sony.co.kr 27 KR - Sony PCGA UVC11A | Operating Instructions - Page 122
, 352 × 288 최대: 30 약 220° 약 0.5 W USB(VAIO 커넥터 USB A 타입 60 × 34 × 33 mm (W × H × D 100 cm 중량 약 43 g(본체만) 5°C ~ 35°C (시간당 10°C 20% ~ 80 35°C에서 65 29°C 20°C ~ 60°C (시간당 10°C 10% ~ 90 60°C에서 20 35°C 미만) • PCGA-UVC11A CD-ROM × 1) 1 3 1 1) 28 KR - Sony PCGA UVC11A | Operating Instructions - Page 123
Sony 27 Network Smart Capture • USB c c 6 c 8 6 USB c Windows • USB c USB USB c 포트에 500 mA USB USB USB USB c c c 29 KR - Sony PCGA UVC11A | Operating Instructions - Page 124
증상 Fn USB Fn 22페이지). • Network Smart Capture Network Smart Capture c CPU • Fn • CPU c c 22페이지). 6 23 c USB USB 6 30 KR - Sony PCGA UVC11A | Operating Instructions - Page 125
Windows LCD CAPTURE CAPTURE NetMeeting c c Network Smart Capture 설정의 "White Balance"에서 "Hold Network Smart Capture c Network Smart Capture 설정 "White Balance"에 서 "Auto CPU CAPTURE Network Smart Capture 설정 "Shutter - Sony PCGA UVC11A | Operating Instructions - Page 126
증상 c c 32 KR - Sony PCGA UVC11A | Operating Instructions - Page 127
33 KR - Sony PCGA UVC11A | Operating Instructions - Page 128
http://www.sony.net/ 2004 Sony Corporation / Printed in Japan 2-023-529-11(1) Printed on 100% recycled paper using VOC (Volatile Organic Compound)-free vegetable oil based ink.
-
 1
1 -
 2
2 -
 3
3 -
 4
4 -
 5
5 -
 6
6 -
 7
7 -
8
-
9
-
10
-
11
-
12
-
13
-
14
-
15
-
16
-
17
-
18
-
19
-
20
-
21
-
22
-
23
-
24
-
25
-
26
-
27
-
28
-
29
-
30
-
31
-
32
-
33
-
34
-
35
-
36
-
37
-
38
-
39
-
40
-
41
-
42
-
43
-
44
-
45
-
46
-
47
-
48
-
49
-
50
-
51
-
52
-
53
-
54
-
55
-
56
-
57
-
58
-
59
-
60
-
61
-
62
-
63
-
64
-
65
-
66
-
67
-
68
-
69
-
70
-
71
-
72
-
73
-
74
-
75
-
76
-
77
-
78
-
79
-
80
-
81
-
82
-
83
-
84
-
85
-
86
-
87
-
88
-
89
-
90
-
91
-
92
-
93
-
94
-
95
-
96
-
97
-
98
-
99
-
100
-
101
-
102
-
103
-
104
-
105
-
106
-
107
-
108
-
109
-
110
-
111
-
112
-
113
-
114
-
115
-
116
-
117
-
118
-
119
-
120
-
121
-
122
-
123
-
124
-
125
-
126
-
127
-
128
 |
 |
Visual Communication Camera
PCGA-UVC11A
Operating Instructions / Manual de instrucciones
/
IMPORTANTE!
POR FAVOR LEA DETALLADAMENTE ESTE MANUAL DE
INSTRUCCIONES ANTES DE CONECTAR Y OPERAR ESTE
EQUIPO.
RECUERDE QUE UN MAL USO DE SU APARATO PODRIA
ANULAR LA GARANTIA.