Sony RDR-GX360 Operating Instructions - Page 42
Place a DATA CD/DATA DVD on the disc, Playing JPEG image files
 |
UPC - 027242735507
View all Sony RDR-GX360 manuals
Add to My Manuals
Save this manual to your list of manuals |
Page 42 highlights
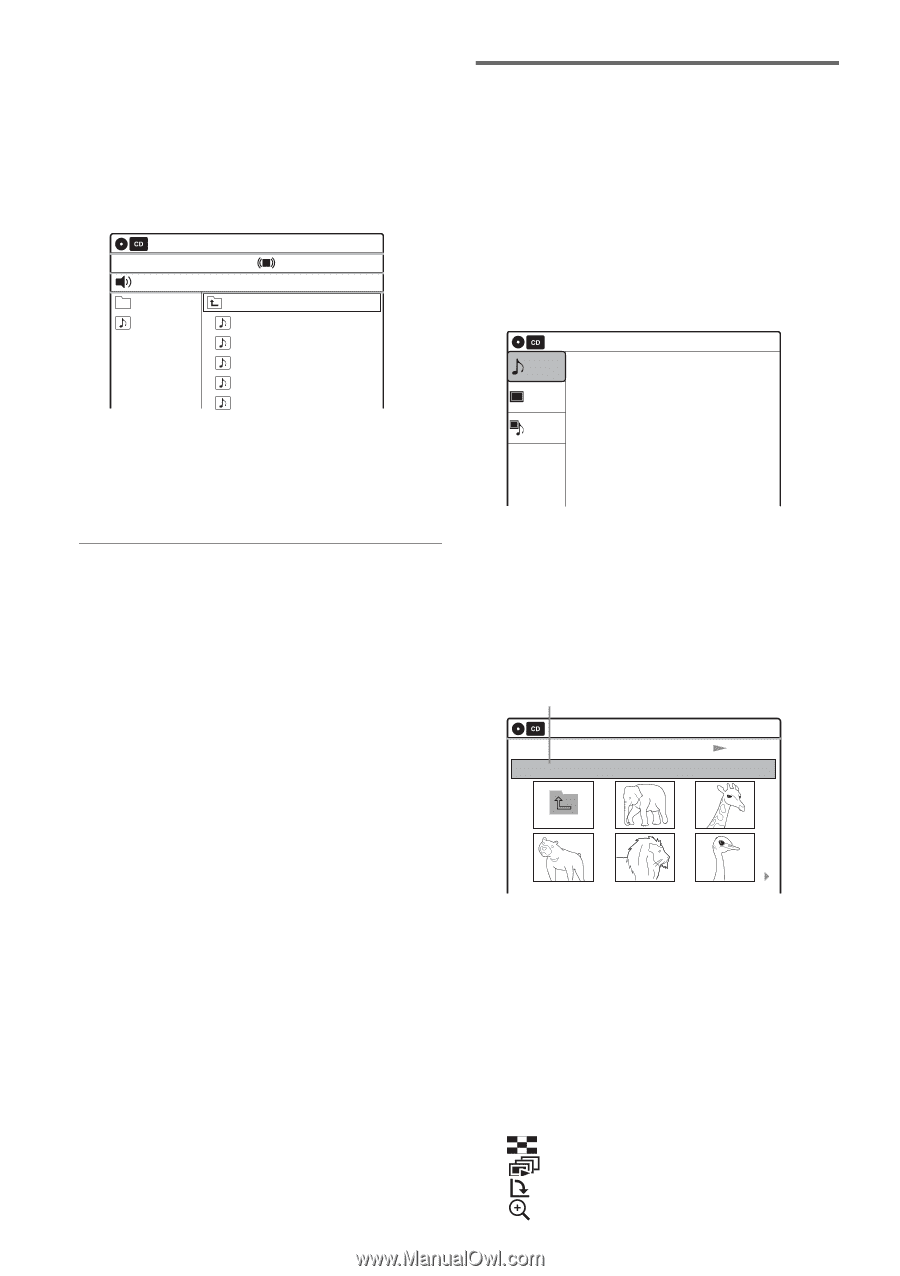
If you insert a DATA CD/DATA DVD containing only MP3 audio tracks, the "Music" display appears. Go to step 4. 2 Select "Music," and press ENTER. The "Music" display appears. 3 Select an album, and press ENTER. Music MP3_001 0/9 10:10 AM Surround:Off Stop 00:00:00 Prev Directory 01-Track1.mp3 02-Track2.mp3 03-Track3.mp3 04-Track4.mp3 05-Track5.mp3 4 Select a track, and press ENTER. Playback starts from the selected track. When a track or album is being played, the title is shown in a box. To stop playback Press x STOP. To pause playback Press X PAUSE. To restart playback, press H PLAY or X PAUSE. To return to the previous display Press O RETURN. To switch between MP3 audio tracks and JPEG image files Press x STOP, and press TOP MENU. z Hint When playback of all the MP3 audio tracks within the album finishes, the recorder stops. 42US Playing JPEG image files You can play JPEG image files on DATA CDs or DATA DVDs. 1 Place a DATA CD/DATA DVD on the disc tray. When you insert a DATA CD/DATA DVD containing MP3 audio tracks and JPEG image files, the display for selecting a media type appears. When you select "Mix," you can enjoy a slide show with sound (page 43). Music Photo Mix 10:10 AM Press ENTER : Music menu for this disc. If you insert a DATA CD/DATA DVD containing only JPEG image files, the "Photo" display appears. Go to step 3. 2 Select "Photo," and press ENTER. The "Photo" display appears. 3 Select a folder, and press ENTER. Directory information Photo \abc\defg 10:10 AM Slideshow Page 1 / 2 To display the previous or next page, press . PREV/> NEXT. 4 Select an image file, and press ENTER. The selected image is displayed over the entire screen. To display the previous or next image, press . PREV/> NEXT. The following menu icons appear in the upper part of the screen. : Returns to the "Photo" display. : Starts the slide show (page 43). : Rotates the image (page 43). : Zooms the image (page 43).
-
 1
1 -
2
-
3
-
4
-
5
-
6
-
7
-
8
-
9
-
10
-
11
-
12
-
13
-
14
-
15
-
16
-
17
-
18
-
19
-
20
-
21
-
22
-
23
-
24
-
25
-
26
-
27
-
28
-
29
-
30
-
31
-
32
-
33
-
34
-
35
-
36
-
 37
37 -
 38
38 -
 39
39 -
 40
40 -
 41
41 -
 42
42 -
 43
43 -
 44
44 -
 45
45 -
 46
46 -
 47
47 -
48
-
49
-
50
-
51
-
52
-
53
-
54
-
55
-
56
-
57
-
58
-
59
-
60
-
61
-
62
-
63
-
64
-
65
-
66
-
67
-
68
-
69
-
70
-
71
-
72
-
73
-
74
-
75
-
76
-
77
-
78
-
79
-
80
-
81
-
82
-
83
-
84
-
85
-
86
-
87
-
88
-
89
-
90
-
91
-
92
-
93
-
94
-
95
-
96
-
97
-
98
-
99
-
100
-
101
-
102
-
103
-
104
-
105
-
106
-
107
-
108
-
109
-
110
-
111
-
112
-
113
-
114
-
115
-
116
-
117
-
118
-
119
-
120
-
121
-
122
-
123
-
124
-
125
-
126
-
127
-
128
 |
 |