Sony RDR-GX360 Operating Instructions - Page 74
Press ONE-TOUCH DUBBING on the, Select Start, and press ENTER.
 |
UPC - 027242735507
View all Sony RDR-GX360 manuals
Add to My Manuals
Save this manual to your list of manuals |
Page 74 highlights
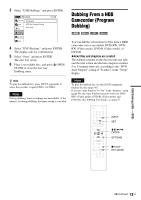
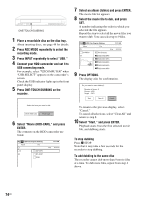
REC ONE-TOUCH DUBBING 1 Place a recordable disc on the disc tray. About inserting discs, see page 49 for details. 2 Press REC MODE repeatedly to select the recording mode. 3 Press INPUT repeatedly to select "USB." 4 Connect your HDD camcorder and set it to USB connecting mode. For example, select " COMPUTER" when "USB SELECT" appears on the camcorder's screen. Check the USB indicator lights up in the front panel display. 5 Press ONE-TOUCH DUBBING on the recorder. 7 Select an album (folder) and press ENTER. The movie file list appears. 8 Select the movie file to dub, and press SET. A number indicating the order in which you selected the file appears. Repeat the step to select all the movie files you want to dub. You can select up to 9 files. USB HDD-Cam Program Dubbing 10:10 AM Album File Stop 00:00:00 101PNV01 Prev Directory 0/0 M2U00026.MPG 2 M2U00027.MPG 1 M2U00028.MPG M2U00029.MPG M2U00030.MPG 9 Press OPTIONS. The display asks for confirmation. Do you want to start dubbing? Number of items : 2 Source : USB Target : DVD Start Clear All Cancel Select the item you want to dub. Movie (HDD-Cam) Photo Copy 6 Select "Movie (HDD-CAM)," and press ENTER. The contents on the HDD camcorder are listed. USB HDD-Cam Program Dubbing Album File AVF_INFO / 0/0 MP_ROOT DCIM 10:10 AM Stop 00:00:00 To return to the previous display, select "Cancel." To cancel all selections, select "Clear All" and return to step 8. 10 Select "Start," and press ENTER. Playback starts from the first selected movie file, and dubbing starts. To stop dubbing Press x STOP. Note that it may take a few seconds for the recorder to stop dubbing. To add dubbing to the same disc The recorder cannot dub more than 9 movie files at a time. To dub more files, repeat from step 4 above. 74US
-
 1
1 -
2
-
3
-
4
-
5
-
6
-
7
-
8
-
9
-
10
-
11
-
12
-
13
-
14
-
15
-
16
-
17
-
18
-
19
-
20
-
21
-
22
-
23
-
24
-
25
-
26
-
27
-
28
-
29
-
30
-
31
-
32
-
33
-
34
-
35
-
36
-
37
-
38
-
39
-
40
-
41
-
42
-
43
-
44
-
45
-
46
-
47
-
48
-
49
-
50
-
51
-
52
-
53
-
54
-
55
-
56
-
57
-
58
-
59
-
60
-
61
-
62
-
63
-
64
-
65
-
66
-
67
-
68
-
 69
69 -
 70
70 -
 71
71 -
 72
72 -
 73
73 -
 74
74 -
 75
75 -
 76
76 -
 77
77 -
 78
78 -
 79
79 -
80
-
81
-
82
-
83
-
84
-
85
-
86
-
87
-
88
-
89
-
90
-
91
-
92
-
93
-
94
-
95
-
96
-
97
-
98
-
99
-
100
-
101
-
102
-
103
-
104
-
105
-
106
-
107
-
108
-
109
-
110
-
111
-
112
-
113
-
114
-
115
-
116
-
117
-
118
-
119
-
120
-
121
-
122
-
123
-
124
-
125
-
126
-
127
-
128
 |
 |
