Sony SLT-A37M User Manual - Page 183
After the cleaning is finished, sensor surface and
 |
View all Sony SLT-A37M manuals
Add to My Manuals
Save this manual to your list of manuals |
Page 183 highlights
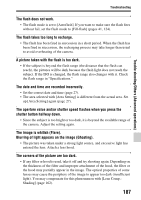
Cleaning (Advanced operations) Cleaning the image sensor 4 Use the blower to clean the image sensor surface and the surrounding area. • Do not touch the image sensor with the tip of the blower and do not put the tip of a blower into the cavity beyond the mount. • Hold the camera's face downward to prevent the dust from resettling in the camera. Complete the cleaning quickly. • Also clean the back of the mirror using a blower. 5 After the cleaning is finished, lower the mirror with a finger until it clicks. • Lower the frame of the mirror back down with a finger. Be careful not to touch the surface of the mirror. • Lower the mirror down until it locks firmly. 6 Attach the lens and turn the camera off. • Confirm that the mirror is locked down firmly when you attach the lens. Notes • After the cleaning is finished, confirm that the mirror is locked down firmly when you attach the lens. Otherwise, the lens may be scratched or this may be the cause of additional trouble. Also, if the mirror is not locked down firmly, the autofocus does not work during shooting. • You cannot shoot while the mirror is lifted up. 183
-
 1
1 -
2
-
3
-
4
-
5
-
6
-
7
-
8
-
9
-
10
-
11
-
12
-
13
-
14
-
15
-
16
-
17
-
18
-
19
-
20
-
21
-
22
-
23
-
24
-
25
-
26
-
27
-
28
-
29
-
30
-
31
-
32
-
33
-
34
-
35
-
36
-
37
-
38
-
39
-
40
-
41
-
42
-
43
-
44
-
45
-
46
-
47
-
48
-
49
-
50
-
51
-
52
-
53
-
54
-
55
-
56
-
57
-
58
-
59
-
60
-
61
-
62
-
63
-
64
-
65
-
66
-
67
-
68
-
69
-
70
-
71
-
72
-
73
-
74
-
75
-
76
-
77
-
78
-
79
-
80
-
81
-
82
-
83
-
84
-
85
-
86
-
87
-
88
-
89
-
90
-
91
-
92
-
93
-
94
-
95
-
96
-
97
-
98
-
99
-
100
-
101
-
102
-
103
-
104
-
105
-
106
-
107
-
108
-
109
-
110
-
111
-
112
-
113
-
114
-
115
-
116
-
117
-
118
-
119
-
120
-
121
-
122
-
123
-
124
-
125
-
126
-
127
-
128
-
129
-
130
-
131
-
132
-
133
-
134
-
135
-
136
-
137
-
138
-
139
-
140
-
141
-
142
-
143
-
144
-
145
-
146
-
147
-
148
-
149
-
150
-
151
-
152
-
153
-
154
-
155
-
156
-
157
-
158
-
159
-
160
-
161
-
162
-
163
-
164
-
165
-
166
-
167
-
168
-
169
-
170
-
171
-
172
-
173
-
174
-
175
-
176
-
177
-
 178
178 -
 179
179 -
 180
180 -
 181
181 -
 182
182 -
 183
183 -
 184
184 -
 185
185 -
 186
186 -
 187
187 -
 188
188 -
189
-
190
-
191
-
192
-
193
-
194
-
195
-
196
-
197
-
198
-
199
-
200
-
201
-
202
-
203
-
204
-
205
-
206
-
207
-
208
-
209
 |
 |
