Sony STR-DA5300ES Operating Instructions (Large File - 21.32 MB) - Page 11
RM-AAL008, Remote commander - video
 |
View all Sony STR-DA5300ES manuals
Add to My Manuals
Save this manual to your list of manuals |
Page 11 highlights
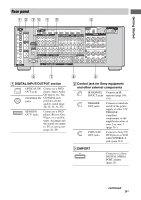
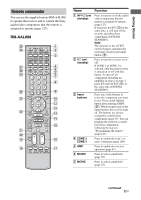
Getting Started Remote commander You can use the supplied remote RM-AAL008 to operate the receiver and to control the Sony audio/video components that the remote is assigned to operate (page 127). RM-AAL008 Name A AV ?/1 (on/ standby) B ?/1 (on/ standby) C Input buttons D ZONE 2 ZONE 3 E AMP F MUSIC G MOVIE Function Press to turn on or off the audio/ video components that the remote is assigned to operate (page 127). If you press the ?/1 (B) at the same time, it will turn off the receiver and other Sony components (SYSTEM STANDBY). Note The function of the AV ?/1 switch changes automatically each time you press the input button (C). Press to turn the receiver on or off. If ZONE 2 or ZONE 3 is selected, only the main receiver is turned on or off with this button. To turn off all components including an amplifier in zone 2 or zone 3, press ?/1 and AV ?/1 (A) at the same time (SYSTEM STANDBY). Press one of the buttons to select the component you want to use. Press a pink-labeled button after pressing SHIFT (wj). When you press any of the input buttons, the receiver turns on. The buttons are factory assigned to control Sony components (page 53). You can program the remote to control non-Sony components following the steps in "Programming the remote" (page 127). Press to enable the zone 2 or zone 3 operation (page 108). Press to enable the receiver operation (page 41). Press to select sound field (page 67). Press to select sound field (page 67). continued 11GB
-
 1
1 -
2
-
3
-
4
-
5
-
 6
6 -
 7
7 -
 8
8 -
 9
9 -
 10
10 -
 11
11 -
 12
12 -
 13
13 -
 14
14 -
 15
15 -
 16
16 -
17
-
18
-
19
-
20
-
21
-
22
-
23
-
24
-
25
-
26
-
27
-
28
-
29
-
30
-
31
-
32
-
33
-
34
-
35
-
36
-
37
-
38
-
39
-
40
-
41
-
42
-
43
-
44
-
45
-
46
-
47
-
48
-
49
-
50
-
51
-
52
-
53
-
54
-
55
-
56
-
57
-
58
-
59
-
60
-
61
-
62
-
63
-
64
-
65
-
66
-
67
-
68
-
69
-
70
-
71
-
72
-
73
-
74
-
75
-
76
-
77
-
78
-
79
-
80
-
81
-
82
-
83
-
84
-
85
-
86
-
87
-
88
-
89
-
90
-
91
-
92
-
93
-
94
-
95
-
96
-
97
-
98
-
99
-
100
-
101
-
102
-
103
-
104
-
105
-
106
-
107
-
108
-
109
-
110
-
111
-
112
-
113
-
114
-
115
-
116
-
117
-
118
-
119
-
120
-
121
-
122
-
123
-
124
-
125
-
126
-
127
-
128
-
129
-
130
-
131
-
132
-
133
-
134
-
135
-
136
-
137
-
138
-
139
-
140
-
141
-
142
-
143
-
144
-
145
-
146
-
147
-
148
-
149
-
150
-
151
-
152
-
153
-
154
-
155
-
156
-
157
-
158
-
159
-
160
-
161
-
162
-
163
-
164
-
165
-
166
-
167
-
168
-
169
-
170
-
171
-
172
-
173
-
174
-
175
-
176
-
177
-
178
-
179
-
180
-
181
-
182
-
183
-
184
-
185
-
186
-
187
-
188
-
189
-
190
-
191
-
192
-
193
-
194
-
195
-
196
-
197
-
198
-
199
-
200
-
201
-
202
-
203
-
204
-
205
-
206
-
207
-
208
-
209
-
210
-
211
-
212
-
213
-
214
-
215
-
216
-
217
-
218
-
219
-
220
-
221
-
222
-
223
-
224
-
225
-
226
-
227
-
228
-
229
-
230
-
231
-
232
-
233
-
234
-
235
-
236
-
237
-
238
-
239
-
240
-
241
-
242
-
243
-
244
-
245
-
246
-
247
-
248
-
249
-
250
-
251
-
252
-
253
-
254
-
255
-
256
-
257
-
258
-
259
-
260
-
261
-
262
-
263
-
264
-
265
-
266
-
267
-
268
-
269
-
270
-
271
-
272
-
273
-
274
-
275
-
276
-
277
-
278
-
279
-
280
-
281
-
282
-
283
-
284
-
285
-
286
-
287
-
288
-
289
-
290
-
291
-
292
-
293
-
294
-
295
-
296
-
297
-
298
-
299
-
300
-
301
-
302
-
303
-
304
-
305
-
306
-
307
-
308
-
309
-
310
 |
 |
