Sony STR-DA5300ES Operating Instructions (Large File - 21.32 MB) - Page 33
Connecting components with, analog video and audio jack, Audio cord not supplied
 |
View all Sony STR-DA5300ES manuals
Add to My Manuals
Save this manual to your list of manuals |
Page 33 highlights
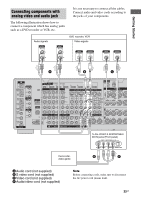
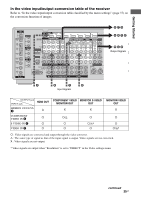
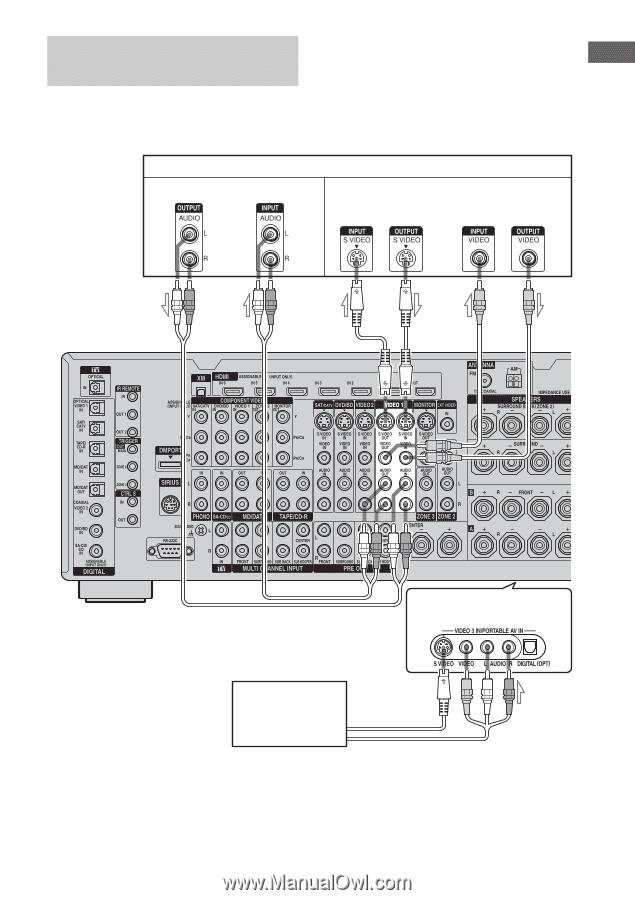
Getting Started Connecting components with analog video and audio jack The following illustration shows how to connect a component which has analog jacks such as a DVD recorder or VCR, etc. It is not necessary to connect all the cables. Connect audio and video cords according to the jacks of your components. Audio signals DVD recorder, VCR Video signals A B C To the VIDEO 3 IN/PORTABLE AV IN jacks (Front panel) Camcorder, B D video game A Audio cord (not supplied) B S video cord (not supplied) C Video cord (not supplied) D Audio/video cord (not supplied) Note Before connecting cords, make sure to disconnect the AC power cord (mains lead). 33GB
-
 1
1 -
2
-
3
-
4
-
5
-
6
-
7
-
8
-
9
-
10
-
11
-
12
-
13
-
14
-
15
-
16
-
17
-
18
-
19
-
20
-
21
-
22
-
23
-
24
-
25
-
26
-
27
-
 28
28 -
 29
29 -
 30
30 -
 31
31 -
 32
32 -
 33
33 -
 34
34 -
 35
35 -
 36
36 -
 37
37 -
 38
38 -
39
-
40
-
41
-
42
-
43
-
44
-
45
-
46
-
47
-
48
-
49
-
50
-
51
-
52
-
53
-
54
-
55
-
56
-
57
-
58
-
59
-
60
-
61
-
62
-
63
-
64
-
65
-
66
-
67
-
68
-
69
-
70
-
71
-
72
-
73
-
74
-
75
-
76
-
77
-
78
-
79
-
80
-
81
-
82
-
83
-
84
-
85
-
86
-
87
-
88
-
89
-
90
-
91
-
92
-
93
-
94
-
95
-
96
-
97
-
98
-
99
-
100
-
101
-
102
-
103
-
104
-
105
-
106
-
107
-
108
-
109
-
110
-
111
-
112
-
113
-
114
-
115
-
116
-
117
-
118
-
119
-
120
-
121
-
122
-
123
-
124
-
125
-
126
-
127
-
128
-
129
-
130
-
131
-
132
-
133
-
134
-
135
-
136
-
137
-
138
-
139
-
140
-
141
-
142
-
143
-
144
-
145
-
146
-
147
-
148
-
149
-
150
-
151
-
152
-
153
-
154
-
155
-
156
-
157
-
158
-
159
-
160
-
161
-
162
-
163
-
164
-
165
-
166
-
167
-
168
-
169
-
170
-
171
-
172
-
173
-
174
-
175
-
176
-
177
-
178
-
179
-
180
-
181
-
182
-
183
-
184
-
185
-
186
-
187
-
188
-
189
-
190
-
191
-
192
-
193
-
194
-
195
-
196
-
197
-
198
-
199
-
200
-
201
-
202
-
203
-
204
-
205
-
206
-
207
-
208
-
209
-
210
-
211
-
212
-
213
-
214
-
215
-
216
-
217
-
218
-
219
-
220
-
221
-
222
-
223
-
224
-
225
-
226
-
227
-
228
-
229
-
230
-
231
-
232
-
233
-
234
-
235
-
236
-
237
-
238
-
239
-
240
-
241
-
242
-
243
-
244
-
245
-
246
-
247
-
248
-
249
-
250
-
251
-
252
-
253
-
254
-
255
-
256
-
257
-
258
-
259
-
260
-
261
-
262
-
263
-
264
-
265
-
266
-
267
-
268
-
269
-
270
-
271
-
272
-
273
-
274
-
275
-
276
-
277
-
278
-
279
-
280
-
281
-
282
-
283
-
284
-
285
-
286
-
287
-
288
-
289
-
290
-
291
-
292
-
293
-
294
-
295
-
296
-
297
-
298
-
299
-
300
-
301
-
302
-
303
-
304
-
305
-
306
-
307
-
308
-
309
-
310
 |
 |
33
GB
Getting Started
The following illustration shows how to
connect a component which has analog jacks
such as a DVD recorder or VCR, etc.
It is not necessary to connect all the cables.
Connect audio and video cords according to
the jacks of your components.
Connecting components with
analog video and audio jack
DVD recorder, VCR
A
To the VIDEO 3 IN/PORTABLE
AV IN jacks (Front panel)
B
B
A
Audio cord (not supplied)
B
S video cord (not supplied)
C
Video cord (not supplied)
D
Audio/video cord (not supplied)
Audio signals
Video signals
Camcorder,
video game
Note
Before connecting cords, make sure to disconnect
the AC power cord (mains lead).
C
D