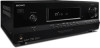
Sony STR-DH520 Operating Instructions
Sony STR-DH520 Manual
 |
UPC - 027242809369
View all Sony STR-DH520 manuals
Add to My Manuals
Save this manual to your list of manuals |
Sony STR-DH520 manual content summary:
- Sony STR-DH520 | Operating Instructions - Page 1
4-263-361-11(1) Multi Channel AV Receiver Operating Instructions STR-DH520 ©2011 Sony Corporation - Sony STR-DH520 | Operating Instructions - Page 2
operation. For customers in the United States Owner's Record The model and serial numbers are located on the rear of the unit. Record these numbers in the space provided below. Refer to them whenever you call upon your Sony dealer regarding this product. Model No. Serial No. This symbol is - Sony STR-DH520 | Operating Instructions - Page 3
not expressly approved in this manual could void your authority to operate this equipment. To reduce the risk of electric shock, the speaker cord should be connected to the apparatus and the speakers in accordance with the following instructions. 1) Disconnect the AC power cord from the MAINS - Sony STR-DH520 | Operating Instructions - Page 4
European countries with separate collection systems) About This Manual • The instructions in this manual are for model STR-DH520. The model number is located at the lower right front panel of the receiver. The illustrations used in this manual are of Europe model and they may be different from your - Sony STR-DH520 | Operating Instructions - Page 5
digital and analog audio (INPUT MODE 51 Using the sound/images from other inputs 51 Using the setting menu 53 Using the Remote Control Reassigning the input button 61 Resetting the input buttons 62 Additional Information Precautions 63 Troubleshooting 64 Specifications 69 Index 71 5GB - Sony STR-DH520 | Operating Instructions - Page 6
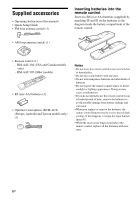
Supplied accessories • Operating Instructions (this manual) • Quick Setup Guide • FM wire antenna (aerial) (1) • AM loop antenna (aerial) (1) Inserting batteries into the remote control Insert two R6 (size AA) batteries (supplied) by matching 3 and # on the batteries to the diagram inside the - Sony STR-DH520 | Operating Instructions - Page 7
C Display panel (page 8) D Remote control sensor Receives signals from remote control. E MASTER VOLUME (page 36, 37) F MUTING (page 37) G DIMMER Adjusts the brightness of the display panel in 3 levels. H DISPLAY (page 38) I 2CH/A.DIRECT, A.F.D., MOVIE/HD-D.C.S., MUSIC (page 43) J TUNING MODE, TUNING - Sony STR-DH520 | Operating Instructions - Page 8
up when the disc being played back contains an LFE (Low Frequency Effect) channel and the LFE channel signal is actually being reproduced. D Input indicator Lights up to indicate the current input. HDMI - The INPUT MODE is set to "AUTO", and when the receiver recognizes the equipment connected via - Sony STR-DH520 | Operating Instructions - Page 9
on the speaker pattern setting. H Dolby Digital Surround indicator Lights up the respective indicator when the receiver is receiver tunes to a radio station. ST Stereo broadcast RDS (Europe, Australia and Taiwan models only) Tuned to a station with RDS services. Preset station number (The number - Sony STR-DH520 | Operating Instructions - Page 10
21, 26, 28) White (L) AUDIO IN/OUT Red (R) Black AUDIO OUT PORTABLE IN 4 B Video signal section* The image quality depends on the connecting jack. DIGITAL INPUT/OUTPUT jacks (page 21, 24, 25, 26, 27) HDMI IN/OUT COMPONENT VIDEO INPUT/OUTPUT jacks (page 21, 24, 26) Green (Y) Blue (PB) Red (PR - Sony STR-DH520 | Operating Instructions - Page 11
section 0 (Europe, Australia and Taiwan models only) (page 31) ql qa AUTO CAL MIC jack qs Remote control qd Use the supplied remote control to operate this receiver and other equipment. The remote control is assigned to operate Sony audio/ qk qf video equipment. You can reassign the - Sony STR-DH520 | Operating Instructions - Page 12
the receiver on or sets it to standby mode. Saving the power in standby mode When "CTRL.HDMI" is set to "CTRL OFF" (page 56). C Input buttons** Selects the equipment you want to use. When you press any of the input buttons, the receiver turns on. The buttons are assigned to control Sony equipment - Sony STR-DH520 | Operating Instructions - Page 13
the current TV program. / (Info/Text reveal) Displays information such as current channel number and screen mode. Reveals hidden information (e.g. answers to a quiz) while in the text mode. H Color buttons Displays an operation guide on the TV screen when the color buttons are available. Follow the - Sony STR-DH520 | Operating Instructions - Page 14
+/- or +/- Adjusts the TV volume. R MUTING or Activates the TV's muting function. S RETURN/EXIT O Returns to the previous TV menu. T GUIDE or Display the on-screen program guide. V AUDIO** or ** Changes the dual sound mode. Z INPUT or (Input select) Selects the input signal (TV or video). (Text hold - Sony STR-DH520 | Operating Instructions - Page 15
function of the AV ?/1 (A) changes automatically each time you press the input buttons (C). **The 5/TV, AUDIO/ , N and TV CH +/ SOUND FIELD +/PROG +/c buttons have tactile dots. Use the tactile dots as references when operating the receiver. VCR Power Channel Enter - Display - - Enter Select - Menu - Sony STR-DH520 | Operating Instructions - Page 16
you connect your video equipment via HDMI connection if they have HDMI jacks. HDMI COMPONENT VIDEO Y PB/CB PR/CR VIDEO Digital Analog High quality image Connecting the audio equipment (page 28) Setting the audio output settings on the connected equipment To output multi channel digital audio - Sony STR-DH520 | Operating Instructions - Page 17
one surround back speaker (6.1 channel) or two surround back speakers (7.1 channel). 7.1 channel speaker system using front high speakers You can enjoy vertical sound effects by connecting additional two front high speakers in Dolby Pro Logic IIz mode (page 44). AFront speaker (Left) BFront - Sony STR-DH520 | Operating Instructions - Page 18
the angles A should be the same. • When you connect a 6.1 channel speaker system, place the surround back speaker behind the seating position. • When you connect a 7.1 channel speaker system with two front high speakers, place the front high speakers - at an angle between 22° to 45°. - at least - Sony STR-DH520 | Operating Instructions - Page 19
Connections 2: Connecting the speakers Center speaker Surround speaker Right Left B B A B Subwoofer * Right Left Surround back/ Front high speaker** B 1 10 mm (13/32") Right Left 4 2 3 Front speaker 2 4 3 A Monaural audio cord (not supplied) B Speaker cord (not supplied) - Sony STR-DH520 | Operating Instructions - Page 20
If the auto standby function is set to on, it turns to standby mode automatically based on the level of the input signal to the subwoofer, and the sound may not be output. **If you connect only one surround back speaker, connect it to the SPEAKERS SURROUND BACK/FRONT HIGH L terminal. Notes • Before - Sony STR-DH520 | Operating Instructions - Page 21
the TV Audio signals TV Video signals or or A B* C D Audio/Video signals ARC E* ** A Audio cord (not supplied) B Optical digital cord (not supplied) C Component video cord (not supplied) D Video cord (not supplied) E HDMI cable (not supplied) Sony recommends that you use an HDMIauthorized - Sony STR-DH520 | Operating Instructions - Page 22
cannot be output through the VIDEO OUT jacks or MONITOR OUT jacks. • When you want to listen to the sound from the TV speaker, set the "AUDIO.OUT" to "TV+AMP" in the HDMI menu (page 60). If you cannot play back multi channel audio source, set to "AMP". However, the sound will not output through the - Sony STR-DH520 | Operating Instructions - Page 23
settings before you can enjoy Multi Channel Linear PCM. Refer to the operating instructions of the playback equipment. • To enjoy 3D images, connect 3D-compatible TV and video equipment (Blu-ray Disc player, Blu-ray Disc recorder, PlayStation 3, etc.) to the receiver using High Speed HDMI cables - Sony STR-DH520 | Operating Instructions - Page 24
Coaxial digital cord (not supplied) C Component video cord (not supplied) D HDMI cable (not supplied) Sony recommends that you use an HDMIauthorized cable or Sony HDMI cable. Notes • Be sure to change the default setting of the BD/DVD input button on the remote control so that you can use the button - Sony STR-DH520 | Operating Instructions - Page 25
Connections Connecting a PlayStation 3 PlayStation 3 Audio/video signals A A HDMI cable (not supplied) Sony recommends that you use an HDMIauthorized cable or Sony HDMI cable. 25GB - Sony STR-DH520 | Operating Instructions - Page 26
tuner, cable TV tuner Audio/video signals Satellite tuner, Cable TV tuner Video signals or Audio signals or A B CD E A HDMI cable (not supplied) Sony recommends that you use an HDMIauthorized cable or Sony HDMI cable. B Component video cord (not supplied) C Video cord (not supplied) D Audio - Sony STR-DH520 | Operating Instructions - Page 27
that you use an HDMIauthorized cable or Sony HDMI cable. B Video cord (not supplied) C Audio cord (not supplied) Note Be sure to change the default setting of the VIDEO input button on the remote control so that you can use the button to control your DVD recorder. For details, see "Reassigning - Sony STR-DH520 | Operating Instructions - Page 28
to disconnect the AC power cord (mains lead). • When listening to a equipment connected to the PORTABLE IN jack, sound may be distorted or volume level to avoid damaging your speaker. Notes • To prevent noise pickup, keep the AM loop antenna (aerial) away from the receiver and other equipment. • Be - Sony STR-DH520 | Operating Instructions - Page 29
the receiver. Unless the power is turned on, neither video nor audio signals will be transmitted. 1 Press ?/1 to turn off the receiver. 2 Hold down ?/1 for 5 seconds. The "CLEARING" appears on the display panel for a while, then changes to "CLEARED". Changes or adjustments made to the settings are - Sony STR-DH520 | Operating Instructions - Page 30
Speaker pattern settings 1 Press AMP MENU. 2 Press V/v repeatedly to select "SPKR", then press or b. 3 Press V/v repeatedly to select "PATTERN", then press or b. 4 Press V/v repeatedly to select the speaker Surround Subwoofer left/right back left back right a - - a a - - - a - - a a - - Sony STR-DH520 | Operating Instructions - Page 31
DCAC is designed to achieve proper sound balance for your room. However, you can adjust the speaker levels manually according to your preference. For details, see "Adjusting the speaker levels (TEST TONE)" (page 35). Notes • The speakers emit very loud sound during the calibration and the volume - Sony STR-DH520 | Operating Instructions - Page 32
. • If you connect a subwoofer with an auto standby function, set it to off (deactivated). 2: Performing Auto Calibration ?/1 Input buttons AUTO CAL , V/v/B/b AMP MENU Note Depending on the characteristics of the subwoofer you are using, the setup distance value may be different from the actual - Sony STR-DH520 | Operating Instructions - Page 33
. 3 Save the measurement result. Select "SAVE.EXIT" in step 2. "COMPLETE" appears on the display panel and the settings are saved. 4 Disconnect the optimizer microphone from the receiver. Note If you reposition your speaker, we recommend that you perform Auto Calibration again to enjoy the surround - Sony STR-DH520 | Operating Instructions - Page 34
is not connected. * xxx represent a speaker channel F Front S Surround SB Surround back FH Front high Depending on the error code, the speaker channel may not appears. 2 Perform Auto Calibration again. Press . "RETRY Y" will appears on the display panel, then press . 3 Repeat steps - Sony STR-DH520 | Operating Instructions - Page 35
Preparing the Receiver Selecting the calibration type You can select the speaker flat. • ENGINEER Sets to "the Sony listening room standard" frequency characteristics. • FRONT.REF Adjusts the characteristics of all the speakers to match the characteristics of the front speaker. • OFF Sets - Sony STR-DH520 | Operating Instructions - Page 36
sequence. * xxx represent a speaker channel. Note Depending on the speaker pattern settings, test tone may not be output from all speakers even though you selected "AUTO xxx". 5 Adjust the speaker levels. Use the LEVEL menu (page 54) to adjust the speakers to have the same sounding test tone level - Sony STR-DH520 | Operating Instructions - Page 37
to adjust the volume. You can also use MASTER VOLUME on the receiver. 6 Press SOUND FIELD +/- to enjoy the surround sound. You can also use 2CH/A.DIRECT, A.F.D., MOVIE/HD-D.C.S. or MUSIC on the receiver. For details, see page 43. To activate the muting function Press MUTING or on the remote control - Sony STR-DH520 | Operating Instructions - Page 38
input name. **Stream information may not be displayed. Note Character or marks may not be displayed for some languages. Recording using the receiver You can record from an audio/video equipment using the receiver. Refer to the operating instructions supplied with your recording equipment. 1 Press - Sony STR-DH520 | Operating Instructions - Page 39
is received. Using the control buttons on the receiver 1 Turn INPUT SELECTOR to select the FM or AM band. 2 Press TUNING MODE repeatedly to select "AUTO". 3 Press TUNING + or TUNING -. In case of poor FM stereo reception If the FM stereo reception is poor and "ST" flashes on the display panel - Sony STR-DH520 | Operating Instructions - Page 40
area. Changing the AM tuning scale (USA and Canada models only) You can change the AM tuning scale to either 9 kHz or 10 kHz using the buttons on the receiver. ?/1 TUNING MODE 1 Press ?/1 to turn off the receiver. 2 While holding down TUNING MODE, press ?/1. 3 Change the current AM tuning scale to - Sony STR-DH520 | Operating Instructions - Page 41
the numeric buttons to enter the preset station. To tune to the selection, press . Using the control buttons on the receiver 1 Turn INPUT SELECTOR to select the FM or AM band. 2 Press TUNING MODE repeatedly to select "PRESET". 3 Press TUNING + or TUNING - to select the preset station you want. 41GB - Sony STR-DH520 | Operating Instructions - Page 42
(upper case) t Numbers t Symbols • To models only) This receiver allows you to use Radio Data System (RDS), which enables radio stations to send additional information along with the regular programming signal. This receiver offers convenient RDS features, such as Program Service name display - Sony STR-DH520 | Operating Instructions - Page 43
models, this receiver will generate a low frequency signal for output to the subwoofer when there is no LFE signals. x MULTI ST. (Multi Stereo) Outputs 2 channel left/right signals from all speakers. However, sound may not be output from certain speakers depending on the speaker settings. Movie mode - Sony STR-DH520 | Operating Instructions - Page 44
58). x PLII MV (Pro Logic II Movie) Performs Dolby Pro Logic II Movie mode decoding. This setting is ideal for movies encoded in Dolby Surround. In addition, this mode can reproduce sound in 5.1 channel for watching videos of overdubbed or old movies. x PLIIX MV (Pro Logic IIx Movie) Performs Dolby - Sony STR-DH520 | Operating Instructions - Page 45
if you use headphones (except Analog Direct). Standard 2 channel stereo sources completely bypass the sound field processing and multi channel surround formats are downmixed to 2 channels except LFE signals. x HP DIR (Headphones Direct) This mode is selected automatically if you use headphones and - Sony STR-DH520 | Operating Instructions - Page 46
This receiver supports the following audio formats. Audio format Dolby Digital Dolby Digital EX Dolby Digital Plus a) Dolby TrueHD a) DTS DTS-ES DTS 96/24 DTS-HD High Resolution Audio a) DTS-HD Master Audio a)b) Multi Channel Linear PCM a) Connection between the playback Maximum number equipment - Sony STR-DH520 | Operating Instructions - Page 47
on the display panel and all sound fields are reset to their default setting. "BRAVIA" Sync Features What is "BRAVIA" Sync? The "BRAVIA" Sync function allows communication between Sony products such as TV, Blu-ray Disc/DVD Player, AV amplifier, etc. that supports the Control for HDMI function. By - Sony STR-DH520 | Operating Instructions - Page 48
the Control for HDMI function of the TV. The Control for HDMI function of the receiver and all the connected equipment are turned on simultaneously. When the setup is completed, "COMPLETE" will appear on the display panel. For details on setting the TV, refer to the operating instructions supplied - Sony STR-DH520 | Operating Instructions - Page 49
from the TV speakers. • When you adjust the TV volume, the System Audio Control function adjusts the receiver's volume simultaneously. Notes • If System Audio Control does not function according to your TV setting, refer to the operating instructions of the TV. • When "CTRL.HDMI" is set to "CTRL ON - Sony STR-DH520 | Operating Instructions - Page 50
the TV off, using the POWER button on the TV's remote control, the receiver and the connected equipment turn off automatically. You can also use the receiver's remote control to turn off the TV. TV ?/1 Enjoying movies with the optimum sound field (Theater/Theatre Mode Sync) Press the THEATER or - Sony STR-DH520 | Operating Instructions - Page 51
compatible with the Audio Return Channel (ARC) function. - "CTRL.HDMI" is set to "CTRL OFF". - When you do not connect the receiver to the ARC compatible TV's HDMI jack via an HDMI cable. Using the sound/images from other inputs You can reassign the HDMI, COMPONENT VIDEO and DIGITAL input jacks to - Sony STR-DH520 | Operating Instructions - Page 52
. To return to the previous display Press B or RETURN/EXIT O. Assigning input jacks Assignable input jacks BD/DVD GAME HDMI HDMI 1 a* a HDMI 2 a a* HDMI 3 a a HDMI 4 a a Video CMPNT 1 a* a (Component 1) CMPNT 2 a a (Component 2) COMP - - (Composite) NONE a a* Audio SAT - Sony STR-DH520 | Operating Instructions - Page 53
you want, then press or b. 3 Press V/v repeatedly to select the parameter you want to adjust, then press or b. 4 Press V/v repeatedly to select the setting you want, then press . To return to the previous display Press B or RETURN/EXIT O. To exit the menu Press AMP MENU. Note Some parameters and - Sony STR-DH520 | Operating Instructions - Page 54
] Surround back right speaker levelb) [SBR LVL] Front left high speaker levelb) [LH LVL] Front right high speaker levelb) [RH LVL] Subwoofer levelb) [SW LVL] Dynamic range compressor [D. RANGE] Speaker pattern [PATTERN] Front speakers sizeb) [FRT SIZE] Center speaker sizeb) [CNT SIZE] Settings FULL - Sony STR-DH520 | Operating Instructions - Page 55
SURROUND [SURR] (page 58) Parameters [Display] Settings Surround speakers sizeb) [SUR SIZE] LARGE, SMALL Front high speakers sizeb) [FH SIZE] LARGE, SMALL Front left speaker distanceb) [FL DIST.] Front right speaker distanceb) [FR DIST.] Center speaker distanceb) [CNT DIST.] Surround left - Sony STR-DH520 | Operating Instructions - Page 56
[TUNER] (page 59) AUDIO [AUDIO] (page 59) VIDEO [VIDEO] (page 59) HDMI [HDMI] (page 60) SYSTEM [SYSTEM] (page 60) Parameters [Display] Front speakers bass level [BASS] Front speakers treble level [TREBLE] FM station receiving mode [FM MODE] Naming preset stations [NAME IN] Synchronizes audio with - Sony STR-DH520 | Operating Instructions - Page 57
back left/right, front left/right high). • LARGE If you connect large speakers that will effectively reproduce bass frequencies, select "LARGE". Normally, select "LARGE". • SMALL If the sound is distorted, or you feel a lack of surround effects when using multi channel surround sound, select - Sony STR-DH520 | Operating Instructions - Page 58
from a channel, the bass redirection circuitry sends the corresponding bass frequencies to the subwoofer or other "LARGE" speakers. However, since bass sounds have a certain amount of directionality, it is best not to cut them, if possible. Therefore, even when using small speakers, you can set them - Sony STR-DH520 | Operating Instructions - Page 59
EQ menu You can adjust the tonal quality (bass/treble level) of the front speakers. x BASS x TREBLE Note This function does not work when "A. DIRECT" is selected. TUNER menu You can set the FM station receiving mode and name the preset stations. x FM MODE • STEREO This receiver will decode the - Sony STR-DH520 | Operating Instructions - Page 60
. x AUDIO.OUT Lets you set the HDMI audio output from the playback equipment connected to the receiver via an HDMI connection. • AMP The HDMI audio signals from the playback equipment are only output to the speakers connected to the receiver. Multi channel sound can be played back as it is. • TV - Sony STR-DH520 | Operating Instructions - Page 61
mode and the Sleep Timer at the same time, the Sleep Timer has priority. x NAME IN Lets you set the name of inputs. For details, see "Naming inputs" (page 37). Using the Remote Control SAT/CATV jack on the receiver, you can set the SAT/CATV button on this remote control to control the Blu-ray Disc - Sony STR-DH520 | Operating Instructions - Page 62
DVD3)b) VCR (command mode 5 VTR3)c) CD player 6 DSS (Digital Satellite 7 Receiver)/Euro Digital Satellite Receiver a)For details on the BD1 or BD3 setting, refer to the operating instructions supplied with the Blu-ray Disc player or Blu-ray Disc recorder. b)Sony DVD recorders are operated - Sony STR-DH520 | Operating Instructions - Page 63
indicated on the nameplate on the back of the receiver. • The unit is not disconnected from the AC power source (mains) as long as it is connected to the wall outlet, even if the unit itself has been turned off. • If you are not going to use the receiver for a long time, be sure to - Sony STR-DH520 | Operating Instructions - Page 64
receiver, use this troubleshooting guide to help you remedy the problem. Should any problem persist, consult your nearest Sony dealer. Note that if service personnel changes some parts during repair, these parts may be retained. Power The receiver is turned off automatically. • "AUTO.STBY" is set - Sony STR-DH520 | Operating Instructions - Page 65
the input button on the remote control or turning INPUT SELECTOR on the receiver to select the equipment of your choice (page 36). • The protective device on the receiver has been activated. Turn off the receiver, eliminate the short-circuit problem, and turn on the power again. There is severe hum - Sony STR-DH520 | Operating Instructions - Page 66
does not have System Audio Control function, set the "AUDIO.OUT" settings in HDMI menu to - "TV+AMP" if you want to listen to the sound from the TV speaker and receiver. - "AMP" if you want to listen to the sound from the receiver. • When you connect the receiver to a video equipment (projector, etc - Sony STR-DH520 | Operating Instructions - Page 67
radio station and find out whether they actually provide the service in question. * Europe, Australia and Taiwan models only. Remote control The remote control does not function. • Point the remote control at the remote control sensor on the receiver. • Remove any obstacles in the path between the - Sony STR-DH520 | Operating Instructions - Page 68
- AV receiver (audio system): up to 1 equipment The TV's remote control cannot be used to control the connected equipment when using the Control for HDMI function. • Depending on the connected equipment and TV, you may need to set up the equipment and TV. Refer to the operating instructions supplied - Sony STR-DH520 | Operating Instructions - Page 69
130 W per channel 1)Measured under the following conditions: Area Power requirements USA, Canada, Taiwan 120 V AC, 60 Hz Europe, Australia 230 V AC, 50 Hz 2)Reference power output for front, center, surround, surround back and front high speakers. Depending on the sound field settings and the - Sony STR-DH520 | Operating Instructions - Page 70
240W Power consumption (during standby mode) 0.3 W (When "CTRL.HDMI" is set to "CTRL OFF") Dimensions (width/height/depth) (Approx.) 430 mm × 157.5 mm × 322 mm (17 in × 6 1/4 in × 12 3/4 in) including projecting parts and controls Mass (Approx.) 7.6 kg (16 lb 13 oz) Design and specifications - Sony STR-DH520 | Operating Instructions - Page 71
EQ 59 HDMI 60 LEVEL 57 SPEAKER 57 SURROUND 58 SYSTEM 60 TUNER 59 VIDEO 59 Movie mode 43 Music mode 44 Muting 37 N Naming 37, 42 Night mode 13 O One-Touch Play 49 P PlayStation 3 connecting 25 R RDS 42 Recording 38 Remote control 11 S Satellite tuner connecting 26 Scene Select 50 Sleep Timer 13 Sound - Sony STR-DH520 | Operating Instructions - Page 72
Sony Corporation Printed in Malaysia
-
 1
1 -
 2
2 -
 3
3 -
 4
4 -
 5
5 -
 6
6 -
 7
7 -
8
-
9
-
10
-
11
-
12
-
13
-
14
-
15
-
16
-
17
-
18
-
19
-
20
-
21
-
22
-
23
-
24
-
25
-
26
-
27
-
28
-
29
-
30
-
31
-
32
-
33
-
34
-
35
-
36
-
37
-
38
-
39
-
40
-
41
-
42
-
43
-
44
-
45
-
46
-
47
-
48
-
49
-
50
-
51
-
52
-
53
-
54
-
55
-
56
-
57
-
58
-
59
-
60
-
61
-
62
-
63
-
64
-
65
-
66
-
67
-
68
-
69
-
70
-
71
-
72
 |
 |

©2011 Sony Corporation
4-263-361-
11
(1)
Multi Channel AV
Receiver
Operating Instructions
STR-DH520