TEAC AD-850 AD-850 Owner s Manual - Page 12
Identifying the parts (main unit
 |
View all TEAC AD-850 manuals
Add to My Manuals
Save this manual to your list of manuals |
Page 12 highlights
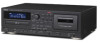
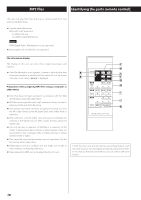
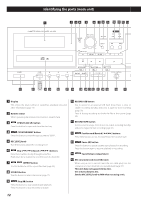
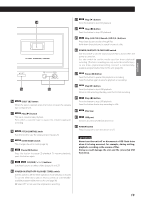
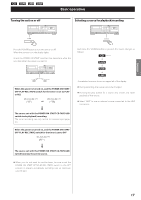
Identifying the parts (main unit) 1 2 3 4 5 6 7 8 9 10 11 12 13 32 31 30 29 28 27 26 25 24 23 22 21 20 19 18 17 1 Display This shows the total number of tracks/files, playback time and other information (page 14). 2 Remote sensor When operating the remote control, point it towards here. 3 OPEN/CLOSE (L) button Press this button to open and close the disc tray. 4 COUNTER RESET button Press this button to reset the tape counter to "0000". 5 REC LEVEL knob Turn this knob to adjust the recording level. 6 Skip (.//)/Search (m/,) buttons Press these buttons to skip through tracks/files. Hold down these buttons to search for part of a track/file. 7 REPEAT button Use this button to set the repeat function (page 20). 8 SOURCE button Use this button to select the source (page 17). 10 RECORD USB button Use to record to an external USB flash drive. Press it once to enable recording standby, and press it again to start recording (page 28). Press it during recording to divide the file at that point (page 30). 11 RECORD TAPE button Use to record to a tape. Press it once to enable recording standby, and press it again to start recording (page 31). 12 Fast-forward/Rewind (m/,) buttons Press these buttons to fast-forward/rewind the cassette tape. 13 Pause (J) button Press this button to pause cassette tape playback or recording. Press this button again to resume playback or recording. 14 Cassette tape compartment 15 MIC connector and mic LEVEL knob When using a mic to record, insert the mic cable plug into this connector and turn the knob to a suitable level (page 34). This unit does not support stereo mics. Use a mono dynamic mic. Set the MIC LEVEL knob to MIN when not using a mic. 9 Stop (H) button Press this button to stop cassette tape playback. Press this button to stop recording to a tape. 12
-
 1
1 -
2
-
3
-
4
-
5
-
6
-
 7
7 -
 8
8 -
 9
9 -
 10
10 -
 11
11 -
 12
12 -
 13
13 -
 14
14 -
 15
15 -
 16
16 -
 17
17 -
18
-
19
-
20
-
21
-
22
-
23
-
24
-
25
-
26
-
27
-
28
-
29
-
30
-
31
-
32
-
33
-
34
-
35
-
36
-
37
-
38
-
39
-
40
-
41
-
42
-
43
-
44
-
45
-
46
-
47
-
48
-
49
-
50
-
51
-
52
-
53
-
54
-
55
-
56
-
57
-
58
-
59
-
60
-
61
-
62
-
63
-
64
-
65
-
66
-
67
-
68
-
69
-
70
-
71
-
72
-
73
-
74
-
75
-
76
-
77
-
78
-
79
-
80
-
81
-
82
-
83
-
84
-
85
-
86
-
87
-
88
-
89
-
90
-
91
-
92
-
93
-
94
-
95
-
96
-
97
-
98
-
99
-
100
-
101
-
102
-
103
-
104
-
105
-
106
-
107
-
108
-
109
-
110
-
111
-
112
-
113
-
114
-
115
-
116
-
117
-
118
-
119
-
120
-
121
-
122
-
123
-
124
-
125
-
126
-
127
-
128
 |
 |
