TEAC AD-850 AD-850 Owner s Manual - Page 30
Erasing files from a USB flash drive, Manual file division, Erasing all files
 |
View all TEAC AD-850 manuals
Add to My Manuals
Save this manual to your list of manuals |
Page 30 highlights
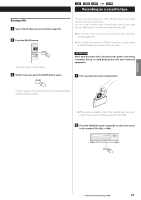
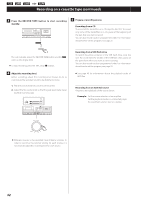
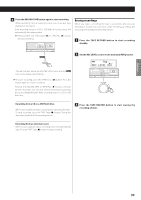
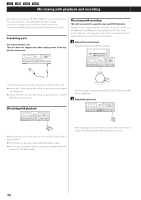
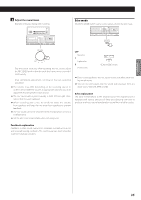
Recording on a USB flash drive (contd.) Erasing files from a USB flash drive Manual file division When recording from a tape or a device connected to the LINE inputs, you can manually divide the MP3 file as it is being recorded. This function cannot be used when recording from a CD. A recorded CD will automatically be divided at each track. ATTENTION Do not disconnect the USB flash drive during erasing. Do not turn the unit off or disconnect the power cord during erasing. Doing so might cause damage to the unit and the connected USB flash drive. Erasing all files ATTENTION Using this function will erase all the contents of a USB flash drive. Non-audio files that are not recognized by this unit will also be erased. Confirm that this is acceptable before beginning this operation. During recording, press the RECORD USB button at the point where you want to divide the recorded file. File division takes about 10 seconds. 1 Press the SOURCE button repeatedly to select "USB". oo "File increment" appears on the display during division. oo "Record Ending" will appear when you press the USB stop (8) button. When recording from a tape: During file division, the tape stops, but almost no gap in the recording should occur. When recording from the LINE inputs: During file division, a gap will occur in the recording. < This unit cannot divide an already recorded MP3 file. This function only works during recording. < Consecutive numbers are added to the end of the file names after division. Example: If "T001.MP3" is divided, files named "T001.MP3" and "T002.MP3" are created. 2 Connect an external USB flash drive to the USB port of this unit. 3 Press the ERASE button for more than 2 seconds. Press at least 2 second "Erase all?" appears on the display. 4 Within 6 seconds, press the ERASE button again. The USB flash drive is completely erased. "NO MUSIC FILE" appears on the display. 30
-
 1
1 -
2
-
3
-
4
-
5
-
6
-
7
-
8
-
9
-
10
-
11
-
12
-
13
-
14
-
15
-
16
-
17
-
18
-
19
-
20
-
21
-
22
-
23
-
24
-
 25
25 -
 26
26 -
 27
27 -
 28
28 -
 29
29 -
 30
30 -
 31
31 -
 32
32 -
 33
33 -
 34
34 -
 35
35 -
36
-
37
-
38
-
39
-
40
-
41
-
42
-
43
-
44
-
45
-
46
-
47
-
48
-
49
-
50
-
51
-
52
-
53
-
54
-
55
-
56
-
57
-
58
-
59
-
60
-
61
-
62
-
63
-
64
-
65
-
66
-
67
-
68
-
69
-
70
-
71
-
72
-
73
-
74
-
75
-
76
-
77
-
78
-
79
-
80
-
81
-
82
-
83
-
84
-
85
-
86
-
87
-
88
-
89
-
90
-
91
-
92
-
93
-
94
-
95
-
96
-
97
-
98
-
99
-
100
-
101
-
102
-
103
-
104
-
105
-
106
-
107
-
108
-
109
-
110
-
111
-
112
-
113
-
114
-
115
-
116
-
117
-
118
-
119
-
120
-
121
-
122
-
123
-
124
-
125
-
126
-
127
-
128
 |
 |
