TEAC SL-D920 SL-D920 Owner's Manual - Page 9
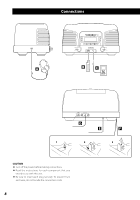
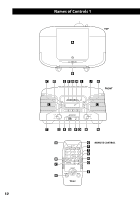
APHONES BUSB connector CAUX IN jack DFM antenna EAC power cord FBattery compartment - stereo
 |
View all TEAC SL-D920 manuals
Add to My Manuals
Save this manual to your list of manuals |
Page 9 highlights
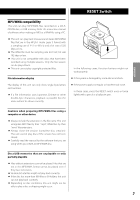
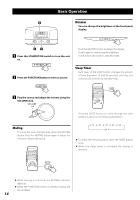
ENGLISH A PHONES For private listening, connect the headphones plug into this jack, and adjust the volume using the VOLUME knob. Battery installation 1. Loosen the fixing screw. 2. Push the other end of the cover to open the compartment. B USB connector This connector is for connecting USB memory that contains MP3/WMA music files. 3. Insert a CR2032 lithium-ion battery with the positive (+) side facing the cover. 4. Close the cover. C AUX IN jack You can connect a portable audio player to this jack. Connect it to the audio output jack (LINE OUT or PHONES) of the player using the included stereo miniplug cable. When using the PHONES jack of an audio player, you must also adjust the volume of that audio player or you might hear no sound from this unit. Battery replacement If the clock begins to indicate the wrong time, replace the battery with a new one. Precautions concerning button-shaped batteries < Be sure to insert the battery with the correct positive (+) and negative (-) polarities. < Do not heat or disassemble a battery and never dispose of an old battery by throwing it in a fire. < Turning the volume of the audio player up too high might cause the sound from this unit to be distorted. In this case, reduce the volume of the audio player until the distortion stops and then adjust the volume level of this unit to a comfortable listening level. D FM antenna While in FM mode, tune in to an FM station and extend the lead to find the best position for reception. This antenna may need to be repositioned if you move your unit to a new location. E AC power cord Plug the AC power cord into an AC outlet. F Battery compartment This battery supplies backup power to the builtin clock and memory when the unit is temporarily disconnected from the AC outlet. 9
-
 1
1 -
2
-
3
-
 4
4 -
 5
5 -
 6
6 -
 7
7 -
 8
8 -
 9
9 -
 10
10 -
 11
11 -
 12
12 -
 13
13 -
 14
14 -
15
-
16
-
17
-
18
-
19
-
20
-
21
-
22
-
23
-
24
-
25
-
26
-
27
-
28
-
29
-
30
-
31
-
32
-
33
-
34
-
35
-
36
-
37
-
38
-
39
-
40
-
41
-
42
-
43
-
44
-
45
-
46
-
47
-
48
-
49
-
50
-
51
-
52
-
53
-
54
-
55
-
56
-
57
-
58
-
59
-
60
-
61
-
62
-
63
-
64
-
65
-
66
-
67
-
68
-
69
-
70
-
71
-
72
-
73
-
74
-
75
-
76
-
77
-
78
-
79
-
80
-
81
-
82
-
83
-
84
-
85
-
86
-
87
-
88
 |
 |