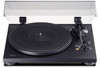
TEAC TN-200 Owners Manual - Page 5
Notes about record styluses, Balancing the tone arm and adjusting, the stylus pressure - cartridge
 |
View all TEAC TN-200 manuals
Add to My Manuals
Save this manual to your list of manuals |
Page 5 highlights
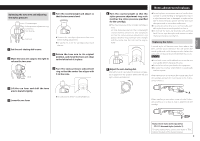
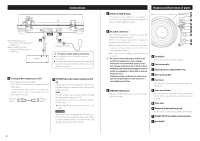
ENGLISH TING NG NG NG NG NG Balancing the tone arm and adjusting the stylus pressure 5 Turn the counterweight and adjust so that the tone arm is level. Counterweight Stylus pressure adjustment ring Center line TI-SKATI Anti-skating TI-SKATI AN 0 3 AN 0 3 Cue lever 1 Set the anti-skating dial to zero. 2 Move the tone arm clasp to the right to release the tone arm. ooRemove the cartridge stylus protection cover before making adjustments. ooBe careful not to let the cartridge stylus touch the unit. 6 Return the tone arm to its original position, and move the tone arm clasp to the left to lock it in place. AN 0 3 TI-SKATI Clasp 7 Turn the stylus pressure adjustment ring so that the center line aligns with 0 on the scale. 3 Lift the cue lever and shift the tone arm to the left slightly. 4 Lower the cue lever. AN 0 3 TI-SKATI ooBe careful not to let the counterweight turn. Notes about record styluses AN 0 3 A 3 8 Turn the counterweight so that the stylus pressure adjustment ring scale matches the stylus pressure specified for the cartridge. ooThe stylus pressure of the included cartridge is 3.0 g. For 3.0g stylus pressure, turn the counterweight counterclockwise around one time completely so that the stylus pressure adjustment ring passes 0 and then keep turning it until 0.5 aligns with the center line. (Do not turn the ring by itself.) TI-SKATI 9 Adjust the anti-skating dial. Start with it set at 3 and adjust it during record playback (page 8) to the position where the left and right volumes are balanced. NTI-SKA 0 ooRecord styluses are precision parts, so handle them carefully to avoid bending or damaging their tips. If a stylus becomes bent or damaged, it might not be able to follow the audio groove precisely and could damage records or cause other malfunction. ooIf a stylus becomes dirty, use a commercially available stylus cleaner or similar product to clean it. ooDo not rub the stylus tip forcefully with anything hard. Do not wipe the stylus with thinner or other chemicals. Doing so could harm it. Replacing the stylus A record stylus will become worn down after it has been used for about 500 hours. This will worsen the sound quality and could damage records. Replace the stylus with one that we recommend before this occurs. CAUTION ooSince loud noises could suddenly occur, put the unit into standby before changing the stylus. ooBe careful not to hurt your hand or the equipment. ooBe careful not to allow small children to accidentally swallow styluses. When detaching a record stylus (the orange part), hold the cartridge and pull the record stylus in the A direction to remove it. A When installing a new stylus, insert it in the B direction, pushing it in so that its clasp is aligned with the cartridge. B Replacement stylus (sold separately): STL-122 diamond stylus (includes 2) For stylus replacements, contact your dealer or TEAC listed on the back of this Owner's manual. 5
-
 1
1 -
 2
2 -
 3
3 -
 4
4 -
 5
5 -
 6
6 -
 7
7 -
 8
8 -
 9
9 -
 10
10 -
 11
11 -
12
-
13
-
14
-
15
-
16
-
17
-
18
-
19
-
20
-
21
-
22
-
23
-
24
-
25
-
26
-
27
-
28
-
29
-
30
-
31
-
32
-
33
-
34
-
35
-
36
-
37
-
38
-
39
-
40
-
41
-
42
-
43
-
44
-
45
-
46
-
47
-
48
-
49
-
50
-
51
-
52
-
53
-
54
-
55
-
56
-
57
-
58
-
59
-
60
 |
 |
