TEAC TN-4D Owners Manual - Page 19
Recording with a computer
 |
View all TEAC TN-4D manuals
Add to My Manuals
Save this manual to your list of manuals |
Page 19 highlights
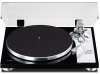
ENGLISH NG When playback finishes 1 Raise the arm lifter lever to separate the stylus from the record, and return the tone arm to its original position. TI-SKATI Arm lifter lever Tone arm 2 Turn the rotation speed setting knob to 0 to stop the turntable (platter). AN 0 3 The sound of a record can be digitally recorded on a computer by using a commercially-available USB cable to connect this unit to a USB port on the computer. oo The USB port on this unit is for connecting to a computer. Supported operating systems Computers running the following operating systems can be connected by USB to this unit (as of January 2019). Windows Windows 7 (32-bit, 64-bit) Windows 8 (32-bit, 64-bit) Windows 8.1 (32-bit, 64-bit) Windows 10 (32-bit, 64-bit) Mac OS X Lion (10.7) OS X Mountain Lion (10.8) OS X Mavericks (10.9) OS X Yosemite (10.10) OS X El Capitan (10.11) macOS Sierra (10.12) macOS High Sierra (10.13) macOS Mojave (10.14) Use with operating systems other than these is not guaranteed. oo This unit will run with the standard Windows or Mac driver, so there is no need to install a special driver. Recording with a computer Connecting with a computer 1 Turn the computer on. Confirm that the operating system is working correctly. 2 Use the USB cable to connect the com- puter and this unit. oo Use a commercially-available USB cable with a ferrite core. 3 Press this unit's STANDBY/ON button to turn it on. The computer will automatically detect this unit's USB port and identify the unit as "USB Audio CODEC". oo To record audio from this record player using a computer, you must first install software that can be used for audio recording on the computer. You may purchase the audio recording software that you prefer separately or download free software, such as Audacity (http://www.audacityteam.org/), from the Internet. As free software, Audacity is not supported by TEAC. oo When recording with a computer, do not do any of the following. Doing so could cause the computer to malfunction. Always quit the computer recording software before doing the following. u Disconnect the USB cable u Put the unit into standby Computer settings The following example explains the settings to make using Windows 10. 1 From the Start menu, select Windows System, then Control Panel. 2 Click "Sound". If the Control Panel "View by" is set to "Category", select "Hardware and Sound". Then select "Sound". 3 Click the "Recording" tab, and confirm that "USB Audio CODEC" is set as the "Default Device". 4 Select "USB Audio CODEC", and click the Properties button. 5 Click the "Advanced" tab. 6 From the "Default Format" pull-down menu list, select the desired recording quality (format). TIP To record at the highest audio quality that this unit can output, select "2 channel, 16 bit, 48000 Hz". Lowering the sampling frequency setting value will relatively reduce the size of files but also decrease the audio quality. 7 Click "OK". After making the above settings, use audio recording software to record. 19
-
 1
1 -
2
-
3
-
4
-
5
-
6
-
7
-
8
-
9
-
10
-
11
-
12
-
13
-
 14
14 -
 15
15 -
 16
16 -
 17
17 -
 18
18 -
 19
19 -
 20
20 -
 21
21 -
 22
22 -
 23
23 -
 24
24 -
25
-
26
-
27
-
28
-
29
-
30
-
31
-
32
-
33
-
34
-
35
-
36
-
37
-
38
-
39
-
40
-
41
-
42
-
43
-
44
-
45
-
46
-
47
-
48
-
49
-
50
-
51
-
52
-
53
-
54
-
55
-
56
-
57
-
58
-
59
-
60
-
61
-
62
-
63
-
64
-
65
-
66
-
67
-
68
-
69
-
70
-
71
-
72
 |
 |
