TP-Link AC1900 Archer C9 V2 User Guide - Page 106
IP & MAC Binding
 |
View all TP-Link AC1900 manuals
Add to My Manuals
Save this manual to your list of manuals |
Page 106 highlights
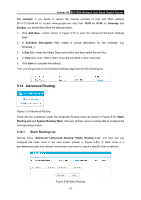
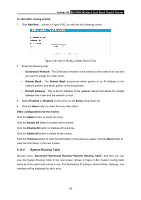
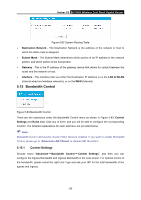
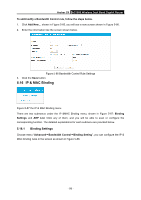
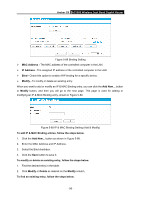
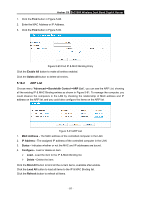
Archer C9 AC1900 Wireless Dual Band Gigabit Router To add/modify a Bandwidth Control rule, follow the steps below. 1. Click Add New... shown in Figure 5-85, you will see a new screen shown in Figure 5-86. 2. Enter the information like the screen shown below. Figure 5-86 Bandwidth Control Rule Settings 3. Click the Save button. 5.16 IP & MAC Binding Figure 5-87 the IP & MAC Binding menu There are two submenus under the IP &MAC Binding menu, shown in Figure 5-87: Binding Settings and ARP List. Click any of them, and you will be able to scan or configure the corresponding function. The detailed explanations for each submenu are provided below. 5.16.1 Binding Settings Choose menu "Advanced→Bandwidth Control→Binding Setting", you can configure the IP & MAC binding rules in the screen as shown in Figure 5-88. - 95 -
-
 1
1 -
2
-
3
-
4
-
5
-
6
-
7
-
8
-
9
-
10
-
11
-
12
-
13
-
14
-
15
-
16
-
17
-
18
-
19
-
20
-
21
-
22
-
23
-
24
-
25
-
26
-
27
-
28
-
29
-
30
-
31
-
32
-
33
-
34
-
35
-
36
-
37
-
38
-
39
-
40
-
41
-
42
-
43
-
44
-
45
-
46
-
47
-
48
-
49
-
50
-
51
-
52
-
53
-
54
-
55
-
56
-
57
-
58
-
59
-
60
-
61
-
62
-
63
-
64
-
65
-
66
-
67
-
68
-
69
-
70
-
71
-
72
-
73
-
74
-
75
-
76
-
77
-
78
-
79
-
80
-
81
-
82
-
83
-
84
-
85
-
86
-
87
-
88
-
89
-
90
-
91
-
92
-
93
-
94
-
95
-
96
-
97
-
98
-
99
-
100
-
 101
101 -
 102
102 -
 103
103 -
 104
104 -
 105
105 -
 106
106 -
 107
107 -
 108
108 -
 109
109 -
 110
110 -
 111
111 -
112
-
113
-
114
-
115
-
116
-
117
-
118
-
119
-
120
-
121
-
122
-
123
-
124
-
125
-
126
-
127
-
128
-
129
-
130
-
131
-
132
-
133
-
134
-
135
-
136
-
137
-
138
-
139
-
140
-
141
-
142
-
143
 |
 |
