TP-Link AC1900 Archer C9 V2 User Guide - Page 81
Common Applications
 |
View all TP-Link AC1900 manuals
Add to My Manuals
Save this manual to your list of manuals |
Page 81 highlights
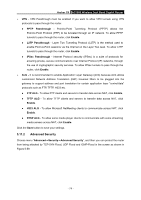
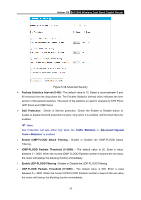
Archer C9 AC1900 Wireless Dual Band Gigabit Router 3. Select the protocol used for Trigger Port from the Trigger Protocol drop-down list, either TCP, UDP, or All. 4. Select the protocol used for Incoming Ports from the Incoming Protocol drop-down list, either TCP or UDP, or All. 5. Select Enabled in Status field. 6. Click the Save button to save the new rule. Figure 5-54 Add or Modify a Triggering Entry Trigger Port - The port for outgoing traffic. An outgoing connection using this port will trigger this rule. Trigger Protocol - The protocol used for Trigger Ports, either TCP, UDP, or All (all protocols supported by the router). Incoming Port - The port or port range used by the remote system when it responds to the outgoing request. A response using one of these ports will be forwarded to the PC which triggered this rule. You can input at most 5 groups of ports (or port sections). Every group of ports must be separated with ",", for example, 2000-2038, 2046, 2050-2051, 2085, 3010-3030. Incoming Protocol - The protocol used for Incoming Port, either TCP, UDP, or ALL (all protocols supported by the router). Status - The status of this entry, Enabled means the Port Triggering entry is enabled. Modify - To modify or delete an existing entry. Common Applications - Some popular applications already listed in the drop-down list of Incoming Protocol. To modify or delete an existing entry: 1. Find the desired entry in the table. 2. Click Modify or Delete as desired on the Modify column. - 70 -
-
 1
1 -
2
-
3
-
4
-
5
-
6
-
7
-
8
-
9
-
10
-
11
-
12
-
13
-
14
-
15
-
16
-
17
-
18
-
19
-
20
-
21
-
22
-
23
-
24
-
25
-
26
-
27
-
28
-
29
-
30
-
31
-
32
-
33
-
34
-
35
-
36
-
37
-
38
-
39
-
40
-
41
-
42
-
43
-
44
-
45
-
46
-
47
-
48
-
49
-
50
-
51
-
52
-
53
-
54
-
55
-
56
-
57
-
58
-
59
-
60
-
61
-
62
-
63
-
64
-
65
-
66
-
67
-
68
-
69
-
70
-
71
-
72
-
73
-
74
-
75
-
 76
76 -
 77
77 -
 78
78 -
 79
79 -
 80
80 -
 81
81 -
 82
82 -
 83
83 -
 84
84 -
 85
85 -
 86
86 -
87
-
88
-
89
-
90
-
91
-
92
-
93
-
94
-
95
-
96
-
97
-
98
-
99
-
100
-
101
-
102
-
103
-
104
-
105
-
106
-
107
-
108
-
109
-
110
-
111
-
112
-
113
-
114
-
115
-
116
-
117
-
118
-
119
-
120
-
121
-
122
-
123
-
124
-
125
-
126
-
127
-
128
-
129
-
130
-
131
-
132
-
133
-
134
-
135
-
136
-
137
-
138
-
139
-
140
-
141
-
142
-
143
 |
 |
