TP-Link AC1900 Archer C9 V2 User Guide - Page 108
Archer C9, Enable All, Delete All, Advanced, Bandwidth Control, ARP List, MAC Address, IP Address,
 |
View all TP-Link AC1900 manuals
Add to My Manuals
Save this manual to your list of manuals |
Page 108 highlights
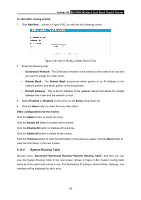
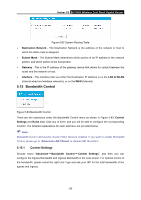
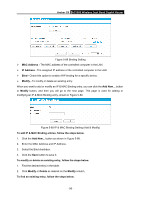
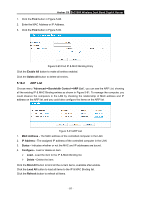
Archer C9 AC1900 Wireless Dual Band Gigabit Router 1. Click the Find button in Figure 5-88. 2. Enter the MAC Address or IP Address. 3. Click the Find button in Figure 5-90. Figure 5-90 Find IP & MAC Binding Entry Click the Enable All button to make all entries enabled. Click the Delete All button to delete all entries. 5.16.2 ARP List Choose menu "Advanced→Bandwidth Control→ARP List", you can see the ARP List, showing all the existing IP & MAC Binding entries as shown in Figure 5-91. To manage the computer, you could observe the computers in the LAN by checking the relationship of MAC address and IP address on the ARP list, and you could also configure the items on the ARP list. Figure 5-91 ARP List 1. MAC Address - The MAC address of the controlled computer in the LAN. 2. IP Address - The assigned IP address of the controlled computer in the LAN. 3. Status - Indicates whether or not the MAC and IP addresses are bound. 4. Configure - Load or delete an item. Load - Load the item to the IP & MAC Binding list. Delete - Delete the item. Click the Bind All button to bind all the current items, available after enable. Click the Load All button to load all items to the IP & MAC Binding list. Click the Refresh button to refresh all items. - 97 -
-
 1
1 -
2
-
3
-
4
-
5
-
6
-
7
-
8
-
9
-
10
-
11
-
12
-
13
-
14
-
15
-
16
-
17
-
18
-
19
-
20
-
21
-
22
-
23
-
24
-
25
-
26
-
27
-
28
-
29
-
30
-
31
-
32
-
33
-
34
-
35
-
36
-
37
-
38
-
39
-
40
-
41
-
42
-
43
-
44
-
45
-
46
-
47
-
48
-
49
-
50
-
51
-
52
-
53
-
54
-
55
-
56
-
57
-
58
-
59
-
60
-
61
-
62
-
63
-
64
-
65
-
66
-
67
-
68
-
69
-
70
-
71
-
72
-
73
-
74
-
75
-
76
-
77
-
78
-
79
-
80
-
81
-
82
-
83
-
84
-
85
-
86
-
87
-
88
-
89
-
90
-
91
-
92
-
93
-
94
-
95
-
96
-
97
-
98
-
99
-
100
-
101
-
102
-
 103
103 -
 104
104 -
 105
105 -
 106
106 -
 107
107 -
 108
108 -
 109
109 -
 110
110 -
 111
111 -
 112
112 -
 113
113 -
114
-
115
-
116
-
117
-
118
-
119
-
120
-
121
-
122
-
123
-
124
-
125
-
126
-
127
-
128
-
129
-
130
-
131
-
132
-
133
-
134
-
135
-
136
-
137
-
138
-
139
-
140
-
141
-
142
-
143
 |
 |
