Toshiba 15DLV77B Owners Manual - Page 16
Connecting to optional equipment Continued - owner s manual
 |
View all Toshiba 15DLV77B manuals
Add to My Manuals
Save this manual to your list of manuals |
Page 16 highlights
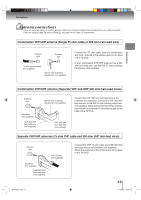
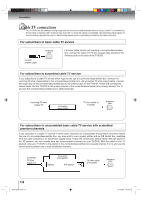
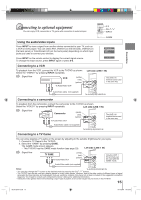
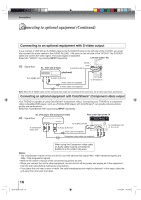
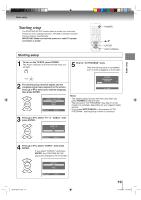
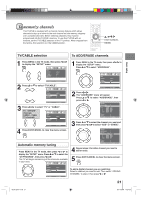
Connections Connecting to optional equipment (Continued) Connecting to an optional equipment with S-video output If you connect a VCR with an S-VIDEO cable to the S-VIDEO IN jack on the left side of the TV/DVD, you must also connect the audio cables to the AUDIO IN (LINE 1 IN) jacks on the left side of the TV/DVD. The S-VIDEO cable only carries the video signal. The audio signal is separated. Select the "VIDEO1" by pressing INPUT repeatedly. Left side (LINE 1 IN) : Signal flow Ex. VCR with S-Video (white) (red) To AUDIO (L/R) IN (playback) To S-VIDEO OUT To Audio (L/R) OUT Audio cable (not supplied) S-Video cable (not supplied) To S-VIDEO IN Note: When the S-VIDEO cable and the standard video cable are connected at the same time, the S-video cable takes precedence. Connecting an optional equipment with ColorStream® (Component video) output Your TV/DVD is capable of using ColorStream® (component video). Connecting your TV/DVD to a component video compatible DVD player, such as a Toshiba DVD player with ColorStream® can greatly enhance picture quality and performance. Select the "ColorStream HD" by pressing INPUT repeatedly. Ex. DVD player with Component video : Signal flow Rear lower right of the TV To Component Video OUT To AUDIO (L/R) IN To Audio (L/R) OUT Audio cable (not supplied) Component video cable (not supplied) To ColorStream HD (Y, PB, PR) IN When using the Component video cable, an Audio cable must be connected to AUDIO IN (L/R) (LINE 2 IN) jacks. Notes: • The ColorStream® inputs on this unit are for use with devices that output 480i, 1080i interlaced signals and 480p, 720p progressive signals. • Refer to the owner's manual of the connected equipment as well. • When you connect the unit to other equipment, be sure to turn off the power and unplug all of the equipment from the wall outlet before making any connections. • If you place the unit near a tuner or radio, the radio broadcast sound might be distorted. In this case, place the unit away from the tuner and radio. 16 Book 5Z0-01.indb 16 9/11/2549 16:15:03
-
 1
1 -
2
-
3
-
4
-
5
-
6
-
7
-
8
-
9
-
10
-
 11
11 -
 12
12 -
 13
13 -
 14
14 -
 15
15 -
 16
16 -
 17
17 -
 18
18 -
 19
19 -
 20
20 -
 21
21 -
22
-
23
-
24
-
25
-
26
-
27
-
28
-
29
-
30
-
31
-
32
-
33
-
34
-
35
-
36
-
37
-
38
-
39
-
40
-
41
-
42
-
43
-
44
-
45
-
46
-
47
-
48
-
49
-
50
-
51
-
52
-
53
-
54
-
55
-
56
-
57
-
58
-
59
-
60
-
61
-
62
-
63
-
64
-
65
-
66
-
67
-
68
 |
 |