Toshiba 19LV506 Owner's Manual - English - Page 20
Connecting to optional equipment Continued, Power source - computer display resolution
 |
UPC - 022265001509
View all Toshiba 19LV506 manuals
Add to My Manuals
Save this manual to your list of manuals |
Page 20 highlights
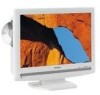
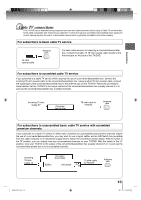
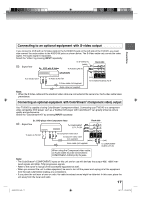
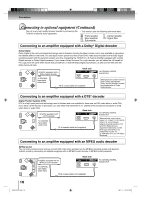
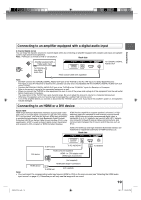
Connections Connecting to optional equipment (Continued)/ Power source Connecting to a PC (Personal Computer) Before you connect this TV/DVD to your PC, change the adjustment of your PC's Resolution and Refresh rate (60 Hz). Connect one end of a (male to male) VGA cable to the video card of the computer and the other end to the VGA connector PC MONITOR on the rear of the TV/DVD. Attach the connectors firmly with the screws on the plug. In case of a Multimedia computer, connect the audio cord to the audio output of your Multimedia computer and to the AUDIO connector of the PC AUDIO IN jack of the TV/DVD. Select "PC" by pressing INPUT repeatedly. Switch on the computer. The TV/DVD can operate as the computer monitor Back side To PC AUDIO IN jack To PC Audio cord (not supplied) MONITOR IN Monitor Display modes MODE Resolution VGA 640x480 VGA 720x400 SVGA 800x600 XGA 1024x768 WXGA 1280x768 WXGA 1280x720 WXGA 1360x768 Refresh rate 60Hz 70Hz 60Hz 60Hz 60Hz 60Hz 60Hz Note: VGA cable (not supplied) To return to normal mode Press INPUT again. • The on-screen displays will have a different appearance in PC mode than in TV mode. • If there is no video signal from the PC when the unit is in PC mode, "No signal" will appear on the TV/DVD-screen. Power source To use AC power source 1. Connect the AC cord plug into this TV/DVD's AC INPUT jack. 2. Connect the AC cord into an AC outlet. Illustration of 19LV505 AC Outlet Wider Hole and Blade AC 120V, 60Hz AC cord (supplied) Note: • Never connect the AC line cord plug to other than the specified voltage (120V 60Hz). Use the attached power cord only. • If the polarized AC cord does not fit into a non-polarized AC outlet, do not attempt to file or cut the blade. It is the user's responsibility to have an electrician replace the obsolete outlet. • If you cause a static discharge when touching the unit and the unit fails to function, simply unplug the unit from the AC outlet and plug it back in. The unit should return to normal operation. • If the AC cord plug is plugged in for the first time, wait for approx. 5 seconds before pressing POWER. 20 J50S0101A.indb 20 08.1.9 4:45:03 PM
-
 1
1 -
2
-
3
-
4
-
5
-
6
-
7
-
8
-
9
-
10
-
11
-
12
-
13
-
14
-
 15
15 -
 16
16 -
 17
17 -
 18
18 -
 19
19 -
 20
20 -
 21
21 -
 22
22 -
 23
23 -
 24
24 -
 25
25 -
26
-
27
-
28
-
29
-
30
-
31
-
32
-
33
-
34
-
35
-
36
-
37
-
38
-
39
-
40
-
41
-
42
-
43
-
44
-
45
-
46
-
47
-
48
-
49
-
50
-
51
-
52
-
53
-
54
-
55
-
56
-
57
-
58
-
59
-
60
-
61
-
62
-
63
-
64
-
65
-
66
-
67
-
68
-
69
-
70
-
71
-
72
 |
 |