Vizio E551d-A0 Download - Page 34
Adjusting the Advanced Audio Settings, Arrow, Advanced Audio, Left/Right, Resetting the Audio
 |
View all Vizio E551d-A0 manuals
Add to My Manuals
Save this manual to your list of manuals |
Page 34 highlights
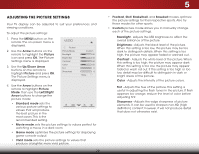
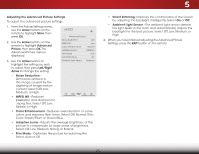
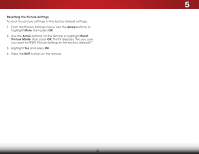
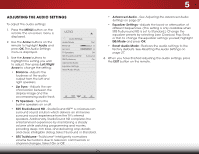
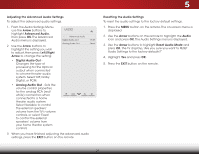
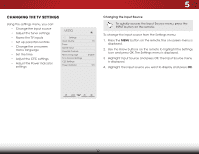
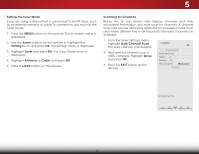
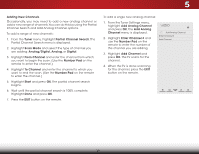
5 Adjusting the Advanced Audio Settings To adjust the advanced audio settings: 1. From the Audio Settings Menu, use the Arrow buttons to highlight Advanced Audio, then press OK. The Advanced Audio menu is displayed. 2. Use the Arrow buttons to highlight the setting you wish to adjust, then press Left/Right Arrow to change the setting: • Digital Audio Out Changes the type of processing for the Optical output when connected to a home theater audio system. Select Off, Dolby Digital, or PCM. • Analog Audio Out - Sets the volume control properties for the analog RCA (red/ white) connectors when connected to a home theater audio system. Select Variable to control the external speakers' volume from the TV's volume controls, or select Fixed to control the external speakers' volume from your home theater system controls. VIZIO Advanced Audio Digital Audio Out Analog Audio Out PCM Fixed 3. When you have finished adjusting the advanced audio settings, press the EXIT button on the remote. Resetting the Audio Settings To reset the audio settings to the factory default settings: 1. Press the MENU button on the remote. The on-screen menu is displayed. 2. WiUdese thZoeomArroNwormbaul ttPoannosraomnic the remote to highlight the Audio icon and press OK. The Audio Settings menu is displayed. 3. Use the Arrow buttons to highlight Reset Audio Mode and press OK. The TV displays, "Are you sure you want to RESET Exit 2D 3D Audio Settings to the factory defaults?" 4. Highlight Yes aABnCd press OK. 5. InPpruet ss thWeideEXIT CbCutton on the remote. Sleep Timer Picture Audio Network Settings Help 27
-
 1
1 -
2
-
3
-
4
-
5
-
6
-
7
-
8
-
9
-
10
-
11
-
12
-
13
-
14
-
15
-
16
-
17
-
18
-
19
-
20
-
21
-
22
-
23
-
24
-
25
-
26
-
27
-
28
-
 29
29 -
 30
30 -
 31
31 -
 32
32 -
 33
33 -
 34
34 -
 35
35 -
 36
36 -
 37
37 -
 38
38 -
 39
39 -
40
-
41
-
42
-
43
-
44
-
45
-
46
-
47
-
48
-
49
-
50
-
51
-
52
-
53
-
54
-
55
-
56
-
57
-
58
-
59
-
60
-
61
-
62
-
63
-
64
-
65
-
66
-
67
-
68
 |
 |
